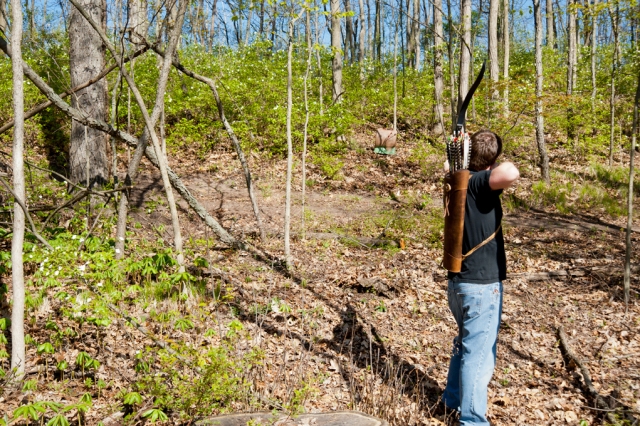
Welcome to the Archer's Den. Here you will find a gathering of traditional archery stories, tips and techniques, trophy animals taken with traditional bows, and plenty more. Stay a while and learn something. We hope you enjoy and even submit a trophy of your own, or leave a comment on a post.
Above is Edward Seales, one of the auction donors, and his son Asher, who is now deceased. Asher is the reason Edward is participating in the auction. “We don’t even understand the disease that killed him. It doesn’t have a name, just a location on a chromosome. He may have been the only person to have it,” he said. “We know it has some relation to Marfan syndrome, as it had connective tissue abnormalities, but it was far more severe than anything I have ever experienced. I hate to hear ‘I don’t know what this disease is.’ I’ve heard it enough, and nobody could ever figure out my only son. Maybe the money we raise will help one family not go through this.”
It’s a fate no parent ever wants to face, but it’s something that tens of thousands of families face each year – serious childhood illness.
Children, often too young to speak, many times cannot express exactly what ails them, which can make diagnosis go from difficult to nearly impossible. This coupled with the high cost of specialty medical care in the United States can make an already stressful situation go from challenging to emotionally crushing.
This is where St. Jude Children’s Hospital tries to help. Despite the more than 65 thousand children they see annually, no family is ever sent a bill and every patient is given top-level care and attention.
This is part of the reason why the administrators at TradGang.com, an online traditional archery forum, decided to hold an annual auction to benefit the children’s hospital. Started in 2004, the members of the forum have raised more than $735 thousand to date.
This year they are hoping to donate at least another $75 thousand more, but Terry Green, a site administrator, explained that the economy isn’t what it was when the annual auction was founded. He said that he isn’t sure if the turnout will be as pronounced this year.
However, he said that, “The kids are sick regardless of the economy” and that they will hold the auction as long as the traditional archery community is willing to give.
So far, this has been a great system and everyone has benefited. However, it takes a massive amount of work.
The auction had such a huge influx of participants the administrators had to setup on a different server. Green explained that between everyone involved there are hundreds of man hours donated before a single item ever gets shipped.
Each year a group of administrators get together and donate their time to run a benefit auction , where 100% of all proceeds are donated directly to St. Jude Children’s Hospital. The members of the forum will donate items to the auction and then other members will bid on those items.
“I had seen it done on another website and a member suggested doing it on TradGang,” said Green, on the initial motivation to have the auction. “Now, we’re one of their biggest annual donors.”
In fact, Doug Campbell, another administrator of the site, visited St. Jude to accept an award on behalf of TradGang, which recognized them as one of the hospitals largest donors. The site even made it onto the hospital’s wall of fame, which proves that even the smallest donation – when combined with the strength of others – can make a huge difference.
Green explained that no one from the site ever touches the money; everything goes directly to St. Jude Children’s hospital.
The auction features everything from custom bows to home made cookies.
“It’s a lot of fun, there’s some bantering that goes back and forth,” Green explained. “We had a lady donate two dozen cookies and one guy bid a pretty large amount and another guy got some buddies together to out bid him.”
Things ended up escalating and the two dozen cookies ended up going for a whopping $6,000. The next year? The same two bidders went at it again and a pound cake went for $7,000.
“Donate whatever you want to donate; we take anything but firearms and ammunition. I’d just like to encourage folks to visit and bid high,” Green said. “One hundred percent goes to the kids.”
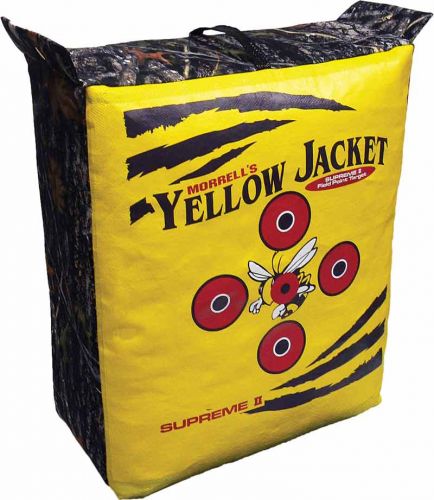
For the traditional archer, high quality archery targets are awesome, but they can get expensive quick. Personally, I love my Yellow Jacket Supreme, but there are many people who love traditional archery because of the DIY aspect, which seems to accompany the sport. It’s for those reasons that I’ve decided to do a DIY traditional archery target blog.
Note: These DIY projects are meant as traditional archery targets; although they may work, they are not meant for compound or crossbow shooters.
All supplies are not created equal, for this reason I recommend taking a few practice shots at close range at half draw to make sure the target is stopping your arrows. Slowly increase your draw until you’re at full draw at close range. If the target is still doing its job, then feel free to enjoy your new DIY traditional archery target.
The Dressed-Up Bag of Mulch
Difficulty level: 1/10
Cost: Less than $15
Time: About 5 minutes
The name of the game for this project is “Cheap.” We’re keeping costs down while maintaining functionality. For this project you’ll need a Polypropylene Target Face and a bag of tightly packed mulch or peat moss from your local hardware store. You want the bag of mulch or moss to be at least 12” thick and VERY TIGHTLY PACKED. I prefer moss because it’s less likely to mess-up your arrows. This target is great because any mess that’s created will benefit your lawn, so there’s really no impact on the environment when the target starts to fall apart.
After you’ve got your supplies, simply affix your burlap target face onto the front of the bag of mulch or moss (unopened). You’re done. What’s bad about this target? It’s not going to stand the test of time. So, although it is cheap and easy to make, be prepare for it to break down quickly.
For a more lasting target, you might consider putting your mulch or moss inside of the U-Fill It bag target or, for an even better (self-healing) target, put your bag of moss inside of the Replacement Cover for the Yellow Jacket Supreme. You’ve just made a long-term, outdoor target that is good for your lawn for less than $25.
The Saran Wrap Filled Box
Difficulty level: 1/10
Cost: Less than $10
Time: About 10 minutes
If you saw the Dressed-Up Bag of Mulch and thought that the price was still a bit much, then this is the project for you. You’ll need an empty box, a bunch of used plastic wrap (enough to fill the box), some duct tape, and a Peel and Stick Target Face.
Note: If you ask a local business (try a superstore or hardware store) you might be able to get the box and plastic wrap for free, which would really keep the cost down. You could also try factories, as they have a ton of excess plastic wrap from shipments.
The bigger the box, the bigger the target – however, the bigger the box, the more plastic wrap you’ll need.
After you have all of your supplies, stuff the box with the plastic wrap. Stuff it in until it’s impossible to fill it anymore. Just like the Dressed-Up Bag of Mulch, you want this target very tightly packed. After you’re sure it’s packed, close it up and tape it shut with the duct tape. Finally, stick your target face on the box and voila – you’re done.
This project is not only easy, but it can be nearly free for those traditional archers who can easily come by the supplies. However, cardboard will not hold up in the rain (or in any wet conditions) and it will break down quickly if you use it often (as it is not self-healing).
The Compressed Carpet Target
Difficulty level: 3/10
Cost: Less than $50
Time: About 2 hours
If you’re a bit more adventurous and you’re not afraid to spend a few extra bucks then this is the target for you. For this project you’ll need to visit your local hardware store and pick up a pressure treated 2x12x8 (should be about $12), four 36” x 5/8” standard threaded rods (about $6 each), eight 5/8” x 1-3/4” zinc-plated standard flat washers (less than $0.20 each), and eight 5/8”- 11 zinc-plated standard hex nuts (less than $0.20 each). You’ll also need a decent target face and some target face pins. Finally, you’re going to need a whole lot of scrap carpet. This is really the biggest variable in price for this whole project. If you’ve got the scrap laying around then you’re going to save yourself a lot of money. However, if you have to buy it, try and find the extra carpet from you local big-box hardware store, you should be able to buy a lot of it for not a lot of money.
For tools, it would be best if you had at least two pipe clamps or some ratchet straps, but if not, then your elbow grease will have to do. You will also need a knife, saw, measuring tape, drill with a 5/8” drill bit, and a 5/8” wrench.
You’ll want to cut your 2x12x8 in half, which will give you two 2x12x4s. Drill a hole in each of the four corners of both boards. You’ll want to make sure each hole is 1” away from the end and side of the board. After you’ve threaded one side of each of your standard rods with a washer and hex nut push each rod through one of the holes on one of your boards (use your measuring tape to make sure the same amount of rod is sticking through each nut).
Now, you will want to cut your carpet in 12”x3’ 10” sections (you’re not cutting them 4’ long because your holes are 1” deep on both sides, which effectively makes your target 2” smaller). After you’ve cut your carpet, start stacking it on top of the board that has the rods threaded through it. Stack it as high as you can – ideally until it’s almost at the top of your rods.
Next, you’re going to put your second board on top of your pile of carpet. Thread the screws through the holes you drilled earlier. Put on the washer and the hex nut – make sure the hex nuts are all finger tight. Gently lay the target on its side and pack it down with your feet to make sure the carpet on one side of the target is flush. Stand the target back up and tighten the boards down with your pipe clamps or ratchet straps. Get them as tight as you can and then re-tighten your hex nuts. If you don’t have pipe clamps or ratchet straps, then you’ll have to tighten the hex nuts with your wrench as much as you can. If needed, you can sit on the target, or apply pressure with your knee to aid in compressing the carpet. After you’ve gotten the hex nuts as tight as they’ll get, use your measuring tape to make sure an equal amount of the rod is coming out of each hole.
Now you’re ready to apply your target face and send some arrows down range. This target is great for those traditional archers who want a target that will last a long time and are determined to make their target themselves.
Clear as mud, right? If you’re having trouble visualizing it, then the below video might help
The Sandbox Archery Target (great for broadheads)
Difficulty level: 5/10
Cost: From $110 (if you use only plywood instead of 2x6s) to $150 (if you use 2x6s)
Time: About 4 hours
So, you want a high-quality target, something that’s going to last a long time AND you want to be able to shoot broadheads into it, but you still want to build it your self –because you’re a masochist.
Although I’m not a masochist, I do love DIY projects and this is one that I think just about anyone can do. What makes it cool is the fact that you can shoot just about anything into it. Yes, that means you can shoot this target with broadheads. However, this is a sand target, which means it can make your broadheads blunt – no problem if you have a few that are for practice anyway or if you know how to sharpen them.
For this project you’ll need a saw, measuring tape, and a drill. You’ll also need to visit your local hardware store and buy six 2x6x8s (about $6 each), one 5 lb. box of 3” screws (about $23), two 4x4x8s (about $10 each), one sheet of 3/4″ pressure treated plywood (about $35), 10 50 lb. bags of all purpose sand (about $3 each).
As this build is a bit more complicated, I’ve made a graphic (above) to help out.
First, cut a 4’x2’ section out of your piece of plywood – this will act as the floor for your new Sandbox Archery Target. If you want to keep costs down, you can cut your plywood into four 4’x2’ sections and use it for the floor and three walls – otherwise, use the remainder of your plywood as a backstop behind your target.
Then, cut one of your 4x4x8s into four sections and screw them onto the bottom of your 4’x2’ piece of plywood 1’ apart from each other. Cut your other 4x4x8 in half and attach it to the other side of your plywood (as shown above).
Next, cut four of your 2x6x8s in half. Cut your remaining two 2x6x8s into four 2’ sections.
If it were me, at this point I would cut two holes in the ply wood, so that you could slide a 2x6x2 down into it – helping hold the sand. Affix the 2x6s together as shown above. Next, simply fill with sand and get shooting.
A good idea would be to staple a rugged outdoor target face to the front of your new Sandbox Archery Target, so you have something to shoot at.
The below video shows what a Sandbox Archery Target should look like after it’s completed:
DIY 3D Style Target
Difficulty level: 8/10
Cost: Less than $20
Time: A weekend
That’s right; I’ve saved the best for last – a DIY 3D style target for less than $20. However, this one is the most time consuming and can be the most technically difficult. Expect this project to take at least one full day if not a weekend. If you value your time, you might want to stick to a traditional 3D archery target. However, if your times not worth that much, or your pretty budget conscious and don’t mind tedious work, this is the project for you.
You’re going to need a sheet of plywood (about $15, but if you want to go all-out get pressure treated plywood for $35), a pencil, tracing paper, a ruler, a computer with a printer, and a jigsaw (if you want it to look a bit more lifelike, then get some paint as well). An old school projector would also be a huge help with this.
First, find a picture of an animal that you would like to turn into a 3D target online. Print the picture, make sure that it will fit in a 4”x8” box (if you don’t have a printer, use the tracing paper to trace the image one the screen – don’t press too hard, you don’t want to puncture your monitor). Next, use your ruler (or measuring tape) to measure out a 4”x8” box on your tracing paper. Next, make 1” squares in that box, making a grid pattern. Next, lay that tracing paper on top of the picture you printed out earlier. Trace the outline of the animal onto the paper. If you have an old school overhead projector, now would be the time to put your outlined image onto it and project it onto your plywood. If you don’t have a projector, then lightly (using pencil) draw your grid pattern (except instead of 1”x1” squares they will be 1’x1’ squares) onto your plywood and transfer the image onto the plywood that way. After you’ve traced your image onto the plywood it’s time to cut it out using your jigsaw.
Be sure to cut out the vital area of your new target. Place a box target behind the vital area of your target and you’re good to go!
If you opted to buy paint, now would be a good time to paint the target to your liking.
Here is a video that might help explain it:
For even more great DIY ideas and toturials, check out the book “Bow Accessories” by Volkmar Hubschmann.
We all know how awesome Renaissance Faires are – you get to step out of your modern life for a day, back into a period when times were a bit simpler (and a bit more unsanitary).
You get to enjoy the food (I’ve never left a Renaissance Faire without first eating a giant turkey leg), take part in the festivities, take in the sights, and sometime you can even show off your skills as a traditional archer.
In fact, what is there at a Renaissance Faire other than awesome traditional archery stuff? Here’s a dozen things we love about Renaissance Faires.
The Food
To be honest, I’m not even sure if I like turkey legs, but I can’t say that I’ve ever left a Renaissance Faires without eating at least one. That’s not to say that there isn’t a veritable cornucopia of foods to consume. Everything from bacon on a stick, pork chop on a stick, pickle on a stick, sausage on a stick, and just about anything else you can imagine – on a stick.
The Clothes
Because, “Why not?” A Renaissance Faire is likely the only place that it’s okay to be an adult who is in costume simply because you want to be. Want to dress like a knight? Wear elf ears, pixie wings, horns, or fangs? The Renaissance Faire is the place to be.
The Shows
This one is kind of hit-or-miss. Some of the shows you’ll find at your local Renaissance Faire will be top notch, other won’t. I’ve seen everything from an actual Liger at a Renaissance Faire and professional comedy acts to some pretty forgettable performances.
The Politics
No voting, no elections – if there is a politician you disagree with, duel them in the streets! (Or at least pretend to dual them as the crowd goes wild.) The winner is vindicated and the loser is banished to wherever the losers go.
The Sports
Jousting is a pretty hardcore sport. Sometimes it seems to take forever to get to the actual event, but it’s fun when it happens and the kids love it.
Family crests
Everyone should have a family crest. Seriously, it’s a unifying force when your entire family can look to a single crest and know you all have that in common. It’s also pretty awesome to learn the history behind your name.
Personal heralds
When and why did we stop doing this? Why do I not have someone announcing when I enter or exit a room, all while singing about my conquests like a modern day bard.
Children’s archery
Well, children’s anything really. This whole thing should be all about the kids (but we all know that’s not true). It’s a lot of fun to watch your kids have fun – especially when that fun includes a bow and arrow, a throwing axe, lance, or maul.
Punishment
Public shaming in the stockade is a great way to discourage stealing wears, I wonder how well it would work for pirating music?
The Music
Everything deserves a song, apparently. Which, if I’m being entirely honest, is cool in my book. In all seriousness though, there is music everywhere at just about any Renaissance Faire.
Work
Forget those TPS reports and, instead, pick up a blacksmith hammer and anvil. Work is just cooler when it looks like you’re dressed like William Wallace
The Craft Stores
The cool thing about most of the stuff you find at a Renaissance Faire is that much of it is hand made. In fact, many of the store keeps you meet are the very artisans who made the wares you’re perusing. Yes, they’re dressed a little funny, but that’s all part of the job.
This story has been republished with the permission of Randy Madden. Randy was shooting “Hope,” one of two bows made by Bob Sarrels of Sarrels Archery. The bows, Hope and Faith, are identical mirrors of each other – one is right handed and one is left handed. They were made with the express purpose of being donated to raise money for Trad Gang’s annual St. Jude Children’s Hospital auction. Every year, Trad Gang members donate and auction off hundreds of items, worth tens of thousands of dollars – 100% of the money raised goes directly to St. Jude Children’s Hospital. After the bows were made, they were passed around the community for more than a year to drum up interest. While he had her, Randy was able to harvest a prize.
By Randy Madden
I was recently asked if Hope had a new story to tell, and as a matter of fact she does! But I better tell the story, so she doesn’t tell everyone about how fast my heart was beating and how bad I was shaking and how I almost messed the whole thing up!
After gathering with some friends last week I almost decided not to hunt, but my wife said I should go because I only have Hope for a few more days. So, I headed out the door around 6:20 that evening. I climbed up in the same stand that I used in a previously unsuccessful hunt around 6:40 p.m.
My feeder had already gone off, but I wasn’t worried about it. The trail cam pics show that the hogs usually don’t come by until right at dark or a little after. With a storm front approaching my hopes that something would move a little early was high. I didn’t hang my feeder light because these hogs have been hunted and usually won’t commit to the feeder if anything is out of the norm.
So, I sat and enjoined the cool breeze, which was perfect most of the time with an occasional errant swirl. I watched the doves, cardinals, blue jays, and squirrels take turns running each other away to take their turn at the free golden bounty. I sat there just enjoying the evening, contemplating what to do about the coons that seem to get the most of what is meant for the hogs. As the light started to fade I texted my wife and told her that if something didn’t come in soon I would be coming home earlier than normal as I was concerned of shooting something late with the storms coming. As last light came I was mentally getting ready to start packing up. I say mentally because I have to make myself quit or I would have stayed until I got wet.
Then I heard the slightest noise to my left and not very far away. I thought “Oh great, another dang bait stealing coon”.
Next thing I know I see a hog step out on the trail to my left at 5 yards. This sucker snuck to within 5 yards of me and I never knew he was there! Always amazes me how quiet they can be when they have to.
Anyway, I was already standing because I was about to pack it in so I eased Hope off the hook she was hanging on and got ready. I couldn’t shoot because of a few limbs from the cedar tree I was in but all he had to do was take two steps and he was mine. Well, he just stood there staring at my feeder and smelling the wind for a min which seemed like forever then he turned and headed back the way he came! Crap!! I thought he was gone.
After another minute long eternity, he comes out at 15 yards to the left of my feeder and I guess he was convinced all was safe because he walked straight in and started eating. It also amazes me how they can always be broadside to everything except you! I watch him eat for a few minutes and every time he moves, he always stops head on. One time he turns broadside and I start to draw and he starts walking to the opposite side of the feeder and I almost let one fly, but it didn’t feel right, so I let down. This goes on for several minutes and all I can do is pray the wind holds.
He finally walks back to the left side of the feeder and I know he’s going to have to turn around to face the feeder to eat so I put some tension on the string. Sure enough he turns to face the feeder and stops broadside. He’s about 9 yards, head down, wind is in my favor, and I start to draw. I honestly do not remember coming to full draw. All I see is the soft spot above his elbow and the next thing I know the woods erupt with a loud grunt and string is coming out of my tracker so fast I was scared it was going to break off.
After what seemed like forever it starts to slow down, then it’s slowly but steadily coming out. Then it stops. Then it starts going slow again. Then it stops again. Then it goes slow again. The next time it stops it doesn’t move. I keep thinking the worst like maybe the arrow pulled out, so I give him a few more minutes and I call my wife and ask her to bring my spotlight. After she arrives we start the tracking job. We slowly follow the string while constantly searching ahead as far as we can see. All I can say is thank God for my string tracker. Due to the downhill angle and the lack of penetration (only got about 6-7” of penetration, and only got one lung, but my Grizzly broadhead did its job) I only found eight drops of blood in about 250 yards. At the end of the string, I was ecstatic! He was much bigger than I thought, he weighed 272 lbs.
Therefore, I had to recruit my brother to help with the drag. We had to drag him about 150 yards to get close enough to load him in my truck. That was tough. As I pulled into my driveway it started to rain. For once everything went right. But that’s why we do what we do. All the times we fail are washed away by each success!
Definitely my best hog with any bow to date thanks to Hope.
Hope, 54#@28″, Grizzly 175 grain Instincts on D/F shafts, string tracker from Chad Orde.
You can purchase Hope, Faith, and hundreds of other items at Trad Gang’s annual St. Jude Children’s Hospital auction – 100% of the proceeds are donated to St. Jude.
What is 3D archery? Generally, when an archer talks about 3D, they’re referring to shooting at three-dimensional life-like targets – normally made from foam and situated in such a way as to simulate a true-to-life hunting experience. At its inception, 3D was focused mainly on hunting practice, as such most of the targets were shaped like game animals, but 3D quickly evolved into a sport of its own, with rules, scoring, and a nearly limitless cornucopia of targets.
3D archery can make for a fun family outing.
As such, 3D is a great way to get ready for an upcoming hunt, or to just have some fun. It can be practiced alone, with friends, or family. In fact, it’s common for young children to participate in 3D. It’s a great way to experience the outdoors (if shooting at an outdoor range) and gain experience in shooting your bow in a realistic situation.
Before you head out to the range, there is some basic equipment you should bring with you. That said, there’s no special 3D bow that you’ll need; just shoot the bow you’re most comfortable with or the bow you plan to hunt with. You should used field points (don’t shoot broadheads at 3D targets!), it’s a good idea to have a pair of sunglasses handy, some sunscreen, an arrow removal tool (just in case you hit a tree, a cheap arrow puller and target arrow release fluid are good ideas too), a decent quiver, a towel for your hands and gear, and some arrows. Many outdoor shoots can be a mile or more in length, so it’s a good idea to bring something to snack on as well as some bottled water, but please don’t litter.
Six arrows should be plenty, but feel free to carry as many as you need. There are many archers who will bring an extra dozen and leave it in their vehicle just in case they need them. If you plan on shooting for score, you’ll want to bring something to write with and on (sometimes that’s not needed, but it’s better to be safe than sorry). Misses do happen and arrows will be lost (arrows are a lot easier to find with lighted nocks). When you do miss the target, don’t take too much time looking for the lost arrow, as it will slow down the whole event.
Most ranges will charge a small fee for shooting, whether you’re competing or not. This money covers normal wear and tear on the targets and on the range.
On how 3D is scored; typically, the high score shots will be in the vital section of the animal you’re shooting at. There are two primary scoring formats used: ASA and IBO. The ASA, or the Archery Shooters Association, uses 14-12-10-8-5-0 scoring areas. The IBO, or the International Bowhunting Organization, uses 11- 10-8-5-0 scoring areas.
When shooting for score, one arrow is shot at each target; the score is determined by where the arrow enters the target. Below is an example of what the ASA and IBO scoring rings look like.
(I can hear you asking, “why is the 14 score in such a weird spot?” While it’s true, you wouldn’t want to shoot a deer there in a real world situation it has to do with risk and reward for those trying to get the highest score possible. The ring is pretty small, and if the shooter misses in any direction they’ll end up with either an 8 or a 5.)
However, this scoring system does pose a problem in some situations. What if the animal is at an angle facing away from the shooter? Under normal circumstances a hunter would shoot the deer so that their arrow would hit midway between the front and rear legs, which would be a lethal, clean harvest. Despite being the most lethal shot in a real-world application, this shot would result in a score of 5 at a 3D shoot. Instead, the archer would need to aim as if they were trying to pass through the outer shoulder, which would result in a much higher score. Further, some targets will have multiple scoring areas marked. In which case, just ask which one is being shot at – if you’re shooting alone just use your best judgment.
Now, what happens if your arrow is on the 10 and the 12 mark? In most situations you get the higher score, if your arrow is touching it, then that’s your score. If you can’t see the scoring rings from the shooting stake, just aim for what would be the most natural lethal area. Some shooters opt to bring a good set of binoculars, but if you choose to bring binoculars remember to be courteous of other shooters and not take too long. There are also some archers who will bring reference cards of each target, so they know where to aim for the highest score.
Although many 3D courses are set outdoors, there are just as many indoor 3D ranges, which is nice when the weather gets too nasty for outdoor shooting. Most shoots will have between 20 and 30 targets arranged at different distances and positions. Usually traditional shooters will have a maximum distance stake at around 30 yards, but not always. If you’re participating in a tournament there will normally be club rules that you’ll have to obey in order to qualify (it might be a multiple day shoot or there might be different classes). During outdoor shoots be prepared to shoot off of elevated platforms, down hillsides and through brush. Some areas might be highly wooded and other areas might be in wide-open fields. Most targets will not have any indicator of what the distance to the target is, which gives the instinctive shooter a real advantage.
Indoor 3D ranges usually have a single line where all archers shoot from. Generally, archers are grouped by class and skill level. Targets can be as close as 2 yards or as far as 50 yards, normally distance is only limited by the venue.
Outdoor ranges, in my opinion, can be a lot more fun as they are usually a walk-through course (just like mini-golf). Normally, there will be three or four archers per lane – your group will finish one target and then move on to the next. Be aware if you or your group is moving slowly – it’s courteous to let faster archers pass you. Each class and skill level will have a designated stake to shoot from – most shoots are operated via the honor system, so no cheating. The shooter is normally required to touch the stake with at least one part of their body (i.e. foot or a knee) when shooting.
Although each club will have its own rules and restrictions, here are some basics to remember:
Although archery is generally a safe sport, it can be dangerous, so stay smart and stay safe. Know what you’re shooting at. Know what’s behind your target. Make sure there are no children about to dart out in front of you or behind your target. Be aware of other shooters at all times.
Try not to talk or be disruptive while others are shooting. If you’ve brought children, make sure they’re not making too much of a ruckus.
Take your time, but don’t stall other shooters. Some people like to really take their time, others love to move quickly – be courteous either way. If you’re a slower shooter, then let the faster archers “shoot through.”
Avoid foul language. These are often family activities and no one wants their children exposed to that.
Feel free to bring something to snack on and some water to drink (in fact, I’d encourage it), but don’t litter.
When you miss a target, don’t take all day looking for it, as it will slow down the entire event. Misses will happen (so be prepared) and arrows will be lost.
You might want to bring a ‘throw away’ arrow for novelty targets, such as steel or iron elks.
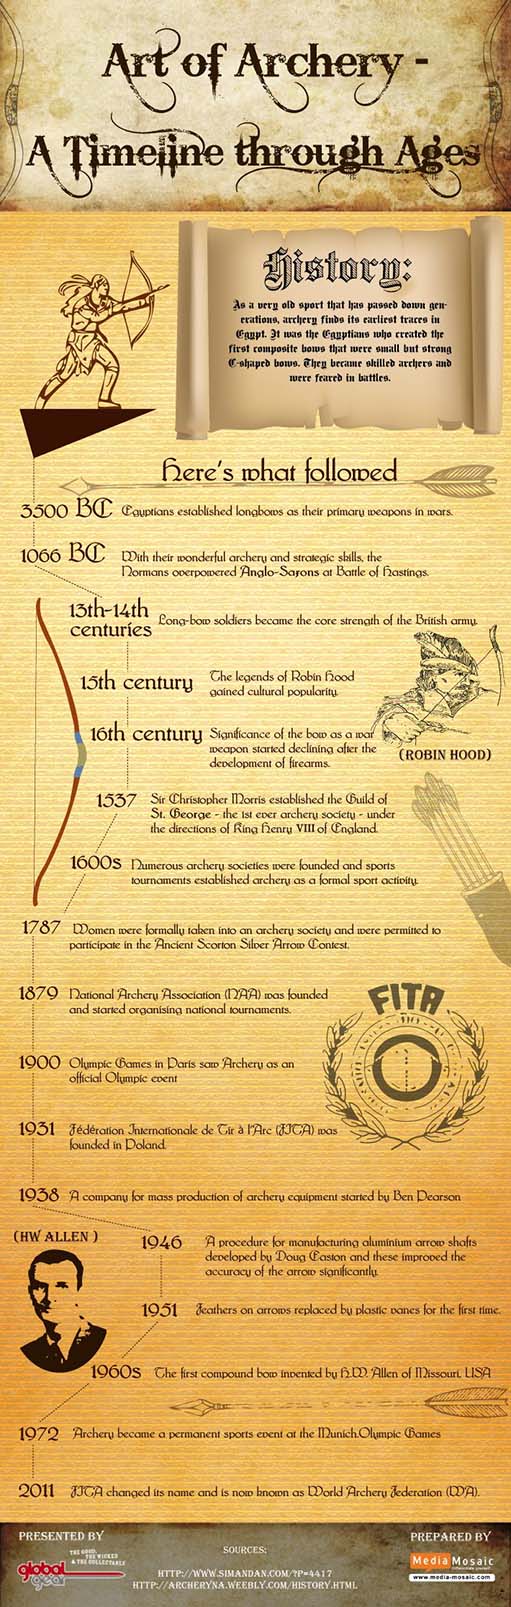
Created by Global Gear, this Archery Infographic offers a brief look at how archery has evolved though the ages. From a tool for survival to a weapon of war to a worldwide sporting phenomena. Although it is clearly not all-inclusive (nor does it claim to be), the infographic focuses on the development of archery into a formal sport activity.
It is worth noting that there is evidence of archery well before 3500 BC, which substantially predates the Egyptian empire. In fact, a recent study suggests that the bow and arrow might date back as much as 71,000 years. We know for certain that archery dates back to at least the mesolithic period (roughly 5,000-10,000 BC) because there are still Holmegaard bows (made of elm) in existence today, which have been dated to 9,000 BC.
But don’t let that keep you from enjoying the rest of the infographic.
Clinton Miller with his first deer harvest with a traditional bow. He said, “the rack may not be significant, but the experience of the saga to kill a deer with my bow and the venison for my family most surely is. The bow is a Border Black Douglas 58#@28″. Arrows were Axis with a Grizzly Head. 680gr total weight.”
Clinton Miller lives in the hills south of Stanthorpe, Queensland, Australia, where it is currently deer season. This article has been re-published here with permission of Clinton Miller. “It’s the first kill for this bow. The shot went in as pictured and came out about 6” lower on the opposite side. Got one lung and the liver. He only went maybe 70 meters. The Axis arrows, grizzly heads, adapters, feathers, inserts, and some various other bow accessories used were purchased from 3Rivers Archery.”
By Clinton Miller
A long time goal was achieved last weekend. For quite a few years I have been trying to take a deer, any deer with a bow. I have been unfortunate to have lost some and until now I haven’t been able to seal the deal. It felt like there was some sort of protective force field around every deer I shot at.
An example of a fallow buck
Well March and April for us is what September and October is for you guys and the fallow deer that I have access to do their thing in these months. I vowed to myself to make 2015 ‘the year of the deer’ and I’ve put in a day every second weekend since February at the property hoping to put to bed this deer hoodoo I had going.
The property is relatively new to me so I started going out there in February to get to know the place and to scout for deer. On the 1st trip, I spotted some does in their beds and made a stalk to about 20 yards but was foiled by a tree that was just behind the crease of the doe I shot at. Yep, dead centered the tree. Remember that force field I told you about …
Fast forward a few trips and the end of March rolls in. This time I was hoping that by now they should be responding to the rattle of a pair of antlers. Up until then they haven’t been.
I arrived at the place by mid afternoon and planned on an afternoon hunt, stay the night, a morning hunt and be back home by lunch the next day.
I checked the wind and accordingly, made plans to circle wide and come in behind the area I wanted to hunt, which is a trail with scrapes I found the week before. The idea was to setup in sight of the scrapes and rattle hoping to deceive a buck into thinking a rival was on his turf and coax him into range.
A little way into the walk I dropped into a rocky little creek, dotted with small rock holes full of water from recent storms. It was a beautiful little locale. A small cascade, surrounded by steep sided walls of rock. I thought to myself, “This is a nice little spot.”
I was standing in the creek bed enjoying being there when I looked up stream and saw a white figure walking down into the creek. My first thoughts were that it was a Billy goat and I casually lifted the binos to check him out. I had no intention of shooting a goat this trip so I was just going to watch him do his thing.
However the binos revealed a white buck. PANIC mode! Get out of the creek before he sees me. Hurry up and find a spot to setup for a rattle. Get the pack off and get the antlers, quick, hurry.
There were two ways that he might come in to the rattle, if he did at all. Down the creek or from above on the creek bank. I wasn’t sure where he was so I was watching both areas as I started rattling. Sure enough he must have been still in the creek bed because after only a few light rattles I saw his antlers coming down the creek. Now that I knew which way he was coming I knelt down and got into a more concealed position. As I did I drove the barbed spikes of a tiger pear cactus into my shin. What a time to do that. Here I was trying to get into a comfortable position with a tiger pear hanging off me.
The buck kept coming and revealed himself broadside at around 13 meters (roughly 14 yards). His chest seemed to fill my field of view. It looked so big that I remember thinking I can’t miss this, I must have been so focused.
As soon as he stepped out I drew and released. As I was drawing he turned his head and looked at me. It was too late though, the arrow was about to hit and seal his fate.
The instant it hit him I knew it was a good shot and thought for sure I’d just killed my first deer with a bow. He crashed off in the direction he came from and not wanting to push him I turned my attention to extracting the tiger pear from my leg. These things have 1.5″ spines that must have microscopic barbs because they are a right pain in the butt to get out. They will hang on, pulling a big fold of skin with them when you attempt to pull them out. They freakin’ hurt too. A couple of them went in 3/8″.
By the time I sorted that out it was time to take up the trail. At the site of the hit there was a good splash of blood on the rocks but it soon deteriorated to just drops then further to having to follow his tracks. I found the arrow and there was blood on it, the dark red type, not as reassuring as the bright pink stuff. Though there were a few little bubbles amongst it, indicating some lung damage.
Continuing to follow his tracks I seemed to lose them after about 40 meters. Puzzled to where he might have gone I went ahead a little too where I thought he may have gone.
I remember looking at the ground wondering where he could have gone and then looking up to my left over the other side of the creek and bingo, there he was, a pale figure lying in a small gully that runs into the creek.
“How did you get over there,” I thought. I backtracked a little more and soon found the spot where he entered the creek and crossed over and joined a trail leading right to where he was. It pays to look for the trail even if you have found the animal as you will most likely learn a valuable lesson about the situation.
The first emotion that hit me was that of relief. I finally proved to myself that it is actually possible to kill a deer with a trad bow. They aren’t an immortal creature after all.
It’s hard to describe the emotions felt, but you all know what I mean. A mix of sadness, deep respect, gratitude, contentment, sorrow, relief and more I don’t understand.
I sat with him for a moment and laid my hand on his fur thankful for this moment and I silently said to him that I will carry out every bit of meat. I would feel like I didn’t fully respect his life and the fact that I ended it if I didn’t.
I took some photos then started the task of field dressing him for packing out.
It was getting on and darkness, I knew, would beat me. I got a lot of it done before I needed my torch, just as well too, because the batteries went flat after about 15 minutes, leaving me trying to dress my first archery deer in the dark. It was time to use something I’ve been carrying for years in my little first aid kit; I finally got to use the most traveled light stick in Australia.
It was a whole lot brighter than I thought it would be and made the job heaps easier. After about an hour I had it all packed up on the kifaru spike camp ready for the haul back the Ute. I reckon it would have weighed easily 50kgs, (100lbs). I left the skin and ribs there for the night and went back in the morning for a second load.
The pack out was tiring but rewarding. Under the light of a half moon, thank goodness.
I remember thinking as I was walking out, that this is how it should be and how I wanted it to be. Working hard, earning the venison. I didn’t want the first to be any other way.
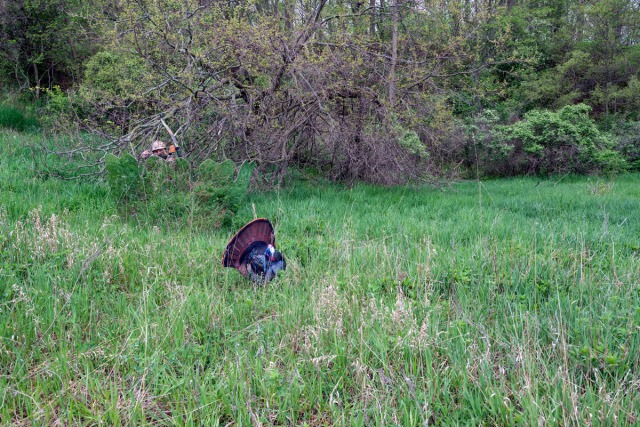
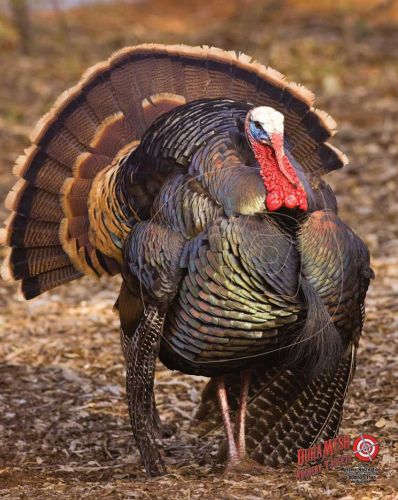
Jared Grewing displays the turkey he took with his Great Plains Long Curve and Zwickey Broadhead, 2013.
For the spring season, if you want to bag a turkey, you’re going have to scout, scout, and then scout some more. Expect this to take a good bit of time and effort. You’re scouting to find where the turkeys are roosting and where they feed or strut in the morning. Usually, they’ll keep to the same patterns in good weather.
When you’re scouting, you’re looking and listening for where the birds are, where are the hens going after they pitch down, what are the Toms doing, which Toms run together and where do they feed.
Go out at dusk the evening before your hunt and listen to where they are gobbling at sunset, use a call to get e response gobble letting you pin the roost tree. When you call and finally do get a gobble in response, do not keep calling.
Turkeys do not call as much as you think. Yes, there are times when a hen will just crank away, but not all the time, in fact, she only does that in specific situations. Until you know why she’s doing that, your best tools are patience and knowing your land.
Get there about an hour before sunrise the next morning and set up your decoys in a spot about 100 yards away from the roost tree. You want to be roughly 15 yards from your decoys (or whatever distance you feel comfortable taking that shot), positioned so your back is against a tree or some brush. Remember to stay still; you don’t want all the work you’ve put in to go to waste just because you can’t sit still. That said, look at where you’re going to sit before you put your butt down on an ant hill.
Five minutes to light, make a tree yelp – resist the temptation to continue calling. Wait for about 10 minutes and see if the birds fly to your setup from the roost. When the turkeys fly down and head to your decoy, it’s time to bag your bird. If you have a bird come in, you wait until he is in full strut. As soon as he turns around and his fan is blocking all view of you, get in position and get ready to draw back on that bird as soon as he turns around again. This may take 5 minutes or an hour, be prepared to be able to hold your bow in an odd or uncomfortable position for a very long time.
However, if you don’t hear anything for another 10 minutes, make a couple more yelps.
If they fly down, but not to you, try a few more periodic calls, but it’s probably not going to work out. If they flew down, but you’re not sure where they went and you’re not getting responses to calls stay where you’re at for at least an hour. About 80% of the time this won’t work; you, however, are hoping it’s the 20% that does work.
If, after an hour, you’re still coming up short it’s time to start hiking your hunting area. Remember, if you’re on public land it’s a good idea (and in many states it’s the law) to wear some orange while hiking; just remember to put it away when you find your next spot. Periodically you’ll want to stop and call to see if you can strike a gobble. If you don’t hear anything then keep moving. If you get a response, it’s time to quickly setup again (just like at the beginning of your hunt). After you get settled in, call again and listen to see if the Tom is coming your way.
If you think that everything is going well and the birds are getting close and then they go silent, be ready for them to show up in stealth mode. If, however, you’re pretty sure they’re gone wait 20 minutes after the last time you called before you either call again or leave. There is nothing more heartbreaking than thinking you’re done for the day, standing up and hearing the familiar sound of a turkey taking flight.
Remember, turkeys have nowhere to be and all day to get there. The hunting shows on TV cut hours of waiting to fit into their 30 minute show. Be patient and most importantly, have fun.
For some great shot placement tips, check out this video on turkey anatomy and proper arrow placement from Hoyt. It’s geared toward compound shooters, but the skills are pretty easily transferable to traditional archery.
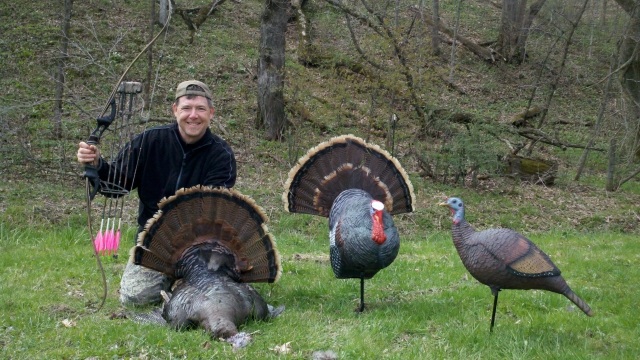
Fred Eichler shows off his Tom from a successful Turkey Hunt in May 2011
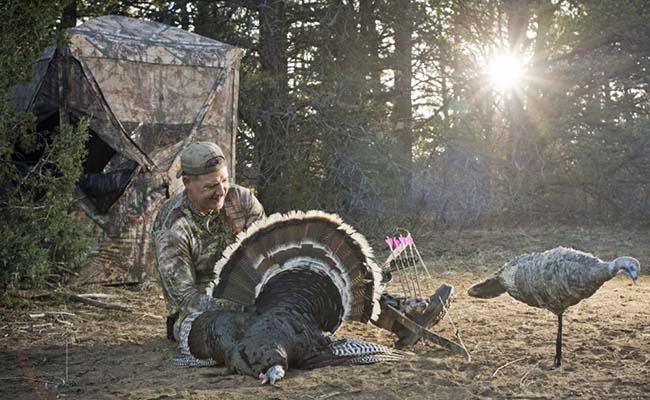
The days are getting longer and the air is getting warmer, which can mean only one thing – turkey season is almost here. Getting a trophy tom with a shotgun can be hard, but when you decide to do it with your bow, especially a recurve or longbow, it can be considerably more difficult. The last thing you want to do is to be caught unprepared on opening day – making an already challenging hunt nearly impossible, but don’t worry 3Rivers Archery has your back.
There are a few things to consider before venturing out into the woods this season, and the best time to start thinking about them is in the weeks prior to opening day.
Where are you hunting?
Many bowhunters will likely already have their hunting area secured. If you fall into that category, now would be a good time to start scouting – you should become intimately familiar with your territory. If you’re still not sure where you’re going to be hunting this season, the advice is the same; don’t wait for opening day to find out where the birds are roosting and feeding.
Will you be hunting from a blind or ‘running and gunning?’
Many archers find it easier to hunt from a blind because it can conceal the extra movement of drawing a bow. When hunting with a shotgun it’s easy to simply get set-up, put the gun on you knee and wait for a bird to get within range. With a bow, however, it’s never that simple. If you do decide to ‘run-and-gun’ consider using a bow sock in conjunction with some bow camo and a ghillie suit. Although this won’t hide your movements completely, it will soften them and it can be much more effective at concealing the human form than camouflage alone.
Is your blind ready to go?
A good ground blind is invaluable to the bowhunter when he is matching wits with a seasoned tom. Turkeys have some of the sharpest eyes in the woods, and your trophy tom has been hunted before, so he’s already weary of even the slightest movements. You can’t hold your bow at full draw for too long and drawing takes a lot of movement, so what do you do? You get a ground blind. There are many different kinds of blinds from single panels to large pop-up blinds and even the high-tech GhostBlind®. Which one is the right one for you? That depends on preference, hunting style, and budget, but I love the GhostBlind®. It works just about anywhere and can be moved easily and setup quickly.
Are your decoys ready to go?
Most hunters can get the old longbeards within 50 or so yards, but arguably the most difficult part of luring a tom within shooting range are those last few yards. A good decoy can be the difference between success or failure this season. That said, it’s hard to find a reason to not recommend the Miss Purr-Fect Hen. It just works. The Miss Purr-Fect weighs about as much as a bottle of water and features perfect pose technology, allowing for detailed adjustable neck/head positioning.
Do you have a good hunting seat?
Whether you will be sitting at the base of a tree or in a ground blind this season, it is important to think about comfort. If you can’t sit still then you might as well not go out at all, because a turkey will see your movement and your hunt will be over. If you’re going to be sitting on the ground, then at least make sure your back is comfortable with some lumbar support. Or, if you’re going to be hunting from a blind you might want to check out the Chama Swivel Hunting Chair.
Is your camo right for the season?
You’re going to need to get your bird within your kill zone, and for most traditional bowhunters that means 20 yards or less. This means the detail of your camouflage is critical. The wild turkey’s ability to pick up movement is truly impressive, so you need to make sure you’re camo is on point. The new Core4Element Realtree Xtra® Camo line by Easton is impressive and has been designed for early season hunting.
Do you have the appropriate broadheads?
What’s the best broadhead for hunting turkey? The one that flies the straightest and gets the job done. The vital area on a turkey is roughly the size of a fist; that said, the best broad head is the one you can shoot confidently into that small of an area time and time again. You do not want to be second guessing how an arrow will fly or your ability to hit a tom when he is at 20 yards.
However, it’s best to avoid a pass though with turkey, because if they can run or fly after the shot, they usually will, which won’t leave a blood trail or, if it does, it won’t be a good one. If you can, try and place your arrow so it penetrates at least one wing, both would be better, while also hitting the vitals. Another good way to avoid a pass through is to add a Zwickey Scorpios Broadhead Stopper to your broadhead.
Have you practiced shooting enough to be confident?
DuraMesh Turkey Target Face
As with all things, the key to successful traditional bowhunting is practice. In the military they have a saying, train like you fight. It would be a good idea to find an area where you can practice shooting, which will closely replicate your actual hunting conditions. It’s also a good idea to get a decent target for practice. I love practicing with a good 3D target, but not every hunter can afford that. The next best option is to get a high-quality lifelike paper target.
Have you purchased your hunting license?
This one seems like such a no-brainer, but it never fails – someone will forget or put it off too long. So, do it now, well not right now, but as soon as you’re done reading this article.
Finally, how are you going to display that big longbeard once you bag him?
Turkey beard and tail feathers pictured with an Arrowhead Plaque
Because you will get him, if not this year then maybe next year, but it will happen. I suggest mounting the tail feathers and longbeard yourself. It’s a good DIY project and is much more satisfying to point at your trophy and say you did everything. Try mounting it on our Arrowhead plaque to show off your pride as a traditional bowhunter.
In closing, I hope this helped. If you think of anything that I might have forgotten, please leave a comment and let me know. Remember to stay safe in the woods this season and as always, good luck and shoot straight. Be sure to share your tom with us and we’ll add it to our Trophy Room.
Heather Culler, our design specialist, will be leaving 3Rivers Archery today to join her husband in running The Angler, a local hunting and fishing supply store in Hudson, Indiana, full-time.
Heather has been a dedicated member of the 3Rivers’ staff for more than four years and, although we’re sad to see her go, we know she and her husband will do great things for the hunting and fishing industry. Originally, Heather joined us as our manufacturing manager and she quickly found herself juggling multiple projects.
Our vice president of operations knew Heather had a degree in interior design and she quickly approached Heather about assisting with our email marketing. Heather was happy to accept the extra duties and said that she leaned as she went, teaching herself how to use design software. Heather also quickly became the manager of the Safety Department and was, in fact, the entire safety department.
Heather explained she thrived on the challenge and said that she will miss working with her best friends every day, but is excited about running the marketing of The Angler.
“Every day was a challenge for me,” she said. “I was able to have that creative outlet with the marketing and I was also able to have that structure as the manufacturing manager.”
After Heather and her husband bought The Angler last April, she slowly began spending more and more time at their new store until, eventually, Heather had to move to part-time here at 3Rivers. Although it can be scary, especially when you’re moving to something as challenging as running your own business, Heather she said she is excited about working with her husband.
“I’m excited to share in the stress and the excitement of what [my husband] does every day,” she explained.
All of us here at 3Rivers Archery would like to wish Heather and her husband the best as they take this next step together. We hope you will join us as we say, “Thank you” for her years of hard work and dedication to the traditional archery community.


.jpg "Welcome to the 3Rivers Archer's Den")