Free Shipping on orders of $99+ click for details

Ask the experts: 260.587.9501 | Customer Service

Call Us: 260.587.9501 | Customer Service

Your cart is currently empty.
Free Shipping on orders $99+ click for details
Welcome to the 3Rivers Archer's Den

Archer's Den

Welcome to the Archer's Den. Here you will find a gathering of traditional archery stories, tips and techniques, trophy animals taken with traditional bows, and plenty more. Stay a while and learn something. We hope you enjoy and even submit a trophy of your own, or leave a comment on a post.

Tag Archives: archery

Setting Up a Clicker for Hunting

Denny Sturgis Jr showing a clicker on his hunting recurve bowA clicker, or draw check, makes an audible noise (click) when an archer hits his desired draw length. They are used by almost all Olympic archery shooters to achieve the precision accuracy needed to succeed in that field. They work great as a signal, or trigger, to release the arrow.

I recently decided to use a clicker as a training aid. I needed to get back to the basics of anchoring on every shot instead of short drawing and trying to “sneak up” on it; as my coach Rod Jenkins informed me I was doing. I set a commitment goal of using a clicker religiously for three months. Part of that three month period included spring turkey season though. Which I most certainly was not going to miss.

Styles of Draw Check Clickers
There are several styles of clickers for bows. On the left is one that mounts to the bow’s riser and slides along the arrow. On the right is a style that mounts to the bow limb and attaches to the string.

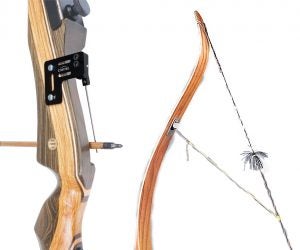
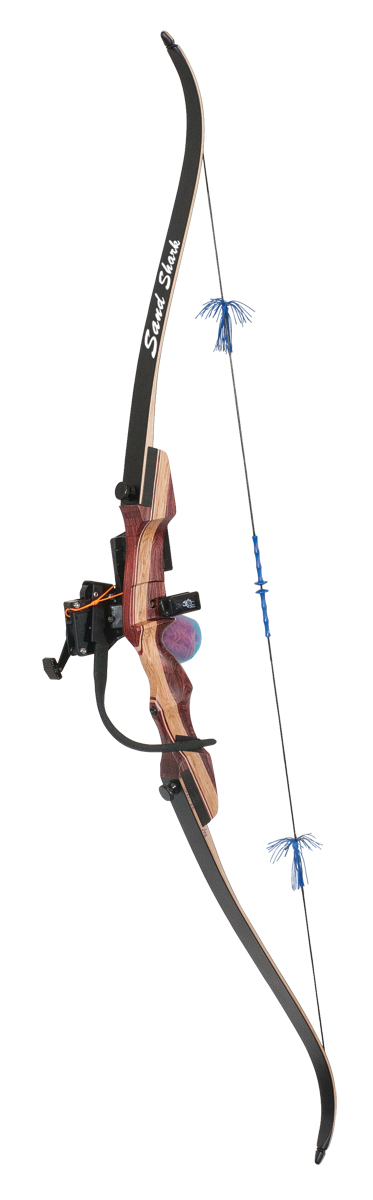
Clickers are available in several different styles. For hunting, the type that attaches to the string as well as the bow works best with all arrow points including broadheads and blunts. What I used here is the Crick-it Draw Check Clicker. While the light string and adjustable ball chain that comes with clickers works fine on the target range, I felt concern over its longevity in the field and the noise of the click when trying to take a super quiet, close hunting shot.

Jason Wesbrock with whitetail buckI consulted with Jason Wesbrock who has successfully used a clicker for years. Jason is an amazing bowhunter, world champion archer, and star of Masters of the Barebow Vol. 5. I took some tips from Jason and incorporated them into my own experiments and came up with a system that worked well for me on the hunt.

Steps for Setting up a Clicker for Hunting

Step 1 is to disassemble the clicker
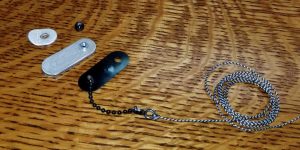
Step 1: Remove the clicker blade, the piece of metal that makes the noise, from the clicker. For the Crick-it clicker mine required a Phillips screwdriver.

Step 2 for setting up a clicker is removing the metal ball chain
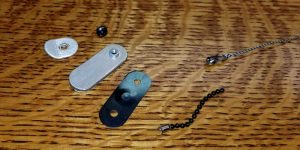
Step 2: You want to remove the chain grommet from the clicker blade. It may require a small amount of force, but be gentle.

Step 3 for setting up a clicker is to slide a nylon cord through clicker blade
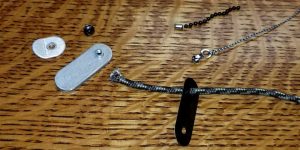
Step 3:  Slide nylon cord through the hole where the ball chain was. As not all nylon cord is the same diameter, it may require drilling the hole to pull the cord through. You want it to be a tight fit though. 

Step 4 for setting a clicker is to singe the cord in placeStep 4: Using a hand lighter, singe the end of the nylon cord and extinguish it by pushing it straight down into a couple drops of water on a flat, non-combustible surface. This should leave a hard, flat collar on one end of the cord. You can test to see if the end will hold by pulling on the cord to get the blade to make the click sound.

Step 5 for setting up a clicker for hunting is to wrap the blade in tape
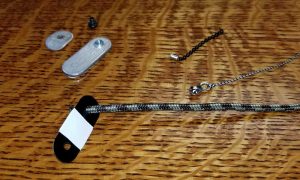
Step 5:  To silence your clicker blade you can apply heavy duty outdoor tape to the center of the blade. The more layers you apply, the quieter it will get. It is up to you how much this will be.

Step 6: Reassemble your clicker by screwing the blade back onto the plate in proper position. It is now ready to be installed on your hunting bow.

Step 7: Clean your top bow limb with denatured alcohol and a clean rag several inches below where the string separates from the bow limb. You want the clicker on the top limb so the least amount of nylon cord is used, and it stays out of the brush when moving.

Mounting the clicker to the upper bow limb
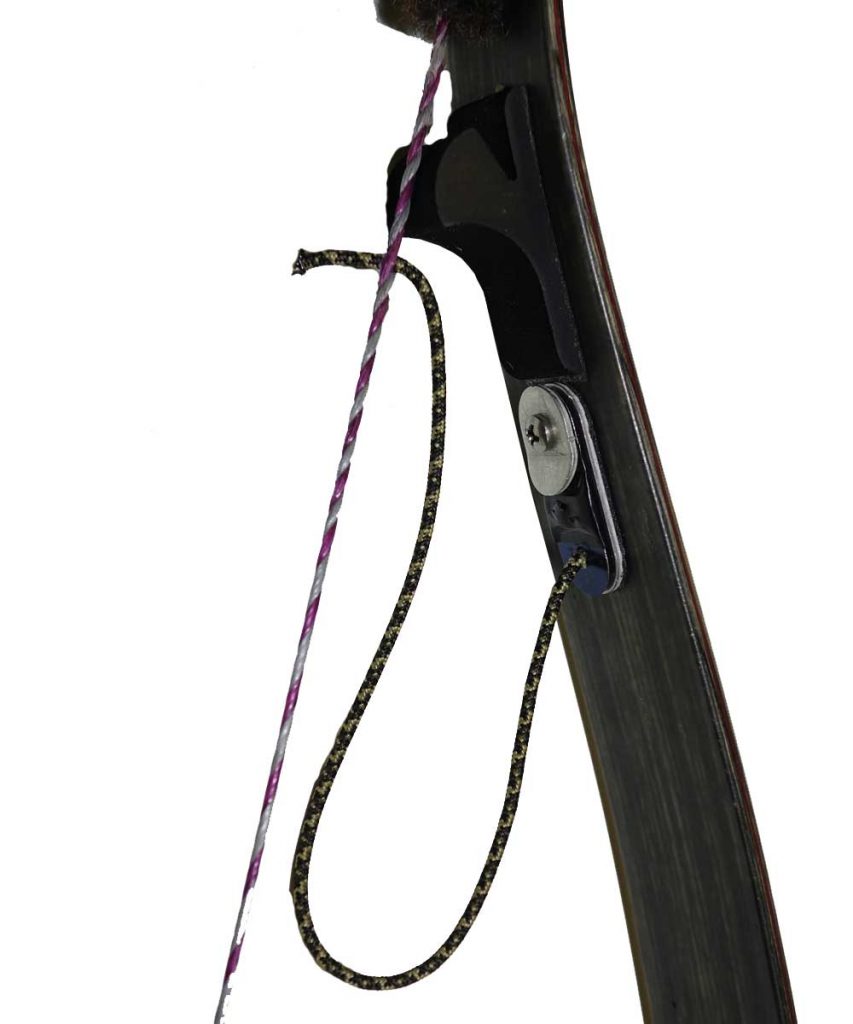
Step 8: Remove the sticky backing from the clicker and press onto the center of the top bow limb with the string positioned down.

Step 9: Mark the bow string where you would like the clicker nylon string to be located so it resembles the photo.

Step 10: Unstring your bow, divide the bow string strands at the mark and insert the end of the cord through about a half inch.

Step 11: String your bow, and double check brace height and position of the cord. Sometimes the string will twist. If the cord is twisted unstring and remove the cord and insert again from the other side.

Step 12: Once the cord is straight you can adjust the length by pulling it to the correct length to click at the desired draw length. I cut off the extra leaving about ¾” of cord and burn the end (be careful here). On a Flemish twist string the cord will stay in position. On an endless loop type string you may need to serve above and below the cord to maintain position.

For silencing the clicker, I tried a number of different suggestions and ideas and have settled on what I believe is the perfect solution. A piece of Scotch brand outdoor mounting tape stuck to the face of the blade silences the click consistently; the bigger the piece the quieter the click. You can even make it silent if you want and still feel the clicker break in your string hand. I ended up preferring a piece of scotch tape approximately ¼” by ¾”.

Denny Sturgis Jr with jake turkey taken with his bow with a clicker installed

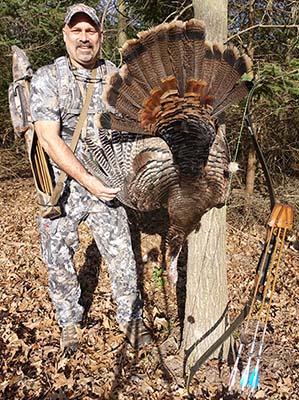
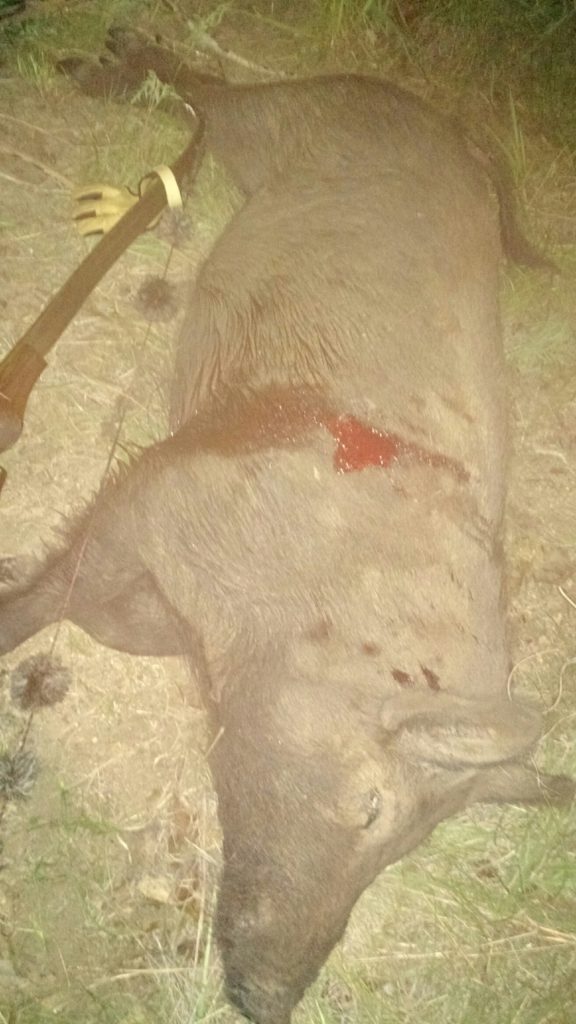
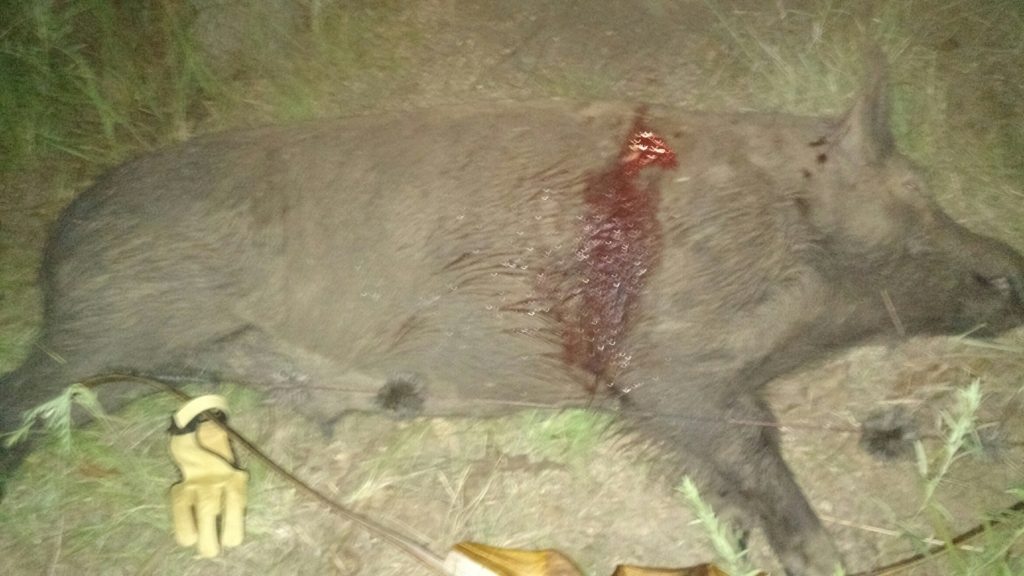
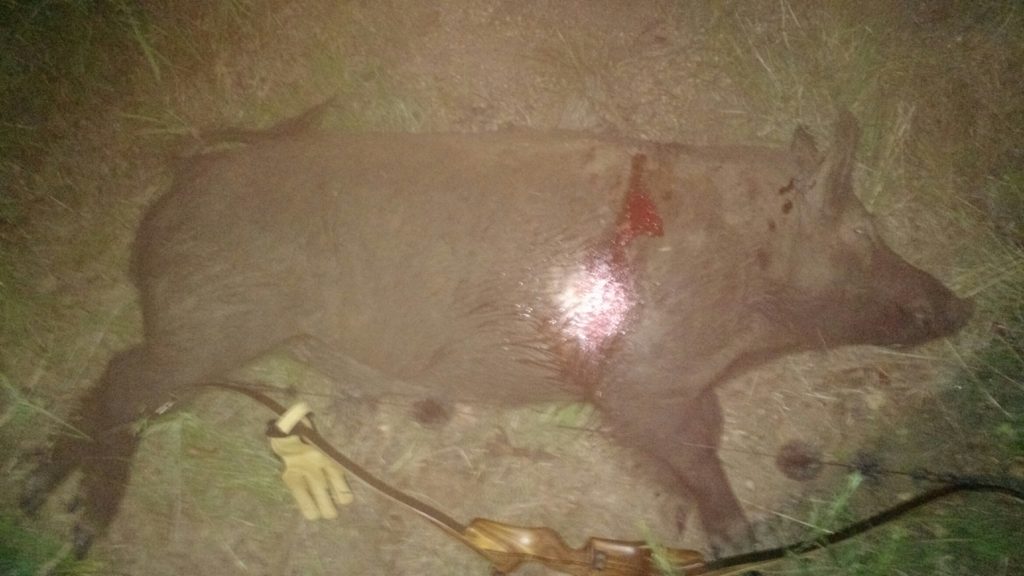
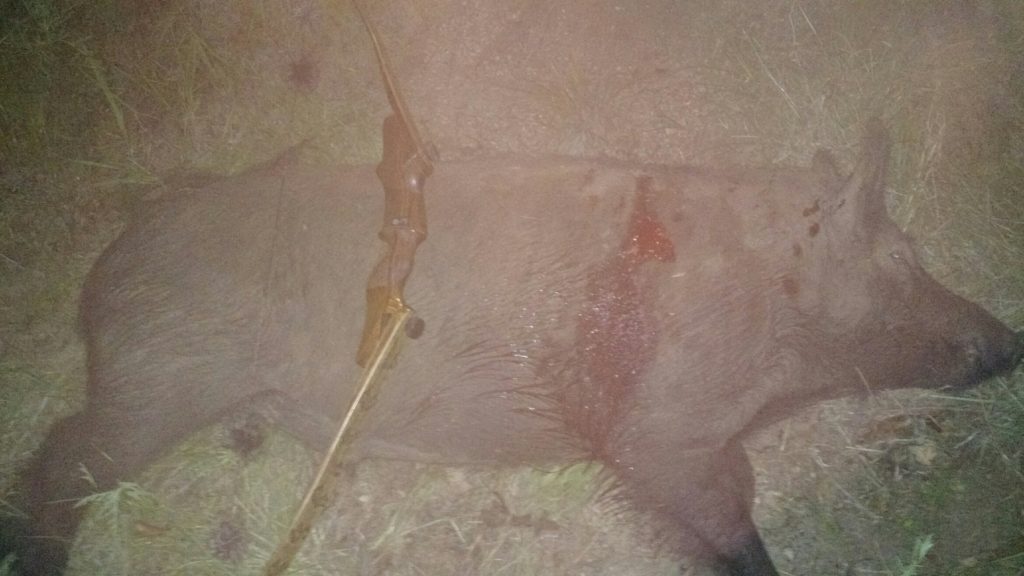
My turkey hunting was very slow that year. When a jake came into my hen calls I decided to take the shot. I hit anchor and pulled while aiming until the muffled click went off and my arrow disappeared in the sweet spot.

I have shot larger toms, but I’ve never been more pumped about making a great shot under pressure and staying on the road to shooting success.

Chase Niblock
Even ‘quick to jump’ African game can be shot with a clicker on your bow… If you have it set up right.
Chase Niblock with BIG buck
Monster deer taken by a bow with a clicker installed.

By Denny Sturgis, Jr.

Unusual 18th Century Ivory Falcon-Shaped Archer’s Ring

18th Century Ivory Falcon-Shaped Archer’s Ring

This Archer's ring is in the form of a Falcon and is probably from Mughal, 18th Century formed by a three dimensional bird with ruby-set eyes and folded wings. The string would rest on the lip of the ring opening and slip off the ring without touching the ornamental face. Photo: Bonhams.
This Archer’s ring is in the form of a Falcon and is probably from Mughal, 18th Century formed by a three-dimensional bird with ruby set eyes and folded wings. The string would rest on the lip of the ring opening and slip off the ring without touching the ornamental face. Photo: Bonhams.

How to: Arrow Cresting

The other day James, one of our traditional archery technical experts, came up to me to show me his newly crested arrow. They’re pretty sweet, if I do say so myself, and after James told me how easy it was I decided to write a short “how to” post about it.

The short and sweet.

After appling carbon/aluminum prep put your arrow on a crester then, using a cresting brush, lay down your cresting paint. James put his cresting on a cap wrap, so he didn’t need to worry about using primer. He finished with a clear coat to keep his work looking great for a long, long time.

It sounds too easy, but it really is that simple. As long as you can hold your hand steady, with the appropriate tools just about anyone can crest an arrow – and make it look awesome.

Let’s get into the weeds a little bit.

The art of cresting dates back (at least) hundreds of years, as a means of arrow identification. In the days when everything was made by hand and each arrow was a work of art, the very idea that someone else might walk off with your arrow was likely appalling.

Recently, however, cresting has become a way of personal expression. Many archers choose to forgo cresting entirely, but few can deny the appeal of an arrow with a crisp crest.

The most important thing to remember when cresting an arrow is to take your time. The easiest way to mess-up an arrow is to try and hurry through the cresting. As with every part of traditional archery, quality takes time.

Your crest can be as simple or as complex as you want. If this is your first time cresting an arrow it might be a good idea to practice on an old “throw-away” shaft. This way you can get a feel for what you’re doing. You could also just apply the crest to a cap warp, as they’re pretty easy to take off.

Before you apply your first coat of paint, you should remember to wipe down the shaft with the arrow prep. (Note: If you’re not going to use a cap wrap, then you should apply two coats of finish to your bare shaft. Wait until each coat of clear finish has dried, then gently rub the shaft with #0000 steel wool until it’s smooth.)

Next, put down a strip of blue painters tape on your crester and mark your cresting pattern (it might be a good idea to make each mark on the tape the color you want on your arrow – this way you can see if you like the color combination or not).

Next, if you plan to use any bright or metallic colors you should first lay down a base coat of white. This will save you some time later and will limit the number of coats. Remember, it’s better to have good prep work, than it is to just glob on the paint. It’s better to have several thin layers than it is to have one thick coat.

As you move forward to your first coat of color remember to clean your brush often. Clean your brush between each arrow and between every color. When you put your brush in your paint remember to try and get an even amount every time – otherwise you won’t have a consistent finish. As you apply the paint, try not to leave the brush on the shaft for an extended period of time, especially with fast-drying paints, because this can lead to a rough-looking finish.

After your base layer, begin applying your cresting pattern; start with your wider bands and move down to your thinner bands.

It’s a good idea to add a thin line to separate colors; this will give your crest a clean finished look. To do this, you’ll need a very fine pointed brush and a steady hand.

After the shaft has had plenty of time to dry, apply a clear coat over the crested areas. (Note: if you’re cresting a wood arrow you should apply a clear dip to the entire shaft.)

You’re done. Cresting is a simple way to make your arrows look great and to showcase your pride as a traditional archer.

By Jason Mills

How to Layer Hunting Clothes for All-Day Comfort

When you layer hunting clothes you control your core temperature in any weather

This story has been re-published with the permission of Core4Element. The link to the original story is no longer available.

One of the most important things a hunter must consider before going out into the field is choosing the best hunting clothing for the conditions. But even the best gear is useless without knowing the best way to wear it. The Core4Element line of hunting clothes is designed to be used as a system of three layers: a base layer, a mid-layer, and an outer layer. Dressing in layers like this allows you to control your core temperature in any weather, which helps you stay focused on the hunt instead of your clothes.

Layering allows you to prepare for all weather extremes, but there is a right way to do it. The first thing you need to keep in mind when creating your layering system is to abandon the thought of wearing cotton on your hunt. Cotton is a light fabric, yes, but it also traps moisture and chafes after wearing it for a long time. These are not ideal conditions for anyone, especially hunters competing with the elements for long periods of time.

Merino Wool Base Layers

Begin your layering system with a base layer. This layer will have direct contact with your skin, so you’ll want to choose something relatively lightweight, breathable and comfortable against your skin. At Core4, we create our base layers with 100% Merino wool, which is soft to the touch, anti-microbial, and has moisture wicking capabilities. Base layers should fit snuggly to make the most use of the wicking technology and allow for other layers to be put on top without bunching up. Depending on the climate of your preferred hunting area, you may want to consider heavier (thicker) or lighter base layers. Since base layers are pretty much impossible to remove once you’re out in the field, do your best to anticipate the weather conditions of your hunting grounds so you can choose the appropriate weight.

Versatile Mid-Layers

Mid-layer hunting clothes allow for a little more versatility than base layers because you can either wear one or several, depending on your comfort level. Mid-layers tend to be looser than base layers, but they do not need to be baggy by any means. The mid-layers are where you really control the body temperature. Adding multiple mid-weight layers for colder temperatures will better protect your from the cold than a heavy, bulky outer layer. Core4Element hunting apparel is tailored to an “athletic fit” to maintain contact with the base layer in order to optimize wicking capabilities. This will keep you warm while still being moisture and odor free. Mid-layers typically have special features to provide maximum comfort and breathability. Core4Element mid-layers often have underarm zippered vents and extra long front zippers for superior ventilation on all-day hunts. Layer the Mid Mountain Vest over the Selway Zip for extra warmth or use the Pivot Shirt as your mid-layer on warmer hunting days.

Protective Outer Layers

The outer layer of a system is going to be the most important layer in terms of protecting against the elements. Whether hunting in rain, wind or snow, Core4 has the high-performance, high-quality gear you need for creating the best final layer to your system. The key to the most effective outer layer is durability. Your pants and jacket need to be able to stand up against tree branches, rocks and whatever else you may encounter in the woods or backcountry. All of our pants and jackets are treated with Durable Water Repellent (DWR) to provide maximum protection against the elements. This is exactly what you want in an outer layer. Pay attention to the weights of the pants and jackets, as some are made for colder conditions than others. Pay close attention to the moisture in the weather. An outer layer protected by a DWR treatment will keep the rain and snow out for a while but if heavy rain or wet snow is in your future you’ll want a fully waterproof outer layer like the C4E Torrent jacket and pants. Torrent is waterproof, breathable, and just as important on the hunt, quiet.

When building your layering system, be sure not to neglect your head, hands and feet. Core4 offers Merino wool or synthetic options to keep you as comfortable as possible on your hunt. Be sure to keep your head covered on bitter hunts, as heat leaves most quickly through the head. Keep extra pairs of wool socks in your pack in case your boots do not protect your feet from water, as they should. Nothing ruins a hunt faster than suffering from soggy socks. Choose a pair of gloves that provides warmth, grip and mobility.

Layering is one of the smartest choices you can make on a hunt. Using the right method, you won’t have to worry about your clothing and comfort for the rest of your hunt, and that’s how it should be. Stay dry, warm and odor free when hunting with the Core4Element layering system. Ready to turn your hunting clothing into a system of specialized gear? Build your system now.

But How do I Bowfish?

Bowfishing from a boat

By Jason D. Mills

You know what bowfishing is, and you’re interested in trying, but you’re still not quite sure how or where to start. Bowfishing is unique in the world of archery in that it can be practiced day or night, on land, while wading in the water, or on a boat.

To get started you’ll need a bow, a recurve is best simply because smaller bows are a bit easier to manage while bowfishing. There is no need for sites because of refraction and because they can’t account for depth. You’ll probably want a bow that shoots 45 pounds or greater in order to have sufficient force.

Bowfishing rig

You will also need a reel and special bowfishing arrows; typically, bowfishing arrows are heavier, use barbed broadhead, don’t have fletchings, and are longer than traditional arrows. They are also attached to a fishing line. On that note, never tie a line to the back of an arrow, it should always be attached to the slide near the front of the arrow. If tied to the back, the line could get tangled in the bowstring, causing the arrow to snap back at you, resulting in facial injuries and even death.

You might also want to bring a pair of hip waders, some gloves, sunglasses (if you’re fishing during the day), sunblock, and a hat. If you’re fishing at night you’ll probably want to bring a decent flashlight or spotlight.

If you have the option, and if you’re shooting from a boat, you’ll probably want to use a flat-bottom vessel, so you can take it into shallower water. Like sport fishing and hunting, individual states regulate bowfishing, so you will probably have to pickup a fishing license.

When you’re bowfishing on fresh water you’ll be looking for fish like carp, eels, suckers, perch, catfish, gars, or even alligators. If you’re saltwater bowfishing you’ll probably target fish like dogfish, sharks, and stingrays. The exact type of fish that you’re allowed to bowhunt legally is regulated by the state, so check on your local regulations.

Something that seems obvious, but should also be mentioned about bowfishing. there is no catch-and-release in this sport. Bowfishing kills the fish.

If you decide to give bowfishing a try, but you don’t have access to a boat, then you’ll be limited to wading or bank bowfishing. You’ll want to do this kind of bowfishing in the spring, while the fish are spawning, before and after the spawn the fish can be harder to find. If you’ll be bowfishing from a bank, you’ll want to target lakes, rivers, and ponds with shore access. If you’ll be wading, you have the option of heading to a marsh with tall grass, where the fish feel safe.

If you’re having trouble narrowing down a good spot for your first bowfishing trip, just give your local DNR fisheries biologist a call and tell them you are looking for heavy concentrations of carp, eels, suckers, perch, catfish, or gars.

If you’ve got a few places in mind, but you’re still not sure about the perfect spot, the most important thing you should consider is the consistency of water depth and overall water clarity – clear water that is between 3-4’ deep is ideal for bowfishing.

Now, if you’re like me you don’t hunt what you won’t eat. That said, many of the fish that you’ll be after (such as carp) can contain contaminants, so it’s a smart idea to contact your local DNR office and ask about fish advisories before heading out.

Refraction

When you finally do get to your fishing spot, the main difficulty that most new bowfishers have is refraction. When light waves pass through water they are deflected, which makes things look like they are where they are not. This is most easily demonstrated using a straw and a glass of water.

Refraction

To compensate for this, you’ll want to aim about 10” below the fish you’re aiming at; keep in mind this is just a general rule of thumb and you should be prepare to miss quite a bit your first time out.

Don’t Leave Your Bow Hanging This Summer!

By Patrick Durkin

Bowfishing has been growing in popularity in recent years as more beginning archers look for fun shooting opportunities for spring and summer. As with almost everything in archery, you can get into bowfishing at nearly any price point you choose.

For basic equipment, some archers simply buy a kit that includes:

One solid-fiberglass fishing arrow

Fishing points

bowfishing reel

Some people who bowfish transfer all the equipment back and forth to their regular hunting bow, or buy a new bow for hunting and put their bowfishing gear on the old bow. Regardless of what you choose to do, our expert techs at 3Rivers Archery can guide you into the right product whether you’re just starting out or looking to upgrade your equipment.

Carp 101

Various species of carp are the most commonly targeted fish. Carp aren’t native to North America. They were brought over from Europe in the 1800s and released across much of the continent.

Because carp are destructive rough fish that reproduce readily almost everywhere they’re found, archers who bowfish typically shoot all they can, often using the fish as fertilizer for gardens and flower beds. Some also are smoked, canned or added to fish stew. About the only requirement is that those who bowfish take home everything they catch.

Bowfishing Is a Good “Next Step” From Recreational Shooting to Bowhunting

Bowfishing provides multiple shooting opportunities. For those archers interested in expanding their interest and archery skill into an outdoor adventure, it’s an ideal stepping-stone between target archery and bowhunting. No two shots are ever the same in bowfishing, and there’s usually much more action than in bowhunting. When bowhunting deer, elk or bears, bowhunters can go weeks – or several hunting seasons – between shots.

It’s also accessible.

Bowfishing can be done from piers, shorelines, and boats. This includes canoes, kayaks, airboats, motorboats, and Jon boats. As paddleboards become increasingly popular across the U.S., bowfishing from paddleboards is also gaining traction, particularly among a younger demographic eager to get outdoors. Several years ago, the Florida-based company, BOTE, partnered with ATA member Realtree, to offer its customers several camo-clad boards.

With bowfishing, you’re seldom restricted to one small area like you are when bowhunting deer from a tree stand or turkeys from a ground blind. If you see carp or gar nearby, you can stalk closer to try intercepting them. Those experiences also help prepare you for stalking or setting up on deer, elk or other game animals.

Gators Too?!

Carp and other rough fish like gar and buffalo make for exciting bowfishing, but perhaps the ultimate in big-game bowfishing is an alligator hunt. States like Florida, Georgia, and South Carolina allow bowfishing for ’gators, but no state offers more alligator tags each year than Florida. This requires specialized equipment, however, so it’s probably best to hire a guide or hunt with an experienced friend before taking on an alligator.

Amy Hatfield contributed to this story.

Happy Father’s Day!

By Jason D. Mills

Happy Father's Day from 3Rivers Archery
Father’s Day is Sunday, June 21. Don’t forget to say “Thank you,” to dad this Father’s Day.

Happy Father’s Day!

Becoming a father was one of the most transformative experiences I’ve ever had in my life. Right up there with earning my Eagle, Globe and Anchor, getting my Bachelor’s Degree, and getting married. Granted, being a dad is an ongoing experience – as my daughter is only three, but I don’t think I’ve ever experienced anything else quite like it. I am my daughter’s hero and I get to shape her entire world, this responsibility is almost unbelievable.

Author, Jason Mills taking a photo with his daughter, Hanabella Mills
Author, Jason Mills taking a photo with his daughter, Hannabella Mills

Every day I wake up early, get dressed and ready for work, drive more than an hour, do my job, and when I get home I have to deal with everything that grown-ups have to deal with. But, at the end of the day, after all the bills are paid and my bank account is empty, after the frustrations of the day are gone, and all of the home repairs are done, it’s all worth it; because I get to kiss boo-boos, I get big hugs, cuddles on the couch, I get to hide in blanket forts, race in the yard, play with stuffed animals, and vigilantly ward off monsters from under the bed.

Too often I see dads portrayed on T.V. as bumbling doofuses, easily outwitted by even the least cunning child. They are the butt of every joke and seen as a not-so-necessary accessory, easily discarded and far from respected. I, however, contend a different point of view:

Dads matter.

Daughters look to their fathers to see what kind of man they should expect to provide for them in marriage. They are the benchmark against which all other men will be tested. Boys watch their fathers to learn what it means to be a man, and to learn what men are supposed to be. They learn how they should treat others and how they should carry themselves.

3Rivers Archery Vice President of Sales and Marketing, Johnny Karch, and his daughter, Bella.

Fathers instill a strong work ethic by going to work every day to provide for their families – even when they don’t want to. Fathers teach their children about honor, by honoring their spouse and others. They teach patience by being patient with willful children. They teach courage by willingly facing their fears. We teach our children – everything. By word and by deed, we are watched and examined. There is likely no higher task any father will be called to do.

So, be a dad. Matter in your kids lives.

3Rivers Archery would like to encourage every dad on their journey, we know you’re committed to doing things well and we know you’re committed to your family.

Tales From the Rut: Spur of The Moment Bowhunting Success

By Patrick Kelly

This story has been republished with the permission of Patrick Kelly, who, at the time of writing this article, was preparing to go on a bear hunt.

I was planning on leaving for my bear hunt early Friday (June 12) morning, but I decided to leave Thursday (June 11) instead, so I could make a stop on the way. I cleared it with my hunting partner, and got off of work around 7:30 p.m. on the 11th, and headed home. After dosing a sick horse with some medicine, I decided to go grab a battery from a light by a feeder, so that I could charge it and put it out tomorrow morning before I left, so that, hopefully, it would last through my bear trip.

“No sense in not taking a bow,” I thought to myself. So, I grabbed my Silvertip recurve, and one arrow tipped with a 175 VPA 3-blade broadhead and a lit nock and began the 1/2 mile walk to the feeder.

I got there around 8:30 p.m. and, wouldn’t you know it, there was a hog under the feeder who spotted me and took off – with a raccoon hot on his heels.

“Oh well, nothing ventured, nothing gained,” I thought.

I decided to back off into a small cluster of trees around 90 yards from the feeder and see what happened in the short time until dark. I promised my wife that I would head home by 9:45 p.m. to eat the steak she was cooking.

A little before 9:30 p.m. came around, and I was just getting ready to head out, and I saw a hog sneak out of the drainage to my east and make it’s way to the feeder. I figured it to be around 100 pounds or so.

I was wearing very faded jeans that seemed to glow in the low light, so waited a few minutes for it to get a little darker to make my move. I slowly moved to the west to put the light (a slow glow light, which was already in position) between me and him, and then headed toward the feeder.

The stalk was a little complicated, because between me putting on some weight and my jeans having shrunk some, they actually were squeaking when I walked, and the wind was dead still. I was also wearing a pair of hard sole Wellingtons and the ground had dried out considerable in the last two weeks in which we haven’t had any rain. I actually covered the distances sidestepping as quietly as I could, while holding my pants to keep from squeaking, all the while bearing in mind that a light wind could swirl at any minute and bust me.

I quickly covered the distance, and as I approached the light, I could see the hog, which now looked more like 175 pounds, under the feeder, and a raccoon feeding between him and the light. The light is not even 10 yards from the feeder.

Just before I made it to the light, the raccoon heard my slight noise, which the hog didn’t hear with his corn munching, and stood on it’s hind legs. He couldn’t smell me, and the light was blinding him, but he knew something wasn’t right. He decided to head for the drainage, and I moved a couple steps closer to the light, now only around 8-10 yards from the hog.

I could see him bending at the knees to get under the feeder, and I could see his front leg clearly, but waited a few moments to see if I would get a better shot. He was facing to my right, and he decided to back up to my left and step just away from the feeder. When I saw his front leg clear the feeder, I quickly came to draw and release. The nock lit up, but the hog took off toward the west (my left), banging the arrow off of the feeder legs and breaking the nock. I heard him circle into the brush toward the south and it sounded like thrashing. I thought that he probably was dead, but I texted my wife to tell her I was on my way to get flashlight, and that I had shot a 150-175 pound hog.

I headed home, ate some steak, and went back out with my wife and the dog to make a quick track and get started. Poor blood on the dry ground, but the dog found the hog in a couple of minutes, and I was pleasantly surprised with my very quick glance that the hog would go 225 pounds. I marked the spot, drove my wife back to the house, headed in to town to pick up a couple bags of ice, then came back to start the field dressing. When I got a good look, I was very happy. I didn’t weigh him, but I am sure that he would go 275 pounds. What a chore it was getting him into the truck. I really had to be creative.

I double lunged him, and he went around 50 or 60 yards, but no more. The arrow stopped on the far side of the shield and broke off when he dropped. Dropping this hog off at the butcher for my mother-in-law, but I’m going to really be needing another freezer if my luck holds up on this bear hunt.

Back to Top