.jpg "Welcome to the 3Rivers Archer's Den")
Arrow Tips by Gold Tip: Arrow Assembly

Arrow Assembly
Broadhead Tuning
Paper Tuning
Bare Shaft Tuning
Arrow Assembly
Gold Tip arrows are not only the best performing arrows on the market; they are also the most user-friendly. With proper care and by adhering to the assembly instructions below you will find Gold Tip shafts quick and easy to assemble in any configuration you desire.
Arrow Cutting
Use only a high speed, abrasive wheel cutoff saw that is designed specifically for cutting arrow shafts. Use of any other method could result in damage to the shaft. It is recommended that your arrow shaft be cut at least one inch in front of the arrow rest at full draw. Arrows that are cut too short can be drawn past the arrow rest which could result in the arrow falling from the string, jamming, or otherwise causing damage to the arrow or the bow, and could even lead to personal injury. Never shoot an arrow that is less than one inch past the arrow rest at full draw.
Tip from the Pros: Try cutting arrow shafts on both ends to improve straightness. Straightness flaws in carbon arrows are typically found on the ends. Cutting both ends will often lead to better straightness and thus, better accuracy.
Installing Inserts
– Read Warning and First Aid instructions on Tip Grip bottle before use.
– Wear safety glasses.
– Do not handle inserts by gluing surfaces as doing so may lead to improper adhesion. Disposable gloves are recommended.
– Use only TIP GRIP adhesive to install inserts. Do not use hot melt glue on carbon arrows.
Step 1: Clean inside of shaft to a depth of 1 inch with clean water on a cotton swab to remove debris. Allow to dry.
Step 2: Apply TIP GRIP adhesive to insert using three generous lines evenly spread and length wise along the flats of the insert.
Step 3: Install insert into shaft and rotate slowly one full turn while doing so.
Step 4: With a clean cloth immediately wipe off any excess glue from the shaft and insert.
Step 5: Allow 24 hours for adhesive to cure before shooting. Shooting before adhesive has fully
Installing Nocks
Gold Tip GT Series and Accu-lite Nocks are designed to fit snuggly without the use of adhesive. Simply press the nock into the shaft and rotate to achieve correct vane orientation.
Gold Tip Pin Nocks and HD Pin Nocks are designed to fit snuggly over a pin nock bushing without the use of adhesive. After following the instructions for installing a Gold Tip pin nock bushing (see below), simply press the nock onto the pin and rotate to achieve correct vane orientation.
Gold Tip Pin Nock Bushings are used in conjunction with a pin nock or HD pin nock. The bushings can be glued in using Tip Grip adhesive or pressed in using plastic or Teflon tape.
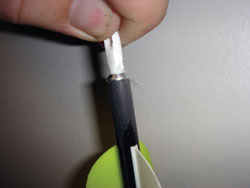
Tip from the Pros: Instead of using glue, press your pin nock bushing into the shaft through a piece of plastic grocery bag, or wrap the bushing with Teflon tape prior to pressing it in the shaft. This will allow the bushing to fit tightly without rotating and at the same time, it will allow you to replace the bushing in the event it becomes damaged. If the pin is damaged after being glued in it is very difficult and sometimes not even possible to remove the damaged pin without damaging the shaft. (see photos below)
| Nock Install
|
Glue Nock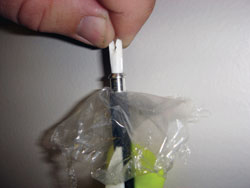 |
Glue Point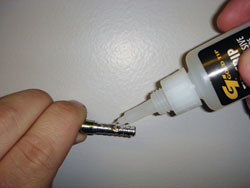 |
Are nock weights counted in the shaft length? I have gained a half inch on my shafts from nock bottom to end. 32.5 is now 33. You should see what that does to the spine calcs.
Arrow length is measured from the valley of the nock to the end of the shaft. So you wouldn’t count the entire length of the nock. Just the deepest part of the nock where it touches the bow string.
Your spine calculator doesn’t have Gold Tip Traditional XT’s on it. What shaft to use?
Use the Gold Tip Traditional. They only difference between the two is the XT have a tighter straightness tolerance.