.jpg "Welcome to the 3Rivers Archer's Den")
Tools for Making Self Bows
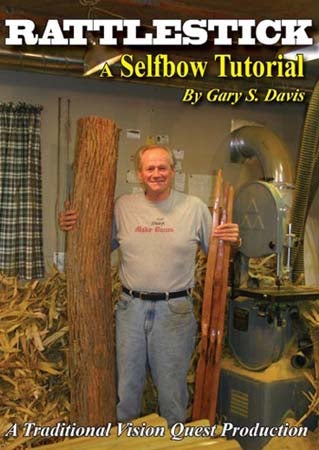
Handcrafting beautiful all-wood bows from staves split from tree trunks is an art. There was a time when we might have considered calling it a lost art. We remember reading an endorsement from the late Fred Bear when commenting to Glenn St. Charles about the bow building video Glenn had just produced. He said something to the effect that it was about time someone had documented the self-bow building process, and he was glad someone did it before the knowledge disappeared forever. That was nearly 20 years ago, and my how the times have changed! Now there are literally hundreds of thousands of people making their own bows from wood. The tide has turned and even many of those within the umbrella of “traditional archery” are coming full circle. They’re looking to find their roots, or at least the roots of the very bows and arrows they’ve come to love. They’re looking for a deeper connection to their sport, and with that connection comes an awareness of a simpler time. A time of carefully crafted “works of art,” bows and arrows that are so beautiful and so well made that they make you weak in the knees. It’s easy to understand why bowhunters are drawn to their past. It’s similar to the need to hunt… deep, primal, and natural.
There’s another group interested in this ancient and time honored art. Kids. We see youngsters, enthralled by movies like The Lord of the Rings, who decide they want to build their own bows and arrows. These kids normally start in on mom and dad to find them an archery shop they can check out. What an opportunity it is for mom or dad to encourage a great new hobby… something that takes effort, study, commitment, and responsibility. In other words, a perfect project to use as a growth experience for kids or grand kids. You may even want to consider it for your own youngsters.
If you’re going to build self-bows, you’re going to need tools. Yes the American Indians made them with nothing but stone tools. But be honest with yourself… how much time do you have? (Answer: Typically not the time it would take to use all stone tools!)
We’re going to discuss some of the more popular modern tools for making self-bows. (Self-bows are bows entirely made from one piece of wood.) It’s easy to get started building your own bows from wood but the many tools available may be a bit confusing for a newcomer to the craft. For that reason, we intend to describe the more popular tools for bow building to enlighten you on the benefits of each.
Once someone gets the passion for bow building, the tools used in the process become more than just tools. They represent bows yet to be made. A bowyer looks at a drawknife at a flea market, picks it up, and searches for signs of its past. He’s already drifted back in time to the workshop or farm where the tool was used. He’ll study the back edge to see if previous owners used it to split wood by pounding on the back with a hammer. He’ll look for chips in the cutting edge, and then, if it passes this inspection, you’ll see him staring off in the distance. This isn’t just a blank stare, no; they’re building their next bow with that drawknife. They probably already have the exact stave picked out they intend to work next. That’s when the decision to buy the tool is made… Bow making tools seem to almost have a life of their own, and bowyers value them highly.
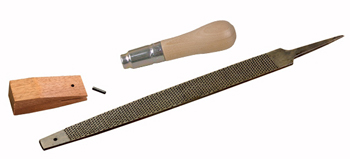
For those looking to get started sooner, check out the Bowyers Bow Building Tool Kit. 3Rivers staff has put together this bow building kit for novice bowyers who do not know where to start. Great tools to get your feet wet, while not spending a lot to do it. It is a great starting point, and is highly encouraged that as you build more bows you expand to find the right tools for you.
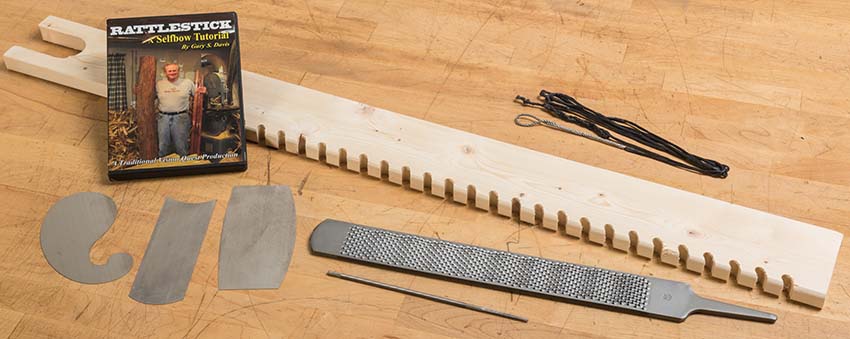
Great starter bow building kit for those needing a place to start on their first bow.
We’ll start with the most aggressive of the tools and proceed through our list. First on the list is the draw knife we’ve already mentioned. Called a drawknife because it’s designed to cut by drawing it toward you. The blade has only one bevel and as such, allows you to select bevel up, for more aggressive cutting, or bevel down for more controlled cutting. The drawknife is an indispensable tool. Few ever attempt to make an all wood bow without one, yet it’s really best used for the rough shaping of your bow and not for the more delicate work of final shaping and tillering. Many modern day bowyers are using antique drawknives they’ve picked up at garage sales and flea markets. Many of these old tools have plenty of life left in them and will do a great job. These older versions are shaped to facilitate the quick removal of wood from a bow stave. For bow building, we offer a unique French drawknife with round palm-filling handles rather than the elongated handles found on the antique varieties. It’s a smaller drawknife designed for more detailed work than the antique versions, it’s very well designed and lends itself perfectly to bow building They’re readily available and it’s easy to keep a supply on hand at all times.
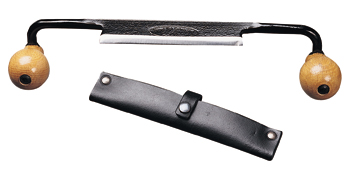
The Drawknife is typically used for the rough shaping of the bow rather than detail work.
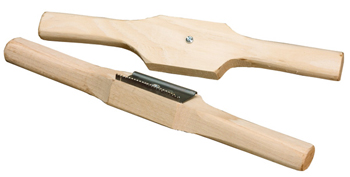
The short draw knife is a little gem that’s often overlooked, but is actually quite handy for all kinds of carving. The handles are in-line with the tool and offer you complete control of your depth and direction of cut. They can be particularly effective when working a stubborn spot in a bow belly that has grain running in opposite directions. Since the blade is beveled equally from both sides, it can be used in any orientation to your working surface. The short draw knife is a very handy tool to have in your workshop.
![]()
The Short Drawknife is effective for working out stubborn spots where the grain runs in opposite directions
Spoke shaves, as the name implies, were originally designed for shaping spokes for wagon wheels. They certainly have their place in the bow builder’s tool chest. When adjusted properly, they are capable of removing beautiful thin shavings in a very controlled manner. The design allows two-handed operation, which results in total control helps to eliminate fatigue. Spoke shaves are excellent shaping tools and are especially useful when the drawknife is too aggressive and it’s still too early in the shaping stage to switch to the cabinet scrapers. Can you get by without a spoke shave? Yes you can. Would you want to? We don’t think so. It’s a small investment for a tool that will last several lifetimes. We recommend the cast bodied Stanley flat based model for bow building
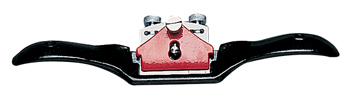
Originally designed for shaping wagon wheel spokes, the Spoke Shave is an excellent bow shaping tool.
Cabinet Scrapers are the ultimate bow building tools. If you’ve never used a metal cabinet scraper with a nice burr rolled on it, you’ve missed one of the true joys of wood working. Unfortunately, not everyone who acquires one of these tools knows about rolling the burr on them. If you’ve ever tried one without the burr, you were probably tempted to toss it in the trash can. Without a burr, trying to work wood with it is like trying to fillet a fish with a butter knife… it just doesn’t work. HOWEVER, once a good burr is rolled on these handy tools, we guarantee you’ll wonder how you ever got along without them. They’ll peel off the prettiest paper-thin curls of wood you’ve ever seen. Trees grow in wild shapes sometimes the grain may swirl, curl, and even change direction. For that reason scrapers come in several shapes, straight, curved, and gooseneck are the most common. Be sure to check out our 3-piece wood scraper set.
Considered by many to be the ultimate bow building tools, Cabinet Scrapers come in many shapes, including straight and curved
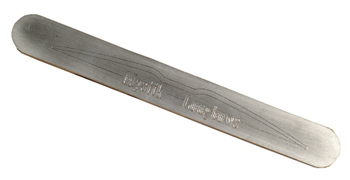
You can’t discuss cabinet scrapers without mentioning the burnishing tool. Each tool is useless without the other. A good burnishing tool is the secret to good scraper results. What you need is a hardened steel burnisher tempered harder than the scraper so it can force the metal of the scraper edge into the proper hook-shape. “OK, but how do I do that?” You might be asking.
Burnishing a scraper is a straightforward process that once learned will take the mystery out of cabinet scraper usefulness forever. Think of your scraper as a rectangle of hardened steel about 1/32″-1/6″ of an inch thick. We’re going to dress-up the outer edges of the scraper first. First you must square up those edges. With a smooth file remove any burrs from the outer edge of the scraper. We’re striving for an edge with ninety-degree edges. Once you’ve removed all previous burrs with your file, polish all three surfaces of the edge with a medium to fine grit sharpening stone. When your edges are clean and smooth at ninety degrees, it’s time for the actual burnishing. Place the scraper in a padded vice with approximately one inch of the blade sticking up out of the vice and running parallel to the floor. Take your burnishing tool and with one hand on either side of the tool, push down on the top surface of the scraper as you push from back to front on that surface. Repeat many times, (10-20) each time bearing down on the scraper with the burnishing tool with a lot of force. Twist your wrists and visualize that you’re changing the shape of the nice ninety-degree square edges to a rounded mushroom-like shape. The bottom edges of this mushroom shape are actually sharp hook-edges of steel that, if shaped correctly, will perform like a tiny plane blade. They’ll peel fine delicate shavings of wood from your bow as you work it. Once you get your cabinet scraper properly “burred” it is a joy to use and it’ll become your “go-to” tool for working down the belly during the tillering process.
The Burnishing Tool is an indispensable tool used in conjunction with the Cabinet Scraper.
A relative newcomer to the world of bow building is the Smooth Scraper. The idea here being that with your scraping blade mounted to a two-handed handle, you gain a lot of leverage and control. The hardened steel blade lasts and lasts while you scrape bow after bow, but this is not a tool for hogging a bunch of material off with a lot of pressure. It’s more of a shaping tool. Its design will let you know if you’re getting too aggressive with it. It’s definitely another tool that once you use it, you won’t want to be without it.
The Smooth Scraper’s design offers a lot of leverage and control.
Another tool from the scraper family is the Mystic Scraper from Bernie Swank of Mystik Longbows. This tool comes ready to work. No burnishing required, its thick design utilizes more sharp corners than the more delicate burr-hook found on normal cabinet scrapers. That makes this a popular tool with self-bow builders everywhere.
The Mystic Scraper from Mystik Longbows requires no burnishing.
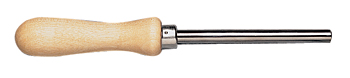
Remember, you have to install your string grooves on the ends of both limbs, so the nock file is a necessity. There’s no better way to shape the string grooves than with a thin but fairly long round file. There’s no need to be any thicker than the string you’ll be using, so thin is good. Long is good too because the longer your file is, the faster the job will be for you. There are nock file handles available for them as well that help keep the file under your control and allows extra leverage. Even if you’re only looking to build a few bows, this is one tool you can’t afford NOT to have.
![]()
The Nock File is used to shape string grooves on the bow.
If you plan on using bamboo to back a self bow you’ll need to look into a toothing scraper. The Toothing Scraper produces grooves on both of your gluing surfaces to allow the adhesive to expand and hold better due to the increased surface area. This tool is must have for the bow builder who wants to make bamboo-backed bows.
The Toothing Scraper is a must if you plan to make a bamboo-backed bow.
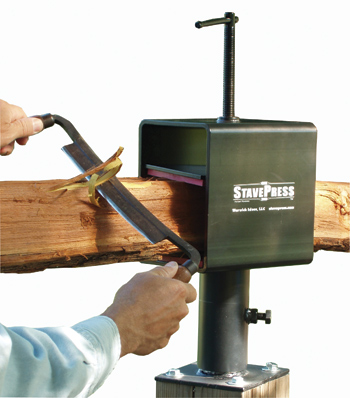
An article on tools for building self-bows wouldn’t be complete without mentioning the Bow Horse. Modeled after the old “Coopers Bench” used by wheelwrights long ago when working on spokes for wagon wheels, the Shaving Horse lends itself perfectly to self bow building. With a little leg-pressure, the vice will hold your stave in place while you shape it with your tools. The shaving horse is quick, handy, and somewhat expensive, but certainly worth consideration. For those how are tight on space and budget, the StavePress Bow Vise holds wood firmly and gently, preserving the integrity of the wood grain as you work your stave. The StavePress will conform to the shape of your work piece, hold it firmly, and will not crush the wood fibers. While working with a rasp, drawknife, or other tools, you can now bear down as hard as you need to and the StavePress holds tight.
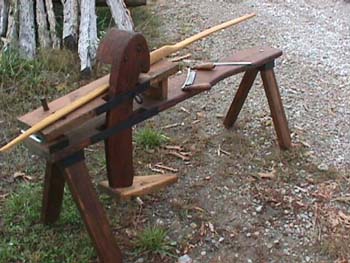
The Shaving Horse is modeled after the old Coopers Benches used by wheelwrights generations ago.
The StavePress was designed to firmly hold irregularly shaped wood such as rough staves, or hand-carved furniture pieces without harming them.
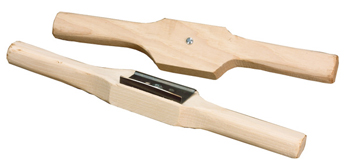
Many people use aggressive rasps to hog-off material. The Farrier’s Rasp Combo File fits that niche wonderfully. Designed offers an aggressive rasp on one side for removing material fast. Flip it over and you’ve got a course file for more controlled stock removal. Serious bowmakers will appreciate Dean Torges Bowmaking Rasp UBR10. This universal rasp is for shaping bows efficiently and accurately with total control due to dual handle design. Each cutting tooth is individually hand-raised with a mallet and chisel on a carbon steel blank, positioned in a quick cutting and non-clogging pattern to speed your work.
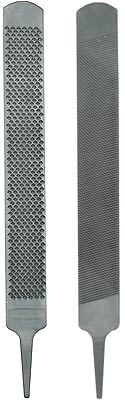
Farrier’s Rasp (above left) is larger in size to get work done faster, while Dean Torge’s Rasp (above right) is slimmer and dual handled for more controlled stock removal of wood from your bow stave.
Bow adhesives can be tricky, so we recommend keeping it simple. We suggest two types, Smooth-On EA-40 Epoxy, and Unibond. If you’re looking for only one adhesive, make it the Smooth-On EA-40 epoxy. It’s used almost exclusively on all fiberglass-to-wood style bows built in the United States. The bow laminations don’t have to be grooved, and bow failure is nearly unheard of. (Unless the bowyer doesn’t get enough glue in a joint, or uses too much pressure in his clamping system and forces too much of the glue out of the joint.) For you old timers, Unibond replaced Urac-185 for wood-to-wood applications and is superior to nearly any other glue in bow building applications. Some would argue that it’s even superior to Smooth-On EA-40 for wood-to-wood joints. Unibond expands as it cures so the surfaces you intend to bond must be scored. Unibond is not an epoxy. It can be used with or without the hardener. It sets up faster when you use the hardener and will do a better job of filling any voids in your joint. The bottom line is, if you want to carry only one adhesive, make it the Smooth-On EA-40 epoxy. If you’re open to the idea of a second adhesive, you can’t go wrong with Unibond. It’s very popular with the old-style bow building crowd.
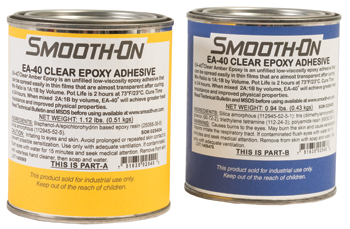
Smooth-On EA-40 Epoxy is a great bow adhesive.
With the proper mix of the tools mentioned above, you could start making your own bows. Some are more specialized than others, and some are indispensable. We hope we’ve shed some light on a somewhat confusing topic, and that you’re now comfortable in selecting the tools you’ll need to start your self-bow adventure!
Keep Hunting
Dale Karch & Todd Smith
For more information contact:
3Rivers Archery
PO Box 517
Ashley IN 46705
(260) 587-9501
[email protected]
or check us out on-line at 3RiversArchery.com
By: Dale Karch and Todd Smith