Welcome to the Archer's Den. Here you will find a gathering of traditional archery stories, tips and techniques, trophy animals taken with traditional bows, and plenty more. Stay a while and learn something. We hope you enjoy and even submit a trophy of your own, or leave a comment on a post.
3Rivers Archery is proud to announce the promotion of Dave Echterling, longtime 3Rivers Archery Technical Expert, to his new position on our management team as our Customer Relations and Sales Manager.
“I’m very excited to fill this role,” Dave says. “We have a really good team in place.”
Background in Archery
Dave has been shooting a bow and arrow since childhood. He first started with a compound bow, but shifted to a longbow about a decade ago when the compound became too easy.
About Dave
Employed at 3Rivers Archery since 2009
Veteran of the United States Marine Corps, where he was a gunner on a Light Armored Vehicle
Honorably discharged at the rank of sergeant on Oct. 22, 2005
Two deployments to Iraq, one in 2003 and one in 2004
Married with two children
Outside of traditional archery, he enjoys shooting firearms, camping, and doing anything that involves the outdoors
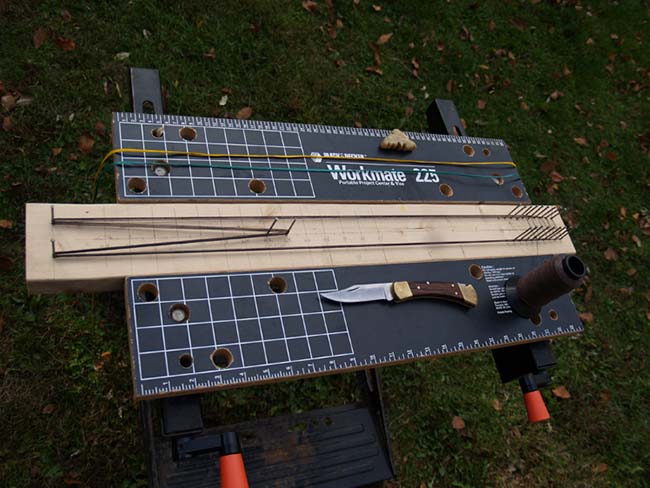
Learning to serve your own bow string is a simple and valuable skill to learn. Really, it’s as easy as learning how to start the serving, how to tie the serving off at the end, and acquiring a feel for maintaining good tension in between. Of course, we need to select the appropriate material for the particular application.
As far as traditional bow strings, there are two main string serving applications to be concerned with – center serving and endloop serving (for an endless loop bow string). Center serving is a great place to start learning. It’s the most likely serving to need replacing during the life of the string. Plus, both Flemish twist and endless loop bow strings have center servings. Only an endless loop bow string will require endloop servings.
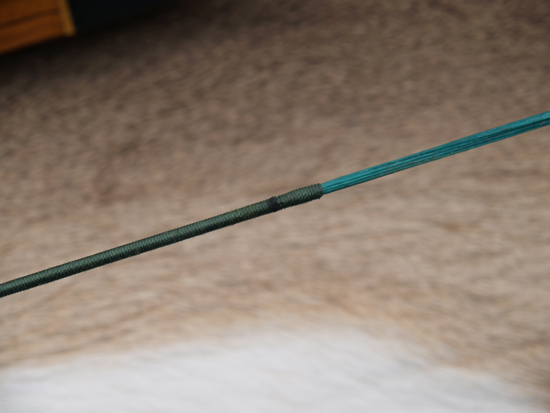
The center serving stratifies two main purposes. Number 1 – it protects the bow string from direct contact with clothing, fingers, nocks, etc. and #2 – it creates the appropriate diameter and release material to accept the arrow nock. Most modern serving material for traditional bow strings measures .018”-.022” in diameter. The three typical materials are polyester, spectra, and nylon.
Selecting the Material
I love Brownell #4 Nylon – .018” serving material. I make a LOT of B-50 bow strings. I use #4 serving material on all the endless loop end servings and on all center servings for my 14-strand strings accepting classic glue-on nocks. If I were serving a 12-strand string for classic nocks – I’d probably select the slightly fatter .021” Halo serving material for a better nock fit. Halo is also a good choice when working with some of the skinnier low stretch materials as well, as it grips tight.
Starting the Serving
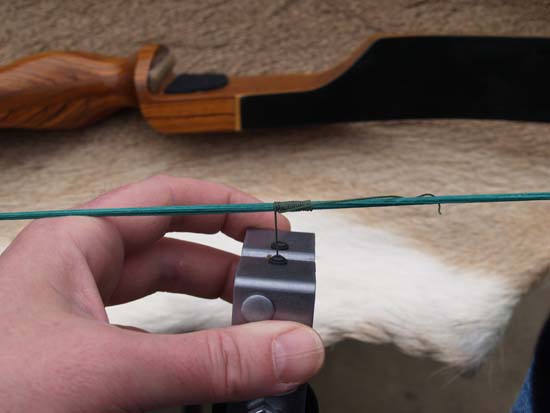
There’s more than one way to start a string serving.
The objective is to catch the first loop of string so that it holds as we add successive wraps over the tag end and begin moving our serving along.
One experienced string builder I know starts with a simple overhand knot. Another standard method is to simply lay 2” of serving on the bow string and just start serving over the tag. My favorite method is to split the string in half, and pass 2” of tag end through the strings and start serving over the tag end. It’s best to set those first few revolutions by hand before letting the serving tool snug up to the string to take over and speed the process.
For my first hundred or so Endless loop bow strings I built, I used an inexpensive Bohning plastic string server and it has done its job well. More recently I’ve obtained a metal AAE string serving jig. I notice marked improvements in the tensioning system, weight, and slightly shorter height of this jig.
Center servings are typically 7-10” in length – according to preference. The idea is to start about 2-3” above where the arrow is nocked, and end somewhere near the bottom of the grip. You want enough coverage above and below the nock point where you contact with your fingers or arm.
Spinning the Jig
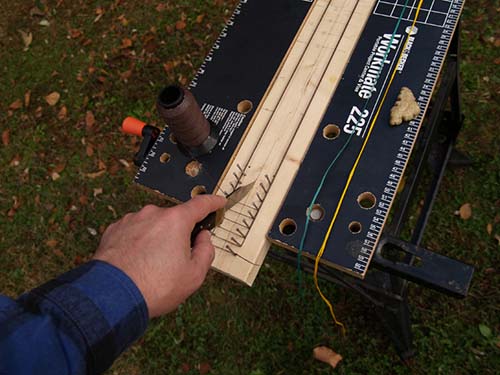
With a bow laid out in front of you, and the top limb to the right, begin the serving approximately 2-3” above the nocking point on string. Lay down 8-10 wraps over the tag end of the string (I do these all by hand). At this point, move the remainder of tag end out of the way and continue wraps with the string jig until a good length of center serving has been laid down.
Tying off the Serving
There are various techniques for tying off the serving, but the two most common are back-serve and needle pull through. I use back-serve to tie off all of my endloop and center servings. Back-serve is a difficult technique to explain without showing (watch our YouTube video below for a visual). But once you’ve tried it and understand it, it’s magic – it becomes immediately understandable and…easy.
Learning the techniques to build and serve my own endless loop Dacron bow strings has given me great freedom. Suddenly, it meant used bows became cheaper. You can get a great price on a vintage bow with no string – or a damaged string and build your own in a half hour. Bow string and serving materials are cheap. I found Anthony Carrara’s book, Shooting the Stickbow, to be a valuable learning resource and reference guide for this.
Method A: Back-serve
Stop serving approximately 1” before reaching the point where you would like the center serving to end.
Hold the last loop tight at the string with right hand and pull out 10” of serving to make a large loop. Place serving jig 4-5” down the string and continue serving 12 more revolutions, but this time wrap from left to right with successive revolutions coming toward the completed section. The jig will be passing through the large loop of 10” of serving string we made. After we have these dozen revolutions on the string, and holding everything in place with left hand, pull another 10” out from the jig and place the jig to the right of your work with the exposed length of serving laying along the string. Then grab the large loop and start wrapping it around the string away from you as we have been doing with the jig. Each wrap will remove one of the dozen revolutions from the left of the loop and place it in line against the center serving. Once you have back served all 12 revolutions to the end of the center serving, quickly pull the jig tight to pull the slack from the loop through which secures the work.
Method B: Needle Pull-through
An alternate method is to stop serving at the same point. Hold work tight with right hand. Take an 8” piece of serving material and fold it in half. Lay this halved piece of string along the area where we need to finish the end serving, with the folded end of the string oriented to the left (direction of the already placed serving) and the tag ends to the right. Complete the final 12 revolutions over this folded length of string. Cut the serving material free of the jig, leaving a few inches of material after the last wrap. Take the end of the last center serving loop and pass it through the small loop produced by the folded end of the ‘needle’ string, which is now peaking out of the end of the center serving.
In either case, pull that tag end snug, which will snug up those last twelve loops. Snip excess string leaving 1/8” exposed. Using a heat source like a cigarette lighter, quickly light the exposed end and smash flat against the serving. This creates a swollen dot which helps to lock the end.
The tools and materials are inexpensive, and you have just added a precious new skill to your archer’s toolbox – every bit as simple and important to know as fletching an arrow.
Flemish twist bow strings have been made from hemp, flax, or linen likely for centuries, and were widely used until the recurve production boom in the 1960s and 70s when machine-made endless loop bow strings became popular for production bows. Modern bow string materials came along after the second Word War, and today we have many varieties of low-stretch materials. Flemish twist strings are enjoying a resurgence today, both with the many custom longbows and recurve bows, and the surging popularity of the great glass laminated recurves of the 50s, 60s and 70s.
There is much debate regarding the merits of modern bow strings of Flemish twist design vs. endless loop design. While there are no absolutes – and a bow’s design, as well as an archer’s form, are additional variables which may skew the data – generally it is accepted that a Flemish twist bow string has a greater effect on brace height when twisted in one direction or the other. Other arguments still open to debate are that an endless loop string may be a hair faster or that a Flemish twist string is somewhat quieter.
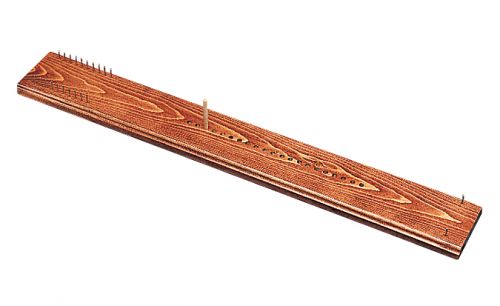
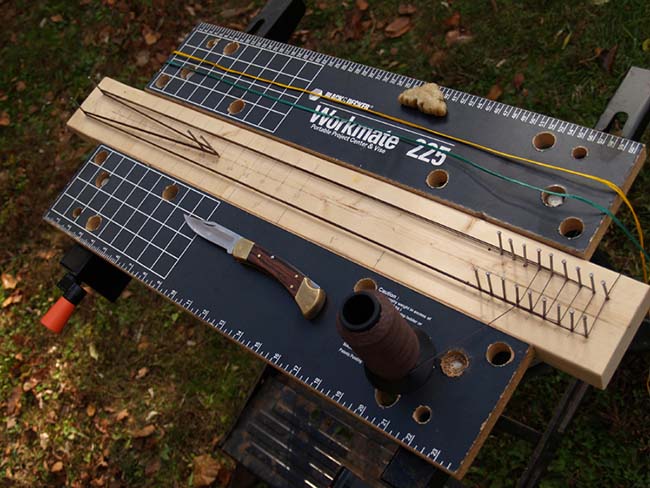
Building your own Flemish twist bow string is not difficult, and while it is possible to build strings without any specialized tools – there are some tools that will make the task quicker and easier. Of course we need bow string material, serving material, and a sharp knife. A Flemish string jig is a useful tool to help quickly and accurately measure off the staggered length strands required in the string bundles and highly recommended for the beginner. String wax, appropriate to the string material selected, will be needed. Needle nose pliers and a lighter will come in handy to neatly finish off the center serving. Optionally, a string stretcher can be used to pre-stretch the finished string, which will need to otherwise be “shot in.”
Buy a Flemish String Jig to get started today
First thing to do is establish some specs – string length, strand count, and number of bundles or plies. If an old string is available that gave the bow a proper brace height, measure for string length. Hang the old string by a nail and pull taught. Measure with a tape measure from the outside end of one loop to the outside end of the other. This is our string length. If no string is available, we likely have some investigative work to do. AMO is an industry standard for defining bow lengths. Many bows have their AMO length written, or printed, on the lower limb. If AMO length is not known, we can arrive at the measurement of the unstrung bow by measuring from nock groove to nock groove along the back of the bow (side that faces away from the shooter) following any curves. As a general rule subtract 4” from the bow length for recurves, and 3” for longbows, to arrive at the preferred string length. This works most of the time, although I have seen an occasional longbow which wanted only 2” shorter than its’ AMO length and some recurves which needed 5” shorter. Contact the bowyer if you can for recommended brace height and string lengths.
Next, we need to consider strand and bundle count. Flemish twist strings are typically made of 2 or 3 bundles depending on the desired strand count. An appropriate number of strands should be used to accommodate a given bow’s draw weight, and failing to use enough strands could void a bow’s warranty and/or result in a potentially dangerous failure. There may also be times when we wish to add an extra strand or two for a tighter fit on a particular arrow nock. For example a 14 strand 2-bundle bow string with a .018″ serving may fit a GT nock well, while a 3-bundle 15 strand string with .021″ #4 serving would give a better fit for a glue-on classic nock. 14 strands of B-50 is plenty strong enough for a 45# traditional bow.
3Rivers Tip: Many people recommend using 15-18 strands of Fast Flight string material in a bow string, or 12-15 strands of B-50 string material for most common weight bows.
Brownell’s Dacron B-50 string material should be used for vintage recurves and longbows. Modern stickbows typically have reinforced bow tips making them safe to use modern low stretch bow string materials. There are some who will say you can use low stretch on any bow, and others who will use nothing other than Dacron – even on their modern bows with reinforced tips. It’s my suggestion that if you cannot confirm with the bowyer or manufacturer, use Dacron B-50 to be safe. For our demonstration purposes here, I am using B-50.
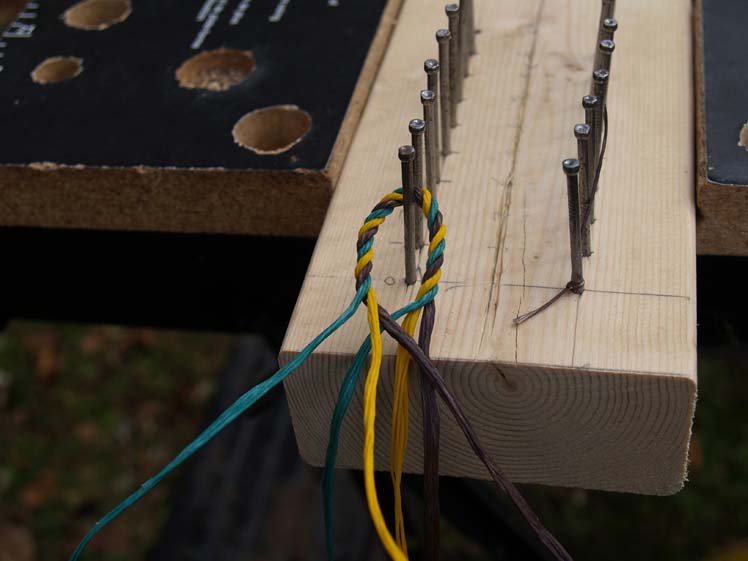
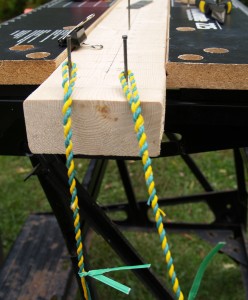
The bundles of a Flemish twist bow string are made up of groups of strands which are successively shorter by half inch increments at each end. This is what gives the string its elegant taper of loop into main body as the ends of the bundles get woven back in. By running our strands around a Flemish string jig, the taper gets figured for us. Wrap the string continuously around all the jigs pegs for a given length string – 5X for a 5-strand bundle, 7X for a 7-strand bundle, etc. When we cut the strand from the jig we end up with multiple staggered length strings. Run a cake of string maker’s wax over the last foot and a half of each end of the bundle and smooth them together, assuring also that no kinks exist throughout the middle of the bundle’s length. Make 2 or 3 bundles depending on the required strand count. Make each bundle a different color.
It’s time to form the first loop. Line up the ends of the bundles and measure 7-8” in from the end and clamp the string securely. I use a large binder clamp. You can go 7” if needing a smaller loop, 8” for a larger loop. Getting the loop size just right is a feel thing that will come with some experience.
3Rivers Tip: When building for a recurve bow the upper loop is larger to compensate for the wider limbs, so be sure to add approximately one inch more for this.
Next, we mount the clamp to something stationary so that the tag ends are facing us. Twist the individual bundle tag ends tight up to the clamp in a clockwise direction to the right, and then begin braiding bundles together by pulling on the right twisted bundle and crossing it over the other bundle(s) to the left – keeping good tension on the entire workings. Each time you grab a new bundle in your right hand, pull and twist it tight to the right before crossing it over to the left of the previous bundle. After two or more inches of braid, bend the braided area over to the body and check loop size.
When an appropriately sized loop has been reached pinch the sections together at their intersection at the bottom of the loop and carefully remove clamp. Place our unsecured loop on a hook or peg to start the process of joining the loop tags to the string body. Align same colored bundles from tag ends with same colored bundles in the body and smooth together. Before proceeding to splice the two together, it is a good idea to add about seven revolutions of back-twist to our newly joined body bundles and loop tags. This will help as we proceed twisting clockwise into the body. Give each joined tag and bundle at least seven counterclockwise twists to the left. For each twist, place your hand further down the string until the seventh twist occurs near the very end of the first loop’s tag end. Now pinch each bundle up tight against the newly formed loop intersection. Try to keep bundles at far end of string from tangling as we work this first loop.
Follow the same process that was used to form the first part of the loop. Pull right furthermost bundle taught and twist the uppermost part tight against the loop intersection point. Cross it left over the other bundles and repeat. Continue this process until all tag ends have been blended into the main string body and then add one more series of pull, twist right, cross over for all bundles and stop. Secure this stopping point with a twist tie to keep the work from coming apart as we proceed to the next step.
Leave the string on the hook/peg and stand back with the opposite ends of the bundles in you hands. It’s imperative here that we check that all bundles are of equal length at the other end of the string before proceeding. If they are — great. If not, a small adjustment to one of the bundles may be made by giving a couple of clockwise twists to the right to shorten by a small increment. If the lengths differ greatly, then something went wrong. Keeping the equal length bundles pulled out somewhat taught, add about 20-25 clockwise twists to the right to each bundle.
Next, measure from these tag ends so that we may repeat the steps above to form the second loop. Do everything as before and in the same direction. Clamp the string bundles 7-8” from the end and secure the clamp with the tag ends facing you. Twist each bundle up tight against clamp and begin… pull, twist to right, cross over to left. Follow all of the steps again to form the second loop same as the first and secure with a twist tie. Take the newly formed string, with twist ties in place, and pull it tight between your thumbs. Examine the string that all bundles have an equal amount of pressure on them throughout the string body. If any one of he bundles sags, the string will be no good. All bundles should be doing an equal amount of work. If it looks okay, place one loop on the hook again, pull tight and add another 20 or so twists to the entire finished string and remove the twist ties.
The finished bow string should be either put on the bow to stretch and settle in for a couple days, or pre-stretched using a string stretcher. While the string is in this settling in phase, it’s a good time to apply some additional bow string wax and burnish the string with a piece of leather until the body becomes nice and rounded. After some initial stretching, a center serving can be wrapped onto the string, while the string is on the bow. Consider arrow nock fit when selecting serving material. It is recommended to start the serving three inches above where the arrow nock sits on the string, and continue down seven inches to give protection from clothing, armguard, etc.
Apply some temporary nock points with string or tape. A good starting point is 5/8” above the point level with the shelf (recommend using a t-square). Once a good nocking point location is established, install either brass, or tied-on, nock points. I prefer tied-on using a serving thread of a diameter slightly greater than the center serving and tied with a nail knot. If your arrow nock’s fit is loose enough to let nock slide up and down on the string, a second nocking point should be added below the arrow.
Proceed to tuning with appropriate arrows and heads, fine-tuning by adjusting brace height up and down by twisting the string. Do not untwist a Flemish string too far or the string can come apart. One full twist per inch of string is a good place to be. When arrows are flying well, decide if string silencers should be used. There are fur silencers that can be inserted between the string bundles and wrapped around the string with the other end also inserted through the bundles. Cat whiskers or wool puff silencers can be tied onto the string using a double constrictor knot of B-50 string material. Place the silencers 1/4 of the way down from where the string contacts the upper limb, and place the other silencer 1/3 of the way up from where the string contacts the lower limb. Adjust as necessary.
Shoot the new bow string in, readjust tune, record that optimal brace height and nocking point location and then build a back-up string! See – there’s nothing to it…
Love traditional archery? Just getting started? Thinking about picking up a quality used recurve bow? Here are a couple of archery videos that will make you love the sport even more.
I waited many years before going after my first black bear. I started applying for preference points in Wisconsin when I still lived in the state, but kept applying for years after I moved to Indiana. I believe I had nine (or 10, hard to remember) preference points, only getting one per year, by the time I applied for a license, so as you can imagine, this was a big hunting opportunity to me.
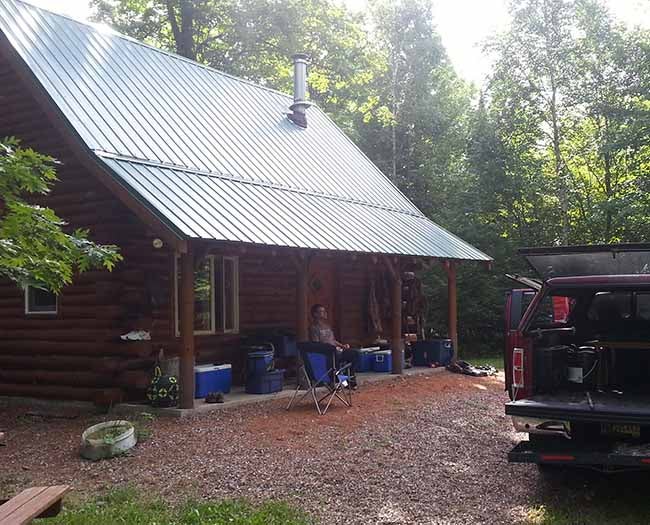
The cabin where we stayed.
So where to start? I had been out of state for many years at this point so finding a place to hunt was a big priority; and a very daunting task. Fortunately, one of the best things about bowhunters, is you create great friendships and connections. My family has always been big supporters of the Wisconsin Traditional Archers (WTA), and active volunteers when we lived in Wisconsin. Reaching out to members of WTA connected me with a fellow trad archer that had a plot of land with a cabin and ability to run a bait line regularly. A pretty ‘dream’ set-up, which came from being in the traditional archery community. So, I highly encourage fellow archers to go to shoots, join their local, state level, and national archery organizations. The people you meet can be lifelong friends, and a great resource for enjoying our common interest of traditional archery.
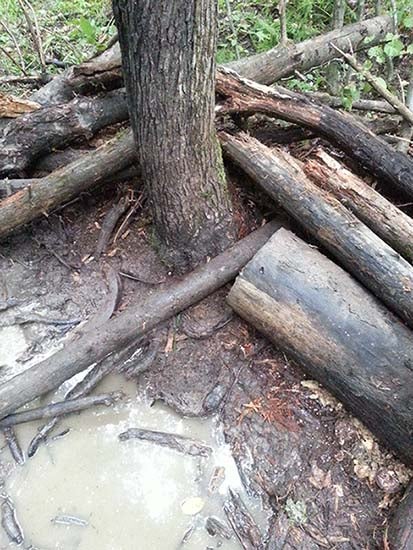
Bait site. Notice all of the standing water – it rained a lot.
For my hunt, we were able to bait two sites on a regular schedule with increased frequency towards the start of the hunt. On the hunt, my dad came with me to film and my uncle, who lived in Wisconsin, came for good comradery. My dad would be in a second tree stand on the bait sites with his camera, and my uncle managed the cabin and food prep, so we could spend more time hunting. It was a great system, and having an opportunity to hunt with family is always a blessing, one which I hope I can do with my kids and nieces in the future.
For my hunting set up I used a 50 pound 64″ DAS Dalaa recurve bow with a Traditional Only carbon arrow tipped with a Woodsman Original Series broadhead. I’ve used this set up for many hunts and loved the level of accuracy I could achieve with my DAS bow and Traditional Only arrow, and the Woodsman head offers great penetration and very deadly being a 3-blade. I add weight tubes to my arrows for an overall weight of 640 grains. A bit extreme, as I normally go for 10 grains per pound of bow, but even with the added weight my comfortable range for a shot is 20-25 yards. Being thicker brush woods of northern Wisconsin left our shooting options to less than 15 yards, which I prefer getting close when bowhunting. Our tree stands were classic hang-on tree stands and were no more than 25 feet in the air, with roughly 10 yards to bait sites. So, a great set-up for a traditional bowhunter (this is the great thing about having a fellow trad archer baiting for you, they know what you like).
Bait site
For black bear hunting you normally only sit for evening hunts, as larger bears stay out of sight until the safety of darkness, but the drive for a free meal before other bears clean house forces them to come earlier and earlier. Our first night we sat the afternoon and within the first hour of being on stand an average sized bear came to the bait. Now I have read many places and been told many times that you will always miss judge the size of your first bear. That they suffer from ‘ground shrinkage’ once you have one on the ground. I did as much reading as I could prior to the hunt on how to judge a bear. Watching for how their ears are on their head, more to the side, the bigger the bear. Having a shorter snout, and lower hanging bellies are good signs of a mature bear also. With our first bear the biggest thing I noticed is how he was always looking around; checking for other bears. I took this as a good sign of bear activity. The other thing that kept me from letting loose an arrow was he was ‘gentle’ with the bait site. You see, you lay logs over the bait to cover it up, so the smell draws in bears and smaller animals, but they have to be big enough to move the logs to get to the goods. This bear looked like he was ‘stealing from the cookie jar.’ He didn’t throw any logs or even slide them around. Our bait hit reports from our land owner showed the logs would be scattered and the bait completely cleaned out. So, with the constant looking around and nimble paws of this very nice bear (that would of made any first-time black bear hunter very happy), I decided to let him pass. Other than seeing him come back to the bait an hour or so later, and a big sow with her cub (off limits both legally and ethically), I went the next four days without seeing another bear. We moved to hunting both mornings and afternoons as the baits were cleaned out by the afternoon. One bear hunting tip, bring a small bag of bait with you to the stand, so at least some bait is their while you are hunting. The four days without seeing activity is part of hunting. Enjoying being in the woods and a comfortable seat are my ways for passing the lull times. For those needing a bit more, try a weather radio. You can pick up talk radio stations, which are not as ‘noisy’ as music stations.
On our second to last hunting day is when my bear came in. It was the afternoon and beautiful weather. The first thing I remember about my bear is how quiet he was on his feet. I didn’t hear him till he was in the shooting lane, and only saw a brief bit of black fur about five yards before that. Let me note he walked in right where I had been starring for the past five minutes. The brush is that thick where I was hunting. It really gets the adrenaline pumping when the action comes on that fast.
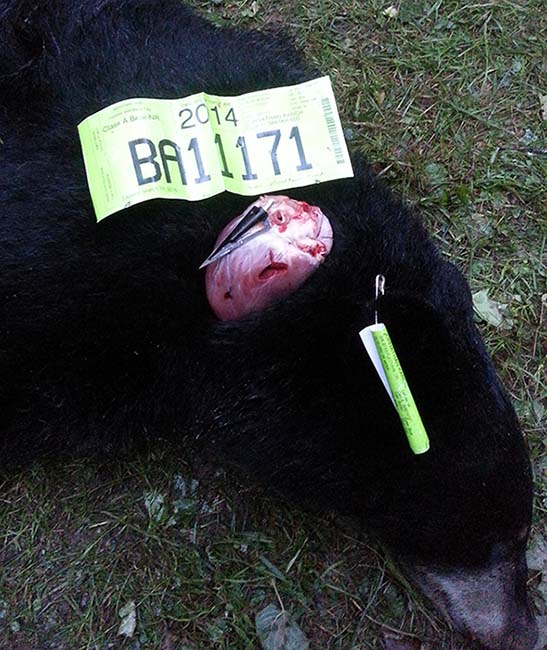
My black bear
I judge my black bear the best I could. Knowing he wasn’t as big as the first bear I saw, but knowing he wasn’t a wandering cub. After the past days of seeing zero bears I wasn’t going to let pass this legal bear. I do love backstraps on the grill, and cannot remember the last time I had eaten bear. The bear walked in quietly to the bait and started to ‘steal from the cookie jar.’ When he went for a second paw full I was already in the shot routine. As calm and instinctive as I could be I hit my anchor, burned a hole where I wanted to place my arrow, and released. The bear spun out of the bait, ran 20 yards in a semi-circle, and dropped. He let out three quiet death moans then nothing. The whole experience from entering sight to death was less than three minutes.
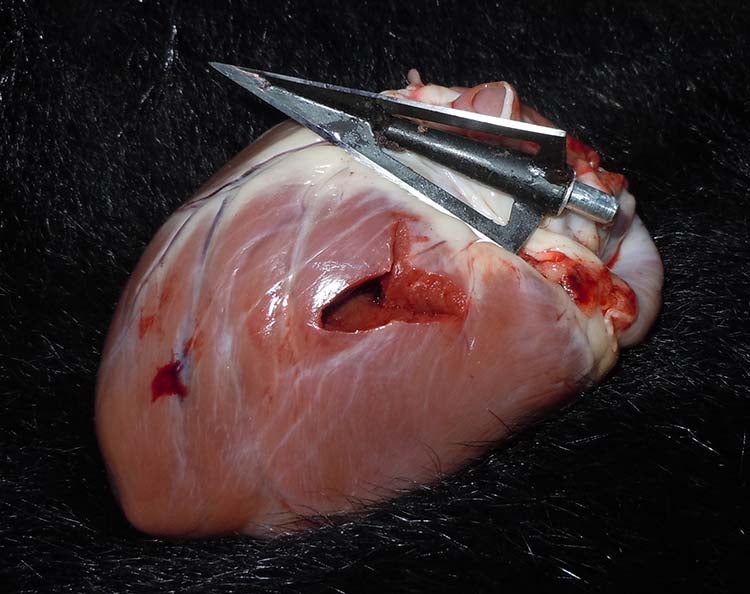
The Woodsman did its job, and then some.
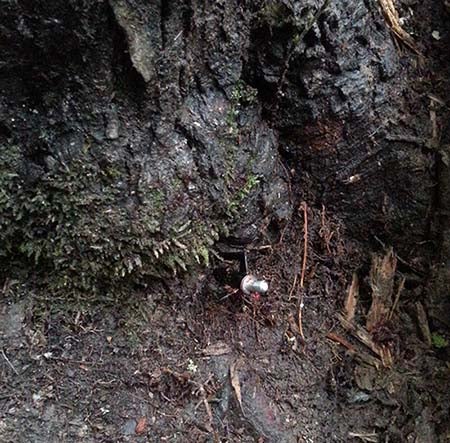
Upon field dressing I discovered I had shot perfectly through the heart and my Woodsman passed thru and buried itself to the base of the ferrule in the tree behind the bear. I am not sure you could have asked for a better result. I was very pleased with myself and my equipment.
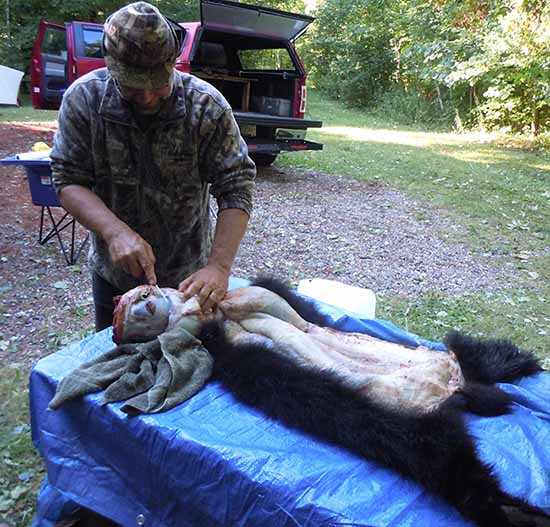
Field dressing my bear
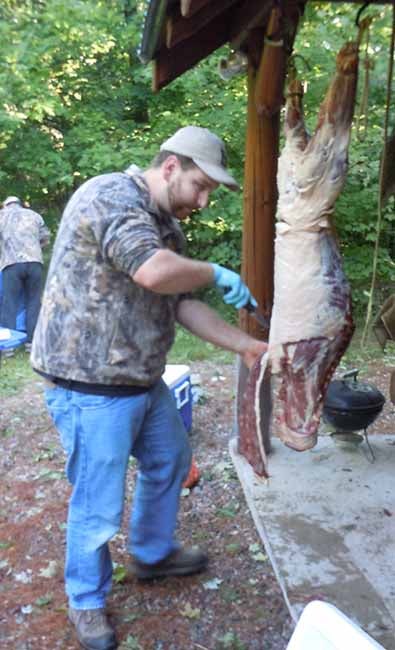
At the cabin we field dressed, skinned, and deboned the bear before dark. One of the advantages of being a younger bear is how quickly those processes can take. Having help from my family made the process faster, and more enjoyable.
We did not have a scale to weigh the bear, and I have never had any of my game measured for trophy books. Everything I have ever been fortunate enough to take with a traditional bow has been a true trophy to me. I can say that my young bear is some of the sweetest, most tender meat I have had the pleasure of enjoying from my grill. I cherish the time with family, the time in the woods, and the opportunity to hunt far more than any measurement could ever provide. I call my first bear a great ‘starter bear,’ as it leaves me with something to challenge myself against if I ever get another chance to hunt black bear.
Any day in the woods is a good time. A day with my bow in my hand is an adventure. A week in a cabin with family, my bow, and a bear tag is a priceless memory. Being fortunate enough to fill my tag is a blessing that I do not take lightly. I look forward to the next time I can step back in the woods, whether that is across the world on an exotic hunt, or down the road on my family’s land chasing whitetail. Every opportunity is a blessing and an adventure.


.jpg "Welcome to the 3Rivers Archer's Den")


 There’s more than one way to start a string serving.
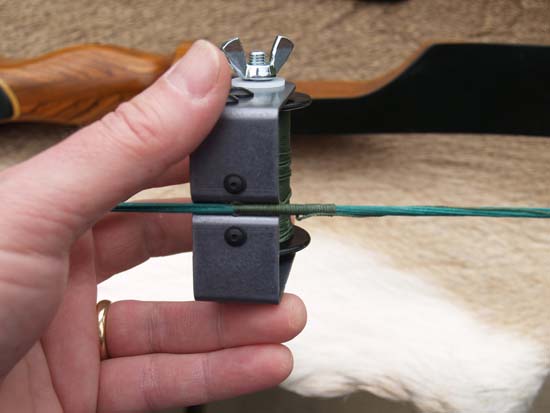 For my first hundred or so Endless loop bow strings I built, I used an inexpensive Bohning plastic string server and it has done its job well. More recently I’ve obtained a metal
 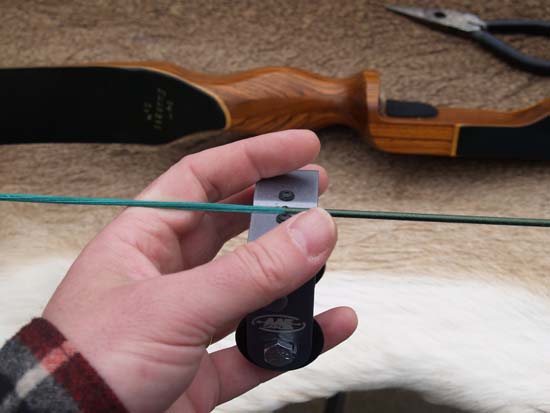 With a bow laid out in front of you, and the top limb to the right, begin the serving approximately 2-3” above the nocking point on string. Lay down 8-10 wraps over the tag end of the string (I do these all by hand). At this point, move the remainder of tag end out of the way and continue wraps with the string jig until a good length of center serving has been laid down.
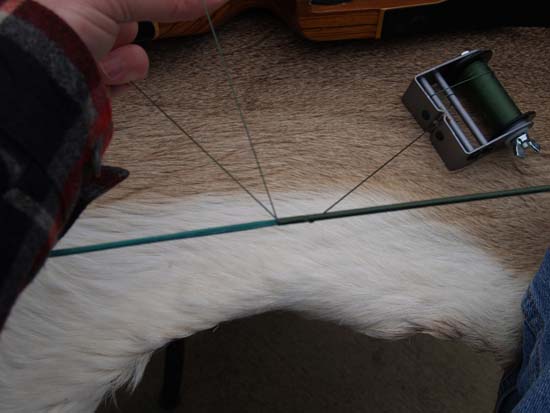
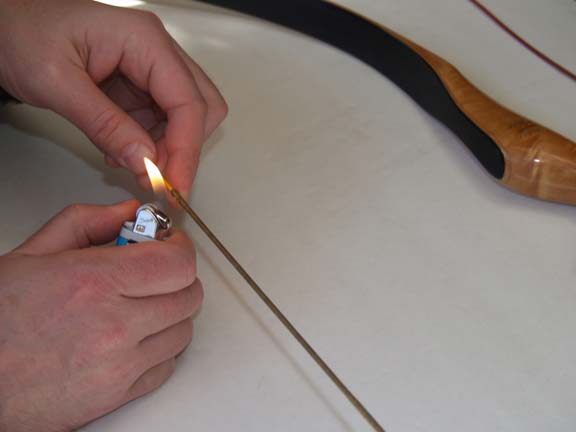 In either case, pull that tag end snug, which will snug up those last twelve loops. Snip excess string leaving 1/8” exposed. Using a heat source like a cigarette lighter, quickly light the exposed end and smash flat against the serving. This creates a swollen dot which helps to lock the end.