.jpg "Welcome to the 3Rivers Archer's Den")
Spiral Wrap Flu-Flu Fletching Instructions
By TrueFlight Feathers
The quick and easy way to make a very effective, low cost flu-flu arrow.
Ideal for aerial and close range targets!

CAUTION: ONLY TRUEFLIGHT SPECIALLY PREPARED FULL LENGTH FOR SPIRAL WRAP HAVE A SUPER THIN QUILL TO EASILY WRAP AROUND THE SHAFT. Regular full length will not wrap around the arrow shaft easily.
Step 1) Choose your colors!
The color combinations are almost unlimited. You can use a single TrueFlight Specially Prepared Full Length Feather per arrow, which will allow the arrow to fly further before slowing down, or you can use 2 or 3 feathers per arrow for shorter flights. Many fletchers choose 2 feathers for a nice color contrast. Left Wing feathers are used in this example.
It’s also recommended that you make a few “practice” fletchings on old arrow shafts or wood dowels just to get an idea of the final appearance and the best starting angles and spiral spacing.
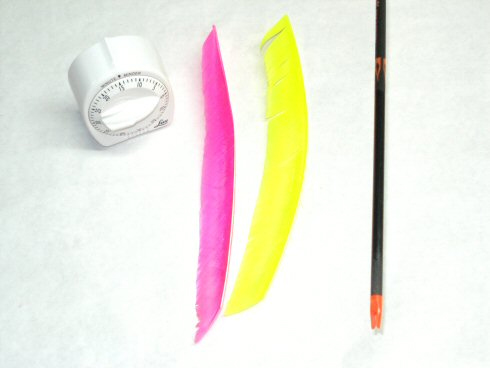
Step 2) Gather materials and supplies
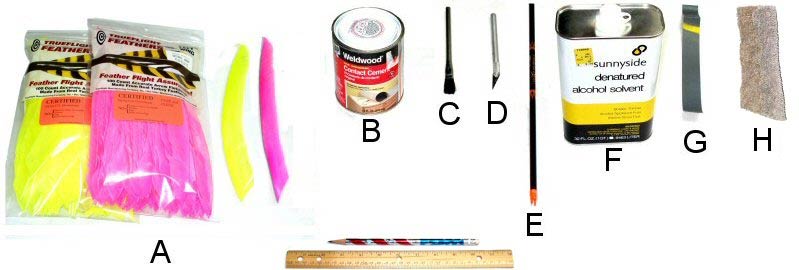
A = TRUEFLIGHT SPECIALLY PREPARED FULL LENGTH FOR SPIRAL WRAP FLU-FLUS. Regular full length will not wrap around the shaft easily. We’ll use two feathers in contrasting colors for this example.
B = Contact Cement.
C = Small Disposable Brush.
D = Small Knife or Single Edge Razor Blade.
E = Arrow Shaft. You can use Wood, Aluminum and Carbon shafts.
F = Denatured Alcohol.
G = 400 to 1000 Grit Sandpaper or fine steel wool or a “Scotch Brite” abrasive pad.
H = Clean rag or paper towel
(A pencil and ruler are optional)
Step 3) Prepare the arrow shaft
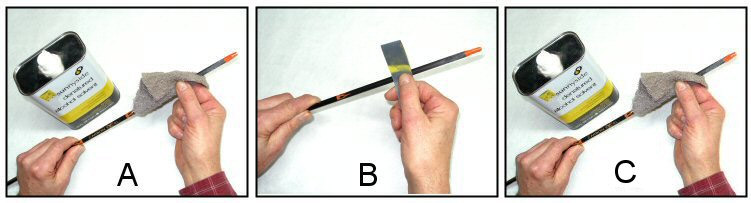
A = Clean the fletching area of the shaft by wiping with alcohol.
B = “Dull” the fletching area of the shaft by lightly sanding with 400+ grit sandpaper, fine steel wool, or a Scotch Brite abrasive pad. It is not necessary to remove the finish of the shaft. You just want to reduce the “gloss” so that the glue will adhere well.
C = Clean the fletching area of the shaft again with alcohol. Avoid touching this area again with your hands.

Step 4) Mark the approximate fletching position on the shaft
This step is optional. The position is not critical, and an “eyeball” estimate when applying the feathers is probably close enough.
It’s recommended that you leave about a 1.5 inch space from the tip of the nock to the end of the spiral wrapped feathers and do the wrapping along about a 5 inch length of shaft. You can vary these spacings depending on the appearance desired.
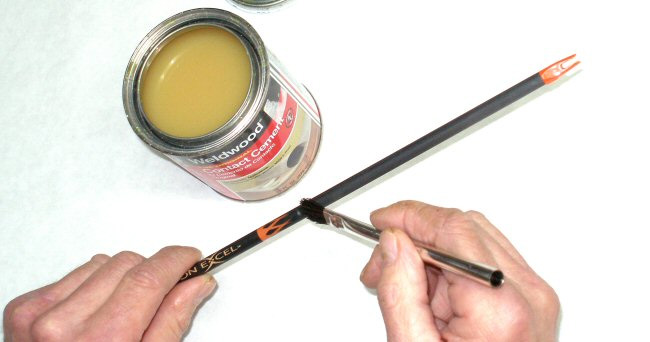
Step 5) Apply contact cement to the entire fletching area of the shaft
A thin, even coat works best. Remember you will need to attach the feather to the shaft within the next hour or so.

Step 6) Trim the tips of the feathers to eliminate the “short” part of the web
It is not necessary for the two feathers to be exactly the same length.
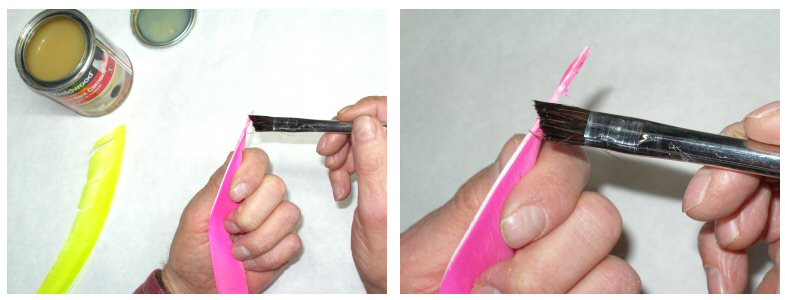
Step 7) Apply contact cement to the base of each feather
Grasp the feather by the web with the base upwards. The base is quite narrow. Use a thin layer of glue and take your time. It is easier with practice.
Step 8) Wait 15 to 20 minutes
The glue should feel nearly dry before you apply the feather.
For best results, work in temperatures of at least 65F.
Of course you can use this time to prepare more shafts and feathers. By the time you have done 6 or so, the first arrow will be ready for assembly.
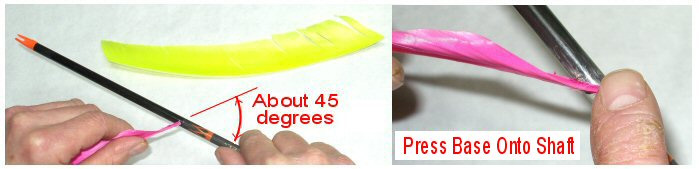
Step 9) Carefully press the end of the first feather onto the shaft.
Begin with the end of the feather with the widest web. The web “segments” should slope in the direction of the spiral.
Start with about a 45 degree angle to the shaft. Be sure to press the feather base onto a part of the shaft which has been coated with contact cement.
Once the two coated surfaces touch each other, they will stick instantly. Make sure the feather is properly positioned when it first touches — you will not be able to re-position it after it first touches.
After the coated surfaces have touched, press down on the end of the feather base to insure a permanent bond. The web of the feather can be pressed down on top of the base temporarily to apply force to the base against the shaft.
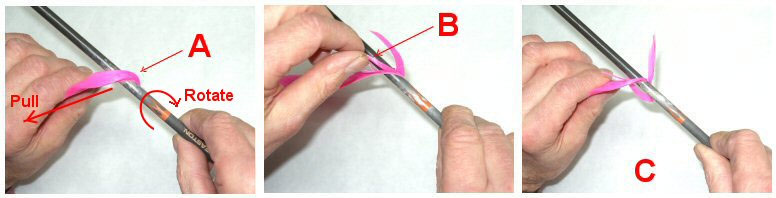
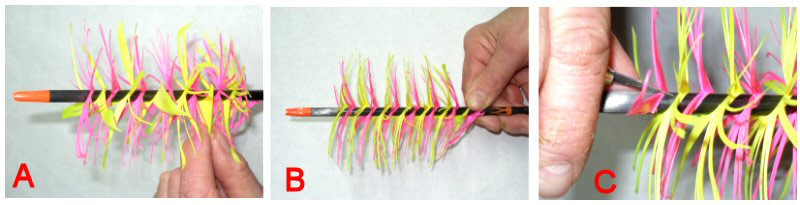
Step 10) Wrap the feather around the shaft
A = Keep a moderate amount of tension on the base pulling away from the shaft with one hand, while rotating the shaft with your other hand. For the first half of the turn, keep your finger pressing the end of the feather to the shaft as you pull the feather around.
B = If the web does not split and pop up from the base (as shown by the arrow in “A”), just nudge or pull the web apart as shown in “B.” The contact cement will hold the attached part of the web in place while you nudge the web.
C = Continue wrapping the web.
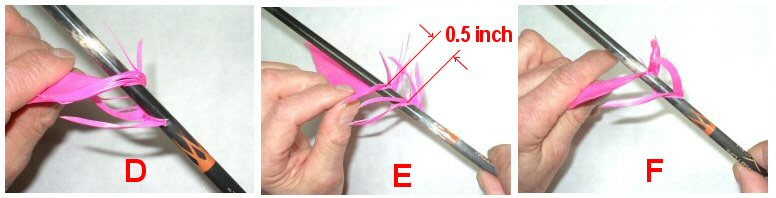
D = Continue wrapping, and nudging the web apart as necessary.
E = It is recommended that you space the “turns” of the spiral about 1/2 inch apart. This can be made larger or smaller depending on the “artistic” effect you like. The exact spacing is not critical for arrow flight.
F = Keep up the good work!
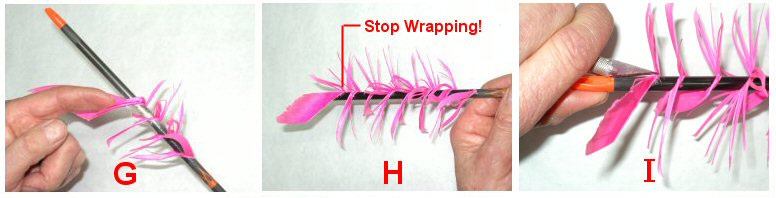
G = A little “nudge” is usually all it takes to encourage the web to split and pop up.
H = When you are near the end of the glued part of the shaft, STOP! If the feather is too short to make it all the way to the end of the glue, don’t worry — just press the end onto the shaft where it stops. A little shorter or longer spiral will make no noticeable difference in the flight of the arrow.
I = Cut the excess feather at the base. Re-press each end of the feather base. Discard the unused portion of the feather.
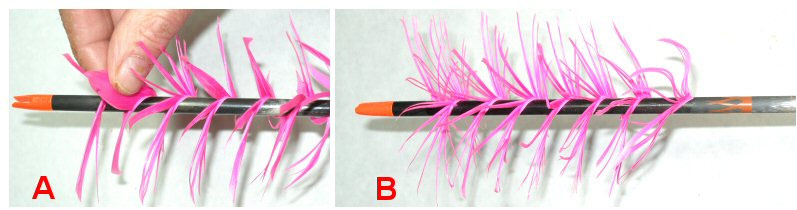
Step 11) “Nudge” any wide sections of web apart along the whole length of the spiral
A = You will end up with web “segments” about 1/16″ to 3/16″ wide, but this is not critical and some random variation makes for a more attractive arrow.
B = If you only want to use one feather per arrow — YOU’RE DONE! A single feather wrap like this will allow the arrow to fly somewhat further than a two feather spiral. But the arrow will fly just fine this way. It is hard to imagine a simpler or lower cost way to make a flu-flu arrow than this!
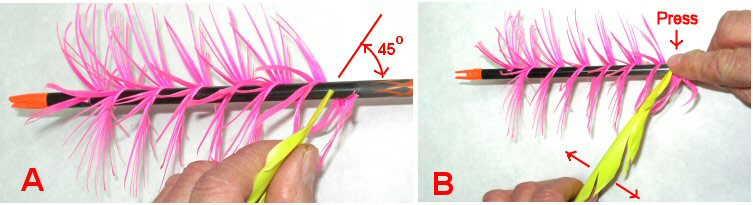
Step 12) Wrap the second feather (optional)
A = Start the second feather in the space between wraps of the first. Once again, use about a 45 degree angle to the shaft.
B = Press the end of the feather base firmly onto the shaft. “Wiggle” the free end of the feather back and forth as shown by the arrows to fit it in between the web segments of the first feather.
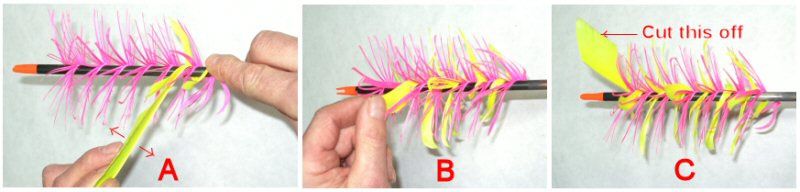
Step 13) Continue wrapping the second feather
A = Continue as done in the first feather.
B = Separate the web as necessary as before.
C = Stop wrapping before the end of the glued area of the shaft. Cut off the excess feather end.
Step 14) Finish up!
A = Once again, spread out web segments along the whole spiral.
B = Firmly re-press each feather end onto the shaft.
C = If a feather end does not want to stay down, just trim it off.
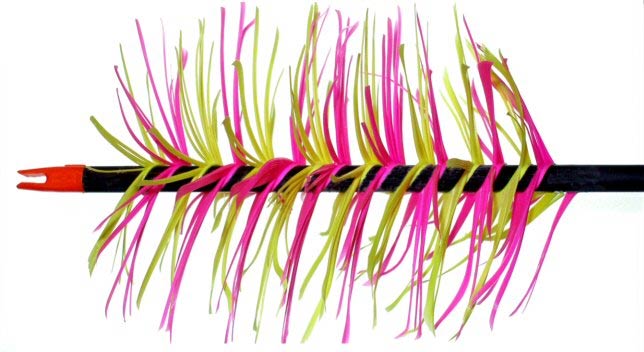
Congratulations! You’ve made an attractive and very effective flu-flu arrow!
Helpful Hints and Special Effects
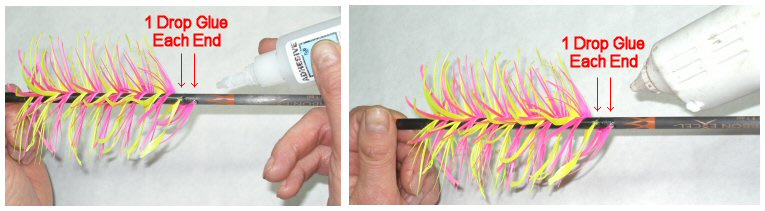
For extra security and unusually severe use, we simply add a drop of glue at each end of the feathers.
“Jell Type” super glue (or “Gap Filling” super glue) seems to work best. “Hot Melt” glue will also work, although you need to be careful not to use too much and leave a “bump.”
Ordinary fletching glue tends to soften the contact cement and is not recommended.
The content of this page was generously provided by TrueFlight Feathers.
For more information contact:
3Rivers Archery
PO Box 517
Ashley IN 46705
1-866-587-9501
[email protected]
or check us out on-line at 3RiversArchery.com
I’m not that much off a online reader to be honest
but your sites really nice, keep it up! I’ll go ahead annd bookmark
your website to come back later. Many thanks