.jpg "Welcome to the 3Rivers Archer's Den")
Basic Longbow and Recurve Set-Up
by Dale Karch and Todd Smith
Imagine you just picked up a new bow and it’s the first longbow or recurve you’ve ever owned. How do you get started? What do you do first? What steps do you take to get your bow out and start shooting? Read on for the answers!
For the scope of this column we have to assume that your shooting form is solid. The one constant in all of the set-up and tuning tips that follow is that your form is not flawed. If we can agree that the form is good, then the symptoms and cures outlined below will be valid.
This entire tuning system is based on the adjusting of the arrow, string, and bow to achieve the desired results. The challenge is getting all three factors working in harmony, producing shot after shot of perfectly flying arrows. Once you’ve accomplished that, you’re there!
Most traditional longbows and recurves are shot right off the shelf; meaning they have no adjustable rests or plungers. They are, however, somewhat adjustable if you know a few basic tricks. With these kinds of bows, it may be easier to tune the arrow to your bow, but we’ll share with you some of the techniques traditional archers use to help tune the bow to the arrow as well.
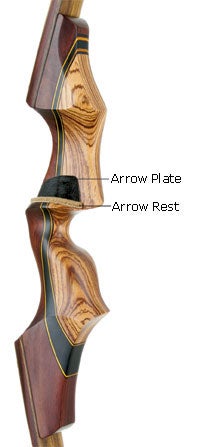
If your bow comes to you ready to shoot, consider yourself lucky. Most new bows need to have an arrow rest and arrow plate installed before you shoot them. The arrow rest is attached to the arrow shelf of your bow and serves as a soft, smooth surface for your arrow to launch from. On the sight window side of your bow, just slightly above the arrow rest is where you’ll install an arrow plate. Like the rest, this arrow plate provides a soft, smooth surface for the edge of your arrow to slip around as it clears the sight window. Before you even string your bow, install your arrow rest and arrow plate.
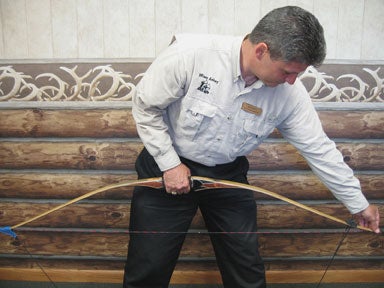
When purchasing a new bow, find out if it comes with a bow stringer. If it doesn’t, make sure you get one. Always use a commercial bow stringer when stringing and unstringing any bow. If you do, you’ll avoid potential physical danger to yourself and your bow. Your grandfather may have used the “step-through” method, but that is totally unsafe for you and the bow, and should NOT be done, even in a pinch. Using a stringer is not really an option; it’s simply something you must do! We can’t stress that enough.
(Click Arrow for Bow Stringer Demo)
There are quite a few bow stringers to choose from and they’re all pretty good. We recommend the rubber pad pressure type like the Selway Limbsaver Recurve bow stringer or Selway Limbsaver Longbow bow stringer. Both products use a moveable rubber pressure pad on the top limb and a non-moving cup or pocket on the lower limb. Follow the directions included with the stringer, and you should have no problem stringing or un-stringing your bow. They’re designed for both longbows and recurves, so with one bow stringer you’ll be set for any bow you might encounter.
When you buy a new longbow or recurve, chances are the bow has never been strung before. Or, if it has been strung, that it hasn’t been shot much. New bow strings, especially the Flemish-twist style, will stretch. We recommend that you string your new bow and either let it sit overnight (not recommended for self bows) or take it out and shoot it straight away. This will cause the string to settle-in and stretch about as much as it’s going to. As a bow string stretches your brace height and nocking point will change. Bear that in mind that when “shooting in” a new string. Once the initial stretch is gone, your string should be much more consistent and you should notice little if any additional stretching.
Note: Always carry at least one spare pre-stretched and set-up string with you. If you accidentally cut or break a string, it’s good to know you have one ready to go that shoots just like the old one.
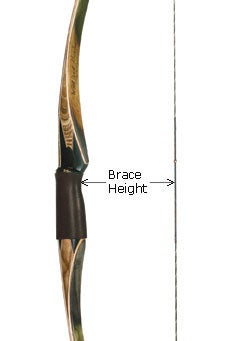
Now you need to get your brace height figured out. What is the perfect brace height? The true answer is, “Wherever your bow shoots best.” It sounds too simple, but it’s true. You experiment to find the best brace height for you and your set-up. It may even change if you change to different arrows. You have to actually shoot arrows from the bow to see how the changes in brace height affect your arrow flight. Here are some guidelines…
Longbows generally are never braced lower than six inches and recurves rarely less than seven. Many modern longbows like to be braced at or around seven inches and recurves, depending on design, between seven and nine inches. Brace height is determined from the deepest portion of the grip.
Note: You can measure your brace height from whatever point on the bow you wish, back to the string. Some folks measure from the middle of the sight window, some from the belly side of the arrow shelf, and some from the deepest portion of the grip. If you’re discussing brace height with someone, make sure you’re both on the same page. Regardless of where you measure from, brace height is a critical measurement for tuning your longbow or recurve. For measuring brace height, nothing beats a T-Square.
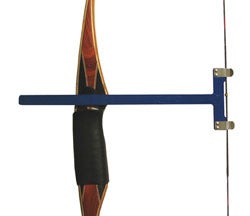
Anyone shooting traditional bows needs a T-Square for both measuring brace height and for measuring string nock location. It is a safe bet, that there is a T-Square found in nearly every archery tackle box in North America. We’ve always used the aluminum version here at the shop. It’s easy to use and lasts for generations. Back to brace height…
If you brace a bow too low, the feathers will hit the shelf before the nock leaves the string. The arrow actually stays on the string past the brace height measurement. It travels forward a bit before pulling itself loose. If the feathers come into contact with the shelf before the nock clears the string, your arrow flight will be erratic. You’ll be prone to having the string slap your wrist with ultra-low brace heights too. The bow will be a bit smoother and pull a little less at the lower brace heights and conversely if you short-string your bow, the weight will increase slightly and the angle of string pinch will increase. You can’t hurt a bow with a high brace height, but you can hurt performance. The bow will pull harder and the short string will force the limbs to stop short in their travel path, robbing you of energy. You should be looking for the “sweet spot” – that special brace height where the bow feels good during the draw and release, and your arrow flight is crisp, clean, and straight.
It’s best to start at the manufacturer’s suggested brace height and twist up and down from there. When using Flemish twist bow strings, you can twist the string tighter to shorten it, thus raising the brace height or you can remove twists to lengthen it, lowering the brace height. Caution: You must be careful when removing twists from a Flemish twist string. These strings rely on opposing twists to stay together. If you remove too many twists, the string loops may unravel and your string may come apart. It can be re-twisted, but many archers don’t know how to do that.
Once you have your brace height figured out, you need to get a nocking point in place. A nocking point allows you to nock your arrow at the same place on the string every time. You can use the common brass crimp-on nock sets, or you can tie on a nocking point using regular string material.
For installing brass nocking points you’ll need a set of nocking pliers and, of course, a package of brass nock sets. They’re easy to install and easy to move as you’re expermimenting to find your best nocking point location. Tip: When experimenting with different nock locations, don’t crimp the nocking point too tightly. Crimp it just enough to keep it in place until you decide if you have to move it again. Once you get it where it needs to be, crimp it on firmly. After that, you don’t want it moving on you. How about a few tips on figuring out where the best spot for the nocking point is?
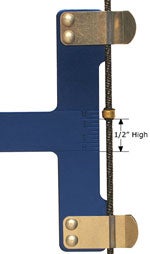
As a general rule, if your arrows are porposing (wagging up-and-down) during flight, you have a nocking point problem. We find that most traditional bows like to have the nocking point approximately 1/2 inch above the shelf. Start by attaching your nocking point 1/2 inch high. This means that the bottom of the brass nock is 1/2 inch above the arrow shelf. Your T-Square makes this measurement easy. Your arrow is then placed on the string under the brass nock and you shoot. If your arrow flight looks good, congratulations!
If you see an up-and-down “porpoising” of your arrows, you’ll need to try raising and lowering your nocking point until the flight is straight, and really all you see is your arrow nock flying straight away from you.
If the arrows are wagging side-to-side (fish tailing), it’s an issue of spine (where the stiffness of your arrow does not match the bow weight or bow design). Fish tailing can be manipulated by trying points of different weights. We offer field points from 70 grains all the way to 250 grains. Adjusting point weight is an easy test for figuring out what’s wrong with your set-up. We even have test kits available with several point weights in one package. With a test kit you can shoot your arrows with several different weight points until you find the one that flies best. For instance, if your arrow looks like it wants to go straight but always impacts the target to the left of where you’re shooting, it’s too stiff (For a right-handed archer, opposite for a left-handed archer). Test this by switching to a heavier point. If by increasing the point weight you see your arrows impacting more directly in line with where you’re aiming, then your arrows are a bit stiff and needed the extra weight to make them flex more. Likewise if your arrows are more or less jumping out of your bow and impacting to the right of where you’re aiming, try a lighter point. The arrow may be too weak and need to be flexed less to get it to shoot where you’re looking.
Note: Once you find the right combination, record it in a notebook so you can always refer back to it. It’s a good idea to keep a record of each of your bows and the set-ups and products that work best with it. It’s recommended that you record each of your batches of arrows as well. It’s not always easy to remember how you built a particular set. Also, this way, if you find a combination that works extremely well, you’ll know how to duplicate it.
Another method of defeating fishtailing is to install a small shim of leather or even a small piece of toothpick behind the arrow plate to push the arrow further away from the sight window. If this helps clean up the arrow flight, the arrows were too weak and needed to be pushed out a bit from the sight window.
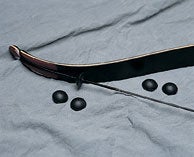
Another facet of setting up a new bow is how shooting the bow feels during and after the shot. Recurves especially benefit from both string silencers and brush buttons. String silencers dampen the after-the-shot string vibrations and quiet the string down fast. Longbows are typically much more quiet to begin with, but a small string silencer on them can make the shot feel better to the archer as well.
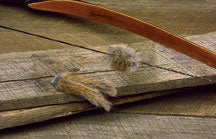
Recurves also have an issue with brush, sticks, grass, and twigs getting caught between the limb and the bowstring. For that reason every recurve bow string should have brush buttons installed on it. They come in two sizes and either size works well. When deciding on which size to use it’s really just a personal preference.
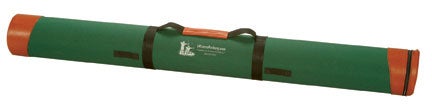
One last bit of gear that is often overlooked when thinking about setting up a new bow, is a quality bow case. You’ve invested your time and money into this bow, right? Doesn’t it make sense to protect it? There are many cases to choose from. On the high end there are hard cases, even suitable for airline travel. In the middle you’ll find nice fleece-lined nylon cases that do a very good job. And finally, at the very least, there are knit and fleece bow socks. For as lightweight as they are, they do a fine job protecting your bow. Whichever way you go, remember, every bow deserves a case. You want a lot from your bow, so keep it safe in its own bow case.
With the techniques outlined above you should be able to get any traditional longbow or recurve shooting accurately in short order. Familiarize yourself with these techniques, think about how they interrelate, and you’ll have some “ah-ha” moments. Once you understand the relationship between bow, bowstring, and arrows, you’ll have what it takes to have a perfectly matched set-up at all times.
See all available Longbows and Recurve Bows here at 3Rivers Archery.
For more information contact:
3Rivers Archery
PO Box 517
Ashley, IN 46705
866-587-9501
[email protected]
or check us out on-line at 3RiversArchery.com