


.jpg "Welcome to the 3Rivers Archer's Den")
Building Wood Arrows, Where to Start
Wood is the most prolific and successful arrow material ever used by man. They’ve been in continuous use for thousands of years, keeping us fed, protecting us from enemies, and delighting us in bow hunting and target archery venues. Yes, wood arrows have withstood the test of time. To Americans, they’re beautiful reminders of the old days of archery and bow hunting in this great country of ours. They’re reminiscent of the classic wood and canvas canoe, having been all but replaced by modern high-tech, low-maintenance materials, but to anyone willing to give them a chance they’ll open a portal to a more simple time, when US craftsmanship created functional products that performed flawlessly. It’s easy to gain an appreciation for wood arrows and very gratifying to make your own.
Today we’re discussing the basics of how to get started building wood arrows. We’ll cover some general knowledge of wood shafting, straightening, fletching (gluing on feathers), tapering, mounting points, and the basic tools needed when building your first set of wood arrows.
Wood arrows can be phenomenal performers, if assembled properly and matched to the bow; they are capable of near perfect flight. If you’re intrigued with the idea of using wood arrows but you think you’d like to try them out before taking a shot at building your own, it’s best to pick up a dozen already made arrows from a reputable dealer. Our 3Rivers Hunters arrows are perfect for that.
Even when buying pre-made wood arrows there are skills you’ll need to learn like straightening, cutting and tapering, and mounting
points. We’ll assume you’ve purchased either pre-finished shafting or pre-fletched arrows and take you through the remaining steps to the completed arrow.
Wood arrows are a natural material and as such they aren’t inherently straight. Newcomers to wood arrows often think they should be perfectly straight like aluminum arrows and carbon arrows but that’s an unreasonable expectation. Wood CAN be straight like that, but they have a tendency to wander. For instance, you can order Pre-made 3Rivers Hunter wood arrows and find a couple that aren’t straight when you get them. Even if they were straight when they were shipped they can move by the time you receive them. Note: Of all the arrow woods, Port Orford Cedar is one of the most willing to stay straight. When first trying wood arrows, we recommend that you look for Port Orford Cedar.
To fly as accurately as possible, arrows must be straight. Wood is no exception. Learning to straighten wood arrows is a must. Once you learn to straighten wood shafts the rest of the arrow building process is fairly easy. It takes practice, but it’s relatively simple to learn.

Think of it like this, the short end of the bend has shorter fibers and by stretching them as described, they lengthen. The wood on the high side is compressed while the short side is stretched. Care must be taken to apply just enough force. If done correctly the wood will learn a new position, a position of straightness. If too much force is applied the shaft will either break or the compression side will rupture forming wrinkles on the surface called crystals. Once this happens it’s time to discard that shaft, it’s no longer safe. This technique is easy to learn, it just takes practice to master.
The archery market has several arrow straightening aids offered like the Ace Roll-R-Straight. These tools are easy to use; they burnish the surface of the shaft on the long side of the bend. Beginning arrow builders have good success rates with these tools and arrows straightened by burnishing seem to stay straight longer than when hand straightened. Either technique works, try them both and then decide what’s best for you.
Before you can glue your feathers on, you’ll have to install your arrow nocks. The same fletching glue used for attaching the feather fletchings is used for installing the nocks. When gluing on nocks it’s important to make sure they’re in perfect alignment with the shaft. This allows for consistent launches from the bow as well as a more aerodynamic projectile. If you look closely at wood arrows you’ll be able to see how the grain runs through them. One side looks like lots of lines running from end to end of the arrow. The other side looks like it has points. It’s like the old days of wooden baseball bats. We always placed the trademark up because that aligned the edge of the growth rings, the strongest side, against the force of the ball. It’s the same with arrows. The edge grain side is the strongest and is the side you want to travel along the sight window at the shot.
When it comes to adding feathers to your shafting you’ll need fletching glue, a fletching jig, and the feathers themselves. When selecting fletching glue you’ll need to know if it’s compatible with the finish used on the arrows. If you use an incompatible adhesive your feathers will likely fall off. Always check to make sure the adhesive you use is compatible with the finish on the shafting.
Choosing a fletching jig can seem confusing because of the large selection available but is easy once you identify your needs. If you’d like the best fletcher money can buy, go with the Bitzenburger Dial-O-Fletch. They’re known as the best fletching jig ever offered and will last a lifetime. A fletching jig is an investment and we suggest that you go with the jig that best fits your personal needs. Be sure to check out all of the fletching jigs we offer.
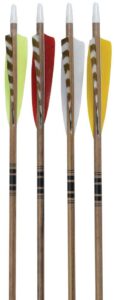
When it comes to feathers we’ve found that TrueFlight Feather Company offers the highest quality feather fletchings in the world. We’ve seen our share of samples through the years and no one has ever been able to match the quality and precision of TrueFlight Feathers. Which shape should you use? Should you use right or left wing? Trust us on this one, feather shape is a personal thing. Don’t sweat over which one to pick. We get folks all the time who agonize over which shape will give the best performance, least amount of noise, and look good all at the same time. This is an instance where shooting what you like won’t hurt you. If you like the looks of shield feathers, shoot shield. If you prefer parabolic, go with parabolic. You’ll never be able to detect a difference in the performance. Use what you like. You’ll be glad you did.
Right wing or left wing? First, right wing feathers are from the right wing of the bird and left wing feathers are from the left. That’s all there is to it. Which wing should a right handed or left handed archer shoot? We’ve tried them both and can find no noticeable difference. Some folks will tell you with certainty that it’s got to be one way or another, and they don’t even always agree. Try it for yourself. The one legitimate rule is, don’t mix wings on the same arrow. For proper flight, all feathers on an arrow must be from the same wing. We’ve found which wing is most popular this seems to be a regional thing, but neither is really better than the other.
When mounting feathers on the shafts, we like to see the feather placed in the clamp with the trailing edge between 1/2″ and 5/8″ down for the nock. This allows for some finger clearance. Mark this location on the clamp so it acts as a quick reference point. Make sure the feather is lined up with your mark and flush along the base. Either add a smooth line of fletching
cement or a Feather Fletching tape to the bottom of the quill then place the clamp into the jig and bring it into contact with the shaft. If using cement, a thin line of the adhesive should squeeze out from the edge of the feather base. Wait at least 15-20 minutes before removing the clamp and repeating the process. If using feather tape, after pressing the feather into place, remove the clamp at once and run a finger along the feather base to assure full-length contact. No additional waiting is required. Simply move on to the next feather. Yes, feather tape is FAST! It’s an excellent choice and has been compatible with every arrow finish we’ve tried it on.
Finally, you’re ready for mounting your points. If you didn’t get your shafts cut to length and tapered you’ll need to do that now. For cutting to length, measure from the valley of the nock to the length you desire then add the length of the taper before cutting! When you taper your shafts the finished taper should be anywhere from 3/4″- 7/8″. If you’re targeting a 28″ finished arrow, you’d measure from the valley of the nock forward to the 28″ mark then add the 3/4″ of your taper and cut the shaft. A small home miter saw works well for this but you can even score the shaft with a knife and snap it off at the score line.
Once the shafts are cut to length you must taper them. You’ll need a taper tool. There are a couple hand-held versions available. The small plastic kind is OK and should work for the person who only makes a few arrows now and again. The True-Center V2 taper tool is machined from aluminum, comes with three different arrow diameter guides, and should last a lifetime. It even has adjustable blades putting you in control of how aggressively the tool will cut. It’s the best hand-held tapering tool on the market. You can also get a power taper tool called the Woodchuck Taper Tool. They’re very nice, have adjustments built in and produce clean precise tapers. When considering which taper tool you want, remember that you’ll use it for arrow building and repair for as long as you shoot wood arrows.
The final step is mounting your points. Field points are the easiest. Broadheads take a bit more care, as they need to be perfectly in alignment with the axis of the shaft to fly correctly. Do yourself a favor and make sure to go back through and check your arrows for straightness before mounting the points. Straight shafts make the point mounting process much easier.
Hot melt glue; sometimes called ferrule cement, is the normal adhesive used for mounting points to wooden arrows. Being heat reversible it allows you to change your points whenever you like.
To mount points with hot-melt adhesive, you’ll need a heat source. We prefer the old standby, the alcohol burner. They run on denatured alcohol, which can normally be purchased wherever paint is sold. The flame is hot, free from soot, and seems the perfect match for mounting heads.
Tip: Before mounting any points take a cotton swab, dip it in alcohol and wipe out the inside of your point. This eliminates any residual oil or chemicals that may have been left behind from the manufacturing process.
Light your heat source and hold the tip of your hot melt above the flame. When it has melted a bit, roll the point taper of the shaft on the adhesive until you see a thin uniform layer of glue form. Now place your point on the taper and slowly heat the point. The idea is to get the point, the glue, and even the shaft all warmed at the same time. When you feel the temperature is right take pliers and hold the point while you turn the shaft inside the point. We have a special tabletop we use for mounting points and at this time we invert the shaft and press the point into the tabletop spinning as we go. What you’re watching for is the shaft and point spinning straight. If you notice the point wobbling, adjust with a tweak of the pliers and spin again. If the glue gets too cool to allow adjustment, heat it again and repeat until you have a nicely spinning arrow.
Tip: For broadheads it’s best to align them up all the same. For two-blade heads that usually means that the blades are aligned either vertically with the bow or horizontally. Do whichever you like, but do them all the same, it’ll ensure consistency of flight and it’ll look like you really know what you’re doing!
Now that you understand the basics of how to make your own wood arrows we invite you to give it a try. Once you get into it and get a few dozen arrows under your belt you’ll realize just how fun and gratifying it is. It can be addicting! Give it a shot, there’s nothing more satisfying than shooting wood arrows you crafted with your own two hands.
For more information contact:
3Rivers Archery
PO Box 517
Ashley, IN 46705
866-87-9501
[email protected]
or check us out on-line at 3RiversArchery.com