Welcome to the Archer's Den. Here you will find a gathering of traditional archery stories, tips and techniques, trophy animals taken with traditional bows, and plenty more. Stay a while and learn something. We hope you enjoy and even submit a trophy of your own, or leave a comment on a post.
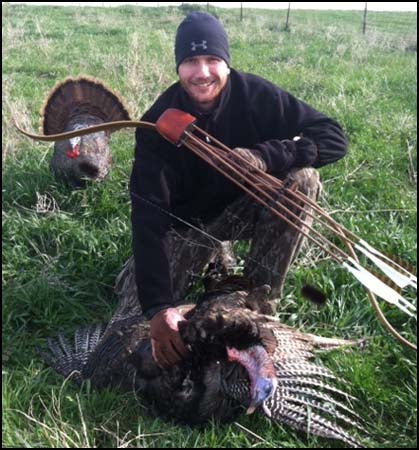
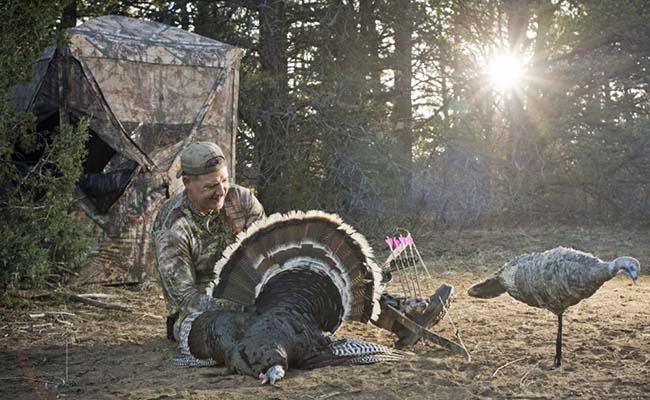
Jared Grewing displays the turkey he took with his Great Plains Long Curve and Zwickey Broadhead, 2013.
For the spring season, if you want to bag a turkey, you’re going have to scout, scout, and then scout some more. Expect this to take a good bit of time and effort. You’re scouting to find where the turkeys are roosting and where they feed or strut in the morning. Usually, they’ll keep to the same patterns in good weather.
When you’re scouting, you’re looking and listening for where the birds are, where are the hens going after they pitch down, what are the Toms doing, which Toms run together and where do they feed.
Go out at dusk the evening before your hunt and listen to where they are gobbling at sunset, use a call to get e response gobble letting you pin the roost tree. When you call and finally do get a gobble in response, do not keep calling.
Turkeys do not call as much as you think. Yes, there are times when a hen will just crank away, but not all the time, in fact, she only does that in specific situations. Until you know why she’s doing that, your best tools are patience and knowing your land.
Get there about an hour before sunrise the next morning and set up your decoys in a spot about 100 yards away from the roost tree. You want to be roughly 15 yards from your decoys (or whatever distance you feel comfortable taking that shot), positioned so your back is against a tree or some brush. Remember to stay still; you don’t want all the work you’ve put in to go to waste just because you can’t sit still. That said, look at where you’re going to sit before you put your butt down on an ant hill.
Five minutes to light, make a tree yelp – resist the temptation to continue calling. Wait for about 10 minutes and see if the birds fly to your setup from the roost. When the turkeys fly down and head to your decoy, it’s time to bag your bird. If you have a bird come in, you wait until he is in full strut. As soon as he turns around and his fan is blocking all view of you, get in position and get ready to draw back on that bird as soon as he turns around again. This may take 5 minutes or an hour, be prepared to be able to hold your bow in an odd or uncomfortable position for a very long time.
However, if you don’t hear anything for another 10 minutes, make a couple more yelps.
If they fly down, but not to you, try a few more periodic calls, but it’s probably not going to work out. If they flew down, but you’re not sure where they went and you’re not getting responses to calls stay where you’re at for at least an hour. About 80% of the time this won’t work; you, however, are hoping it’s the 20% that does work.
If, after an hour, you’re still coming up short it’s time to start hiking your hunting area. Remember, if you’re on public land it’s a good idea (and in many states it’s the law) to wear some orange while hiking; just remember to put it away when you find your next spot. Periodically you’ll want to stop and call to see if you can strike a gobble. If you don’t hear anything then keep moving. If you get a response, it’s time to quickly setup again (just like at the beginning of your hunt). After you get settled in, call again and listen to see if the Tom is coming your way.
If you think that everything is going well and the birds are getting close and then they go silent, be ready for them to show up in stealth mode. If, however, you’re pretty sure they’re gone wait 20 minutes after the last time you called before you either call again or leave. There is nothing more heartbreaking than thinking you’re done for the day, standing up and hearing the familiar sound of a turkey taking flight.
Remember, turkeys have nowhere to be and all day to get there. The hunting shows on TV cut hours of waiting to fit into their 30 minute show. Be patient and most importantly, have fun.
For some great shot placement tips, check out this video on turkey anatomy and proper arrow placement from Hoyt. It’s geared toward compound shooters, but the skills are pretty easily transferable to traditional archery.
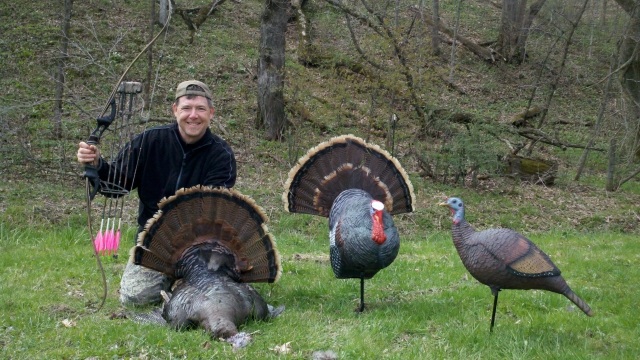
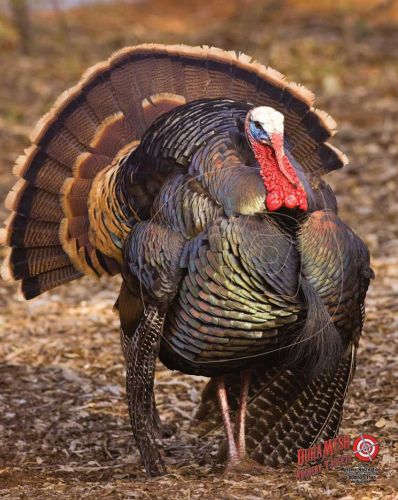
Fred Eichler shows off his Tom from a successful Turkey Hunt in May 2011
The days are getting longer and the air is getting warmer, which can mean only one thing – turkey season is almost here. Getting a trophy tom with a shotgun can be hard, but when you decide to do it with your bow, especially a recurve or longbow, it can be considerably more difficult. The last thing you want to do is to be caught unprepared on opening day – making an already challenging hunt nearly impossible, but don’t worry 3Rivers Archery has your back.
There are a few things to consider before venturing out into the woods this season, and the best time to start thinking about them is in the weeks prior to opening day.
Where are you hunting?
Many bowhunters will likely already have their hunting area secured. If you fall into that category, now would be a good time to start scouting – you should become intimately familiar with your territory. If you’re still not sure where you’re going to be hunting this season, the advice is the same; don’t wait for opening day to find out where the birds are roosting and feeding.
Will you be hunting from a blind or ‘running and gunning?’
Many archers find it easier to hunt from a blind because it can conceal the extra movement of drawing a bow. When hunting with a shotgun it’s easy to simply get set-up, put the gun on you knee and wait for a bird to get within range. With a bow, however, it’s never that simple. If you do decide to ‘run-and-gun’ consider using a bow sock in conjunction with some bow camo and a ghillie suit. Although this won’t hide your movements completely, it will soften them and it can be much more effective at concealing the human form than camouflage alone.
Is your blind ready to go?
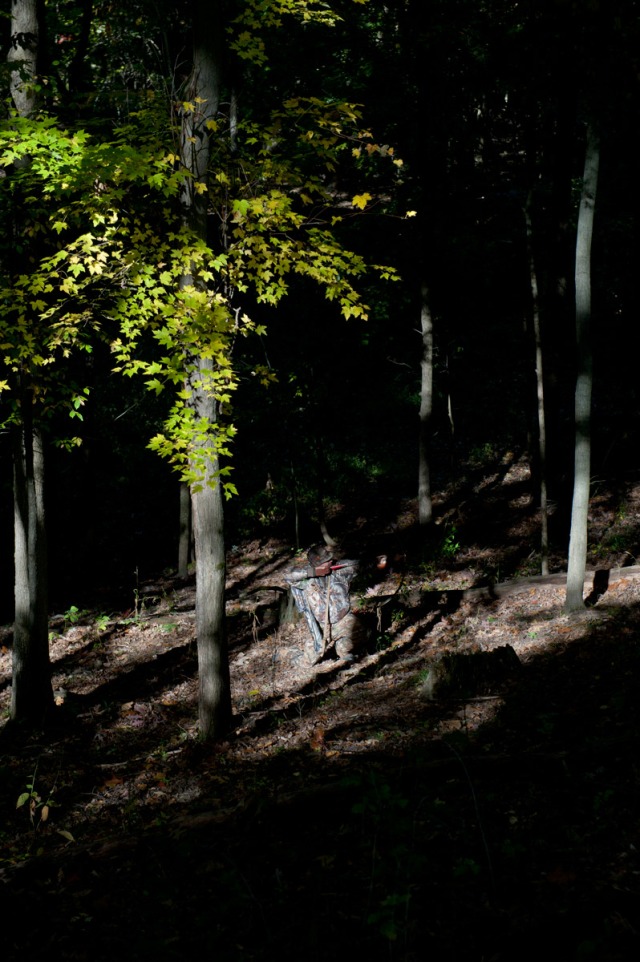
A good ground blind is invaluable to the bowhunter when he is matching wits with a seasoned tom. Turkeys have some of the sharpest eyes in the woods, and your trophy tom has been hunted before, so he’s already weary of even the slightest movements. You can’t hold your bow at full draw for too long and drawing takes a lot of movement, so what do you do? You get a ground blind. There are many different kinds of blinds from single panels to large pop-up blinds and even the high-tech GhostBlind®. Which one is the right one for you? That depends on preference, hunting style, and budget, but I love the GhostBlind®. It works just about anywhere and can be moved easily and setup quickly.
Are your decoys ready to go?
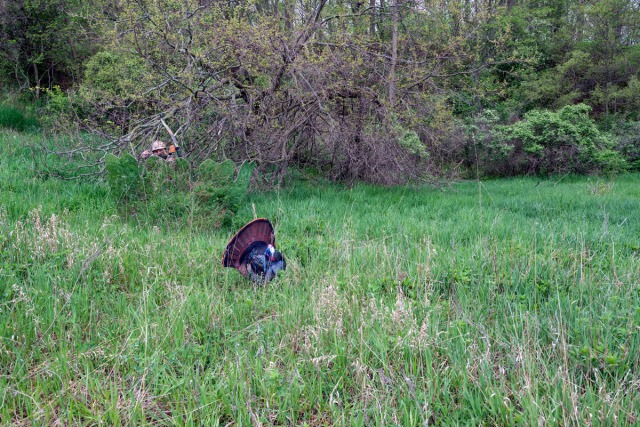
Most hunters can get the old longbeards within 50 or so yards, but arguably the most difficult part of luring a tom within shooting range are those last few yards. A good decoy can be the difference between success or failure this season. That said, it’s hard to find a reason to not recommend the Miss Purr-Fect Hen. It just works. The Miss Purr-Fect weighs about as much as a bottle of water and features perfect pose technology, allowing for detailed adjustable neck/head positioning.
Do you have a good hunting seat?
Whether you will be sitting at the base of a tree or in a ground blind this season, it is important to think about comfort. If you can’t sit still then you might as well not go out at all, because a turkey will see your movement and your hunt will be over. If you’re going to be sitting on the ground, then at least make sure your back is comfortable with some lumbar support. Or, if you’re going to be hunting from a blind you might want to check out the Chama Swivel Hunting Chair.
Is your camo right for the season?
You’re going to need to get your bird within your kill zone, and for most traditional bowhunters that means 20 yards or less. This means the detail of your camouflage is critical. The wild turkey’s ability to pick up movement is truly impressive, so you need to make sure you’re camo is on point. The new Core4Element Realtree Xtra® Camo line by Easton is impressive and has been designed for early season hunting.
Do you have the appropriate broadheads?
What’s the best broadhead for hunting turkey? The one that flies the straightest and gets the job done. The vital area on a turkey is roughly the size of a fist; that said, the best broad head is the one you can shoot confidently into that small of an area time and time again. You do not want to be second guessing how an arrow will fly or your ability to hit a tom when he is at 20 yards.
However, it’s best to avoid a pass though with turkey, because if they can run or fly after the shot, they usually will, which won’t leave a blood trail or, if it does, it won’t be a good one. If you can, try and place your arrow so it penetrates at least one wing, both would be better, while also hitting the vitals. Another good way to avoid a pass through is to add a Zwickey Scorpios Broadhead Stopper to your broadhead.
Have you practiced shooting enough to be confident?
DuraMesh Turkey Target Face
As with all things, the key to successful traditional bowhunting is practice. In the military they have a saying, train like you fight. It would be a good idea to find an area where you can practice shooting, which will closely replicate your actual hunting conditions. It’s also a good idea to get a decent target for practice. I love practicing with a good 3D target, but not every hunter can afford that. The next best option is to get a high-quality lifelike paper target.
Have you purchased your hunting license?
This one seems like such a no-brainer, but it never fails – someone will forget or put it off too long. So, do it now, well not right now, but as soon as you’re done reading this article.
Finally, how are you going to display that big longbeard once you bag him?
Turkey beard and tail feathers pictured with an Arrowhead Plaque
Because you will get him, if not this year then maybe next year, but it will happen. I suggest mounting the tail feathers and longbeard yourself. It’s a good DIY project and is much more satisfying to point at your trophy and say you did everything. Try mounting it on our Arrowhead plaque to show off your pride as a traditional bowhunter.
In closing, I hope this helped. If you think of anything that I might have forgotten, please leave a comment and let me know. Remember to stay safe in the woods this season and as always, good luck and shoot straight. Be sure to share your tom with us and we’ll add it to our Trophy Room.
In this useful video, Kaminski covers what the different parts of the bow are called, basic bow set-up, eye dominance, proper bow size, draw length, arrow selection, form, grip, release, and aiming.
Although this is not the end-all-be-all guide, it’s a good place for new shooters to start.
Today is March 5, which also happens to be Fred Bear’s birthday.
Born in Waynesboro, Penn. on March 5, 1902, Bear was an American author, video host, bow maker, and traditional bow hunter. Bear left his home, a small farm, when he was only 21 years old to pursue opportunities in Detroit’s growing auto industry.
Although Bear grew up in a hunting family, he did not start bow hunting until 1929. In fact, Bear said that after hunting with a rifle he was not all that interested in the sport – as there was not enough challenge in it.
“I grew up a gun hunter, my dad was a hunter,” Bear explained in a 1985 interview with Mike Avery. “I shot a deer in 1933 up in the Upper Peninsula [in Michigan] that dressed 285 pounds, the biggest deer I ever saw. And it was so easy. That opening morning I walked up the draw and there he was looking at me and I was looking at him and I shot him and went down and that’s when the work began. So, I thought this [traditional bow hunting] would be a little bit better.”
Bear first had his interest in traditional archery piqued in 1927, when he visited the Adams Theatre in Detroit, where he watched “Alaskan Adventure,” a film featuring a Californian bowhunter named Arthur Young. In that same year, 1927, Bear met Young and he soon began craft his own bows, arrows, and bow strings under the tutelage of Young himself. If Bear had never watched Young’s film or if he had not met Young it could easily be said that archery, as it is known today, would have never existed.
However, Bear did not begin hunting with a bow until 1929, when he ventured into the woods with a bow carved from an $8 Osage orange stave. It took Bear six years before he finally connected with his first whitetail deer with a bow.
Bear Products Company, which made advertising materials for the automotive industry, was founded in 1933 by Fred Bear and Charles Piper after the plant where the men were working burnt down. The business was started with a $600 loan from Piper’s mother and used $600 in Bear’s personal equipment to function.
“I was running a plant for a fellow in Detroit, during the depression, terrible depress of ’29-33 and [the plant owner] wasn’t doing so well and the place caught fire, the insurance company owned it and I was out of a job,” Bear explained. “So, he had a nephew in there, been there about a year. Fresh out of Dartmouth, who came in with the selling capacity and he made friends with Chrysler. We were doing automotive work, in the beginning no one could live off the archery thing. We were making advertising materials, the same business where I was running the plant. So, I got ahold of him and I said, ‘Chuck, you can get the orders for this stuff and I know how to make it, why don’t we form a partnership and get back in business.’ And that was in ’33. Well, he didn’t have any money, and I didn’t either, really; we took inventory of the equipment I had in my basement and it came to $600, and he borrowed $600 from his mother and that was the beginning of this whole thing.”
It was only during his off hours that Bear crafted archery equipment, usually only for his circle of friends. However, the demand for Bear’s products steadily grew and in 1937 he patented his first bow glove and hired Nels Grumley, a master bowyer, to begin making bows under the name “Bear Products by Grumley” fulltime.
In 1939 the side business of archery demanded so much of Bear’s time, he decided to devote himself to it; and in 1940 Bear Products split into two companies, where Piper retained control of the automotive business and Bear retained the archery business. This is when the Bear Archery Company was officially born.
This was no accident, and Bear’s business didn’t grow organically. Bear tenaciously promoted the sport of archery.
http://www.youtube.com/watch?v=MF6PEw5_yRI
“I had to not only make a product, but create a market for it,” he said. “So, I got into the promotional business and I soon found that the newspapers weren’t interested in the scores of the tournament, but if you could run down there with a deer or a bear you shot with a bow, you might make the front page.”
Further, Bear’s clout as a target archery champion helped him champion Michigan’s first bowhunting season in 1937, which prompted many other states to do the same. This, likely, was no small part to Bears success in the archery business.
“In 1937, four years later, we had our first archery season with 193 hunters; 193 bow hunting licenses were sold,” he said. “And it got to a point where I could some days; maybe eat three meals a day. And then I kept on promoting and as the business grew we did better and I found myself in the position where I could go hunting anyplace in the world, I could, you know, take some pictures, write a story, or make a film and I could expense it out tax wise and I could pay myself for doing it. Well, I’ve been doing that for 30-something years now and having a ball. So, I’ve shot a lot of animals and had a great time. I’m still having a great time.”
Shortly thereafter, in 1942, Bear produced his first hunting movie as a move to further promote the sport of archery. The next year Bear began experimenting with what would later become his favorite and most popular bow model – the take-down.
“On a trip I made to Alaska with a conventional longbow that I had to check as baggage along with my other gear; I took a flight nonstop, Chicago to Anchorage, and I got off the plane, but my archery equipment didn’t,” Bear said. “The stop in Anchorage was for fuel, and my hunt was a fly-in hunt and I’m being left handed, there were no other left handers in the party and I found those moose pretty hard to kill with rocks. So, I determined that I would make a bow that could be taken apart and put in a small enough case to go under my seat in the airplane.”
It took Bear years of trial and error before finally perfecting the design to his takedown bow in 1970, but his efforts were not in vain. It is not only a bow style that is still sold today, but Bear said “this is the bow that is the ultimate … this is my personal hunting bow. I’ve been hunting with this bow since 1965; I still shoot this bow.”
Four years later, in 1946, Bear patented the first bow quiver and the next year he moved the Bear Archery company from Detroit to Grayling, MI.
However, this growth did not sit well with Grumley, the bowyer Bear hired in 1937. Grumley knew that this move would mean mass producing bows by machines instead of individually crafting every bow by hand and, despite Bear’s attempt at retaining him, Grumley left Bear in 1948. After Grumley’s departure, Bear began using the famous “Running Bear” decal.
The next year, in 1949, Bear began mass producing the Polar, Grizzly, and Kodiak bows. It was also in 1949 that Bear championed the use of fiberglass in bows.
“A salesman for Corning Glass Company … dropped in – he was an archer, bowhunter – dropped into our shop in the very early ‘40s,” Bear explained. “And he had a piece of fiberglass cloth and I had never seen or heard of it and I was very surprised that glass would be flexible like it was … but I had not any great interest in it until he mentioned that it was elastic. He said that it was elastic and very strong and it would stretch or compress and unlike any other material it would always return to its original position until it was overstressed and then it would break. Well, that interested me because if it’s elastic maybe it’s a material we needed for the back of our bows.”
At the same time, Bear was doing some work with Chrysler and he knew their head chemist. Bear knew that Chrysler had developed a glue for bonding rubber to metal, which was called cycle-weld cement. So, Bear took the fiberglass cloth to the chemist at Chrysler and asked if he would put three or four layers of it on the back and belly of one of his bows with the cycle-weld cement. He found that the fiberglass, currently in a crisscross pattern, worked great on the back of the bow, but did not work well on the belly. This prompted Bear to begin manufacturing bows with fiberglass laminated backs and aluminum bellies. Interestingly, the aluminum was scrapped from B-17 bomber airplanes of WWII.
However, Bear found that the aluminum caused too much handshock when shot and there were also a large number of bows returned because of delaminating, which was caused by the large amount of shock. This warranty problem caused a substantial strain on the company’s finances; nonetheless, Bear insisted that all bows be replaced if returned broken.
This prompted Bear to begin developing a unidirectional fiberglass and, in 1951, the aluminum belly bows were discontinued entirely.
Two years later, in 1953, Bear patented the working recurve limb, which is the design that almost all modern recurves use today. The next year Bear began marketing their new fiberglass working recurve – the Kodiak II (see all Kodiak models still in production). Then, in 1965, Bear began marketing his, now famous, Bear Razorhead broadhead for the first time.
Despite his successes, Bear sold his company to Victor Comptometer in 1968 in an effort to grow the company even more. After the sale, Bear stayed on as President and remained active in the design and promotion of products, even after Kidde Corporation took over Victor Comptometer in 1977.
Shortly thereafter, in 1978, a strike at the Grayling plant forced the new owners to move operations to Gainesville, Fla., where the company remains today.
Notwithstanding the turbulence, Bear was an active part of his company until his death on April 27, 1988, at the age of 86.
There is something enchanting about the idea of crafting something from scratch with one’s own hands – looking at a piece of dead wood and seeing something more and then breathing life into it again in the shape of a bow.
Hundreds of thousands of people have made their own bow from wood, and they all started somewhere. Whether you’re looking for a deeper connection to the sport of archery, trying to find your roots in hunting or you’re looking for your next challenge in woodworking; today, you can start here.
This build-along shows you how to craft a laminated flat-board longbow.
For this build-along we will be aiming at constructing a 45# at 28” hickory longbow.
Pro-Tip: Don’t be upset if your bow ends up pulling #20 at 28” – it happens more than you’d think. Being a bowyer takes practice and patience.
For this build-along we’ll be making a hickory longbow; although you might be more interested in making a recurve bow, that’s not a great place for a beginner to start. Hickory is not the only bow wood you can use; in fact you will find countless videos and tutorials online showing you how to make a self-bow from red oak, a cheap, brittle wood that is easy to come by and easy to break. However, hickory is, perhaps, the best wood for a beginner to start with because it can handle compression and tension better than red oak. Further, hickory has very good performance and speed and it will be a little easier for a beginner to tiller because the wood is a little softer than red oak.
Pro-Tip: Hickory is also great because it can be backed by its own wood. You can take a 1/8” strip of lumber off with a table saw and flip it end for end and reverse it, then glue this piece back on and you are good to go.
There are no specific schematics or a plan to print, but I’ll try my best to provide as detailed instructions as possible. However, you can learn more from our books and DVDs.
Making the Rough out Marks
Every piece of wood is different – for that reason, every bow is different, so there is no perfect guide or set of measurements, but hopefully these will help you along.
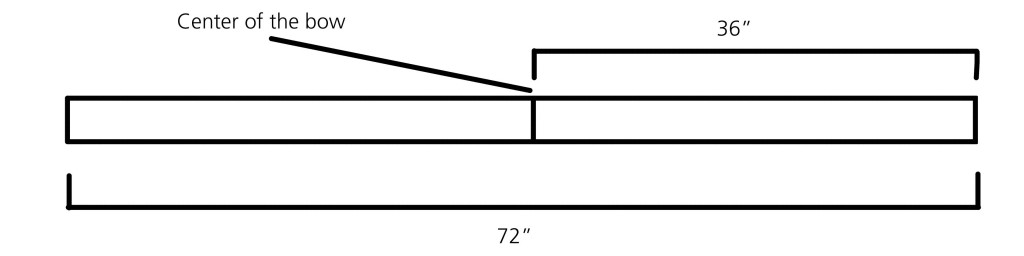
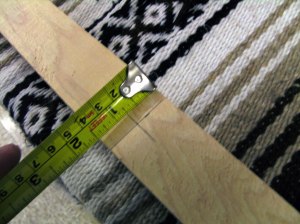
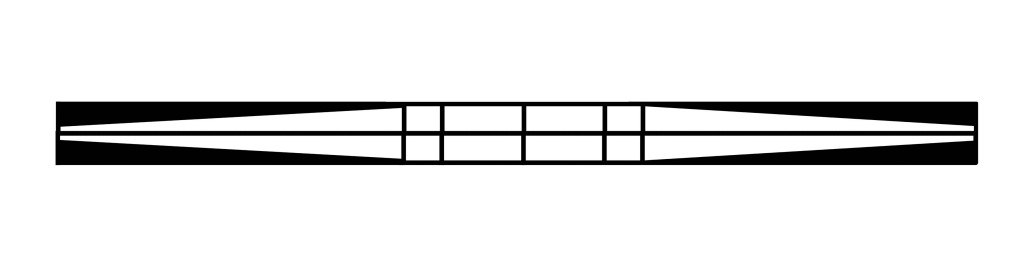
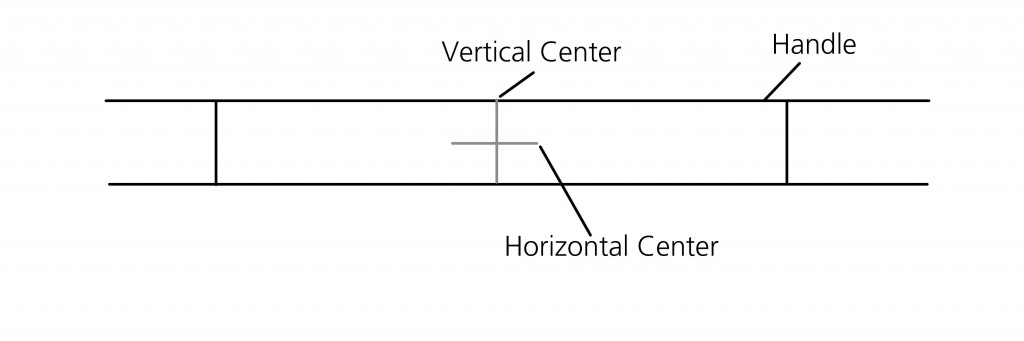
Find the middle of your bow stave (i.e. 36” would be the middle of a 72” bow).
Mark the middle.
Mark 6” on either side of the middle – this will eventually become your handle.
Mark 1” on the limb side of your 6” marks – these lines indicate where you will start your taper.
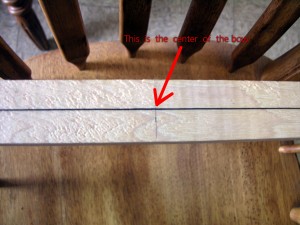
To mark the center of your bow, measure up 3/4″ from the edge of the bow and put another mark perpendicularly on your middle mark. Now, you should have a + in the middle of your bow.
Take a string that is longer than your bow and run it across your bow. Attach a weight on either end; you might find it easiest to use squeeze claps.
Move either end of the string on the tips of the bow until the string is resting as close to the middle of the ends of the bow as you possibly can, while ensuring the string is running straight through the center + of the bow.
Make a mark on either end of the bow directly under the string. Connect the marks on each tip, running through the center + on your bow.
At either tip of the bow, mark 1/4″ on both sides of your center mark.
Connect each mark to their corresponding 1” mark.
This should make a taper from your handle to the end of your bow.
Next, starting from your 1” mark, draw a line to 3/8” above the tip of the bow (this will shape the belly of your bow).
Let’s Get Cutting
Wear safety glasses while cutting
Never touch the blade while it is moving
Although a band saw is the best tool for the job, there are a number of hand tools that will also work such as your draw knife.
Congratulations, you have the belly and the sides roughed out.
Rounding Out the Rough Edges
Make a mark on the side of both tips 1/4″ above the back of the bow.
Draw a line connecting the points.
Using your rasp, round out the edge of the belly of your bow.
Pro-Tip: You may want to clamp down the bow, so you can use both hands during this process.
You will want to round the edges from the belly to the 1/4″ line that you drew earlier.
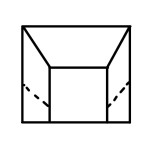
The goal is to make your bow go from the top image to the bottom image (looking down the bow).
OPTIONAL – Attaching the Riser
Although your hickory bow doesn’t necessarily need a riser, it can still be desirable to have. The riser (your handle) acts as a stop for each limb, which stops the flex from traveling through the middle of your bow. It is that travel, which will sometimes cause the phenomenon of a riser popping off of the bow. This is why there is a 1” buffer on either side of the riser and this is also why you add the riser before you start the tillering process. If you start the tiller before you add the riser the wood will “remember” flexing through the handle, which could cause your riser to pop off.
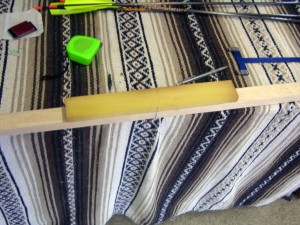
Feel free to play around with different kinds of wood for the riser (adding different colors and species of wood can really give your bow a custom, beautiful look). However for this build-along we’ll be using a 3/4″ x 1-1/2″ x 14″ Osage bow handle blank.
Make a mark indicating the middle of your bow on the side of your handle.
Make a mark on the side of your riser indicating the middle of the riser.
Align the two marks.
Glue your riser to the handle (on the belly side) of your bow.
Be sure to use plenty of wood glue (I recommend using EA-40 because it has more longevity than regular wood glue) – making sure to glue both surfaces, this will ensure you don’t have any dry surfaces.
Pro-Tip: You might want to put a piece of wax paper under your work area to avoid making a big mess.
Clamp the riser down with c-clamps.
Pro-Tip: Put a cloth or another piece of scrap wood between the back of your bow and the c-clamp to avoid scarring the wood.
Glue will ooze out everywhere, but that’s why we put wax paper down. This whole process can prove to be a little bit tricky, as the riser will try and move while you’re attempting to clamp it down. This will lead to a kind of twist-and-correct action on your part, but it’s not impossible.
Pro-Tip: This would be a great time for a second pair of hands.
After gluing on your riser, take the phenolic tip overlays (you also have the option of using wood of differing thicknesses, and using different species of wood to give your bow a nicer look) and epoxy them to the tips (making sure to apply epoxy to both surfaces) – on the back of your bow.
Pro-Tip: For a more traditional look, you can always use horn nocks.
Just like the riser, clamp down the tips with c-clamps.
After you’ve glued and clamped everything down it’s time to walk away.
After you’ve waited for at least 24 hours, remove the clamps and prepare to remove the excess wood on the riser and at the tips of the bow.
Be sure to avoid cutting into the belly of the bow when cutting the riser
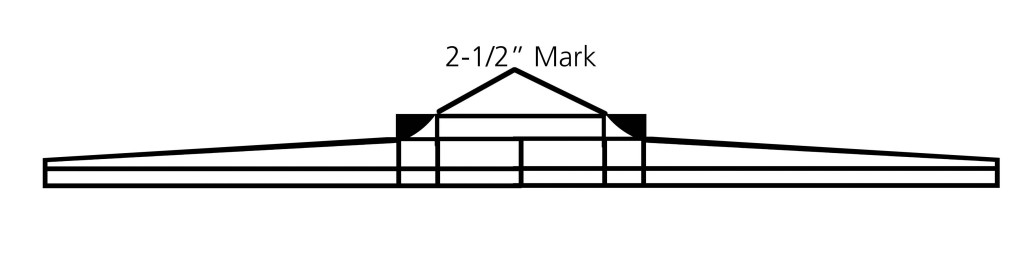
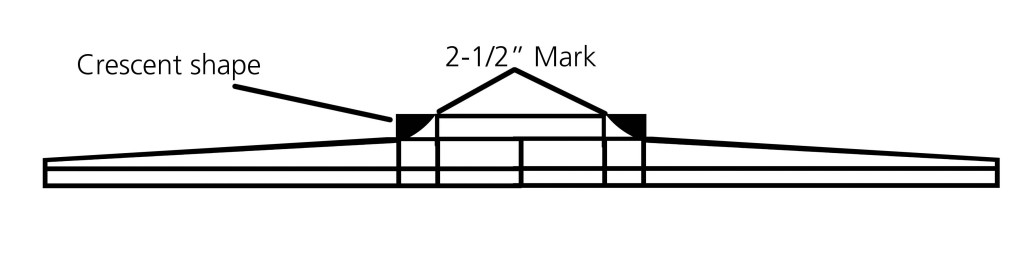
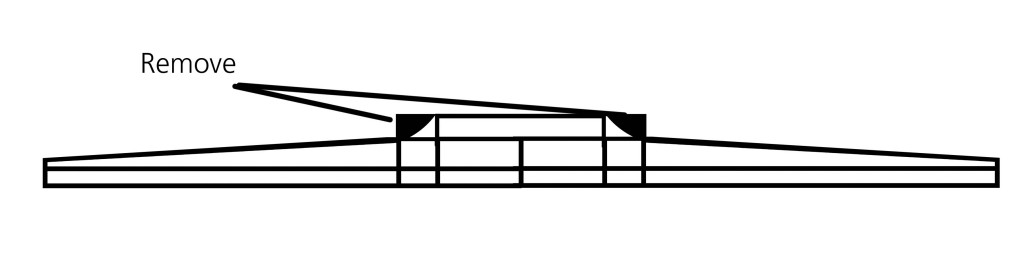
Mark roughly 2-1/2″ back on either end of your riser.
On the side of your riser, from the mark you just made draw a line in a crescent shape to the belly of the bow.
Remove the marked section, blending the riser into the limb of your bow.
You can use a band saw to remove this section, but it would be safer to use a rasp file.
Pro-Tip: If you’re going to use a file, clamp the bow down. By clamping the bow, you will be able to use both hands to remove excess wood.
We’re going to leave the sides of the riser squared off for now, so it will sit flat in the tillering stick later.
Backing the Bow
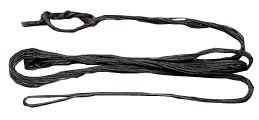
Although there are a number of different materials that can be used to back a bow, for our purposes, we will be backing the bow with hickory and EA-40.
Although there are many materials you can choose to back your self-bow (such as fiberglass, snake skin, bamboo, rawhide, sinew, and even cotton) for this bow hickory will give you the most longevity and protection from breaking.
Pro-Tip: You might be thinking that you don’t need to back your bow, and you might be right, but you’re probably wrong. Think of a toothpick. What happens when you bend a toothpick? One side, the back, will splinter and break. Your bow is like a giant toothpick, the backing will help to prevent your bow from splintering and cracking, which is why you back your bow before you tiller your bow.
Again, it might be a good idea to put some wax paper down to keep your workspace clean.
Apply a thin layer of EA-40 Bow Glue onto the back of the bow.
Apply a strip of hickory on the back of the bow that runs the length of the bow.
After 24 hours, gently sand the hickory to knock off any burrs or excess Smooth-On EA-40 Bow Glue.
Use your draw knife or a band saw to remove any excess hickory that might be hanging off the sides of your bow.
Be sure not to cut your bow, just the excess backing.
Use sandpaper to smooth out the sides of the bow.
Adding the Rough Nocks
Draw a line 1” from the tip – making the bow 70” from nock to nock.
Using your file, cut a notch where the line is marked on the back of the bow (where you glued the tip overlay earlier).
Next, using your file cut another notch on the side of the bow at about a 45 degree angle.
Work the file so that you don’t have any sharp edges and that both sides match each other.
Don’t cut the nock so deep that you can’t make adjustments later, but be sure to cut it deep enough that it will hold onto the string securely.
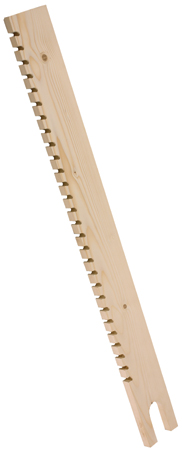
Time to Tiller the Bow
Successfully tillering a bow takes time and is difficult to teach, even in person, so there is only so much that you can learn from reading without just going and doing it. That said, be prepared to break a few bows.
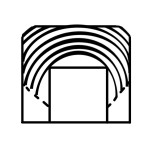
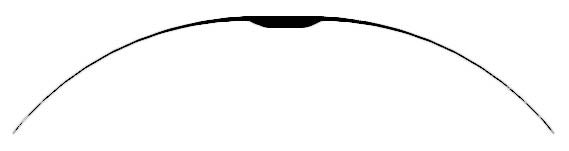
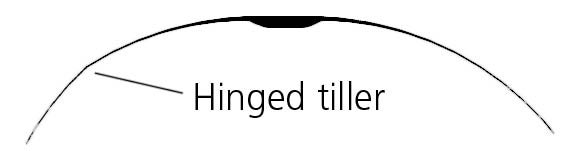
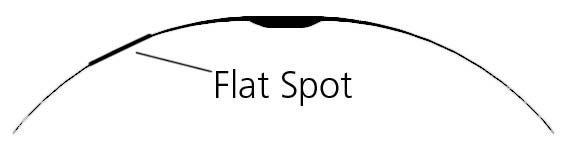
Perfect tillerHinged TillerFlat Spot
Pro-tip: Never pull the bow past your desired weight. This means that if, after you first string the bow, you pull 45# at the first notch on the tiller stick then you need to stop and achieve a good tiller. After you’ve gotten a good tiller, repeat the process, if you are still pulling to the same notch, then cautiously remove some more material from the bow. Once you can successfully pull the bow to another notch at 45#, re-tiller the bow. Continue this process until you’ve achieved your ideal draw length.
The tillering stick allows you to draw the bow to different lengths, stand back and examine the limbs to see how you need to work the bow.
Pro-tip: Your tillering rope needs to be long enough that you can put it on the bow and still have plenty of slack.
Pro-tip: If you don’t have a bow scale (and if you’re following along with this build-along, I’m guessing you don’t) it’s a smart idea to put a bathroom scale under your tillering stick. This way, when you pull down on the string you can see what poundage the bow is pulling. Just remember to either zero out your scale with the tillering stick on it, or subtract the weight of the tillering stick from the weight you’re pulling to get the actual weight of the draw.
You’ll start the tillering process by pulling down just a few inches
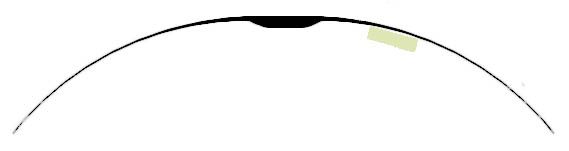
Longbows generally are never braced lower than six inches and many modern longbows like to be braced at or around seven inches. Your brace height is the distance between the string and the belly of the bow. Brace height is determined from the deepest portion of the grip. However, you can measure your brace height from whatever point on the bow you wish, back to the string. Some folks measure from the middle of the sight window, some from the belly side of the arrow shelf, and some from the deepest portion of the grip. If you’re discussing brace height with someone, make sure you’re both on the same page. Regardless of where you measure from, brace height is a critical measurement for tuning your longbow or recurve. For measuring brace height, nothing beats a T-Square.
Some things to remember when tillering:
When tillering, you will want to avoid the hinges and remove wood from stiff areas, so the bow bends equally
Whenever you remove wood from one place on a limb remember to blend it with the rest of the limb
After you’ve worked one limb be sure to equally work the entire other limb, so that both limbs are even
More flaws will show up the farther you bend the bow, so if you pull the bow and see a flaw, stop and fix it
Your standard tiller process will look something like this:
Brace the bow on the tillering stick; you should not go to full brace starting off, keep it low, 2-3”
Exercise the limb 30-50 times by pulling the bow to where it is currently braced and then relaxing it
Place the string on the desired notch and level the bow
Step back and evaluate the limbs for areas that need to be worked
Mark the area that needs to be worked with a pencil and unbrace the bow
Bring the bow to your work area and clamp it down
Use a block sander or a scrapper to remove stock from the wood
Remember to remove only a little wood at a time, as even removing a small amount can make a big difference
Repeat until you have your desired tiller
Whenever you remove any wood from the belly, you should exercise the limbs at least 30-50 times
Pro-tip: Count your strokes and mirror the number on the other side – especially when you’re simply reducing the weight of the bow and not fixing any flaws.
Pro-tip: At times, you might want to flip your bow around. This will help give you a fresh perspective on the project.
Remember, we’re shooting for a 45# at 28” bow, which means you should never pull the bow beyond that 45# threshold – you don’t want to put unnecessary stress on the bow.
You should set several milestones for yourself during the tillering process. Remembering that tillering is more of an art than an exact science, the first of those milestones should be something like 30# at 20.”
When you first string the bow with your tiller rope you will have a lot of excess. Pull down on that excess and see how far down it is when the limbs just start to bend. What ever the distance and weight, double it and that will be your first target milestone.
By taking a slower, more conservative approach to the tillering process you’re giving your bow the best chance of avoiding a break.
After you reach your first milestone you will want to string your bow at half-brace.
Now, you will want to pull the bow to 30# again and check how far you’re pulling , since you’re half braced you can expect it to be less than 20.”
At this point you might want to use a 2x4x4 and slide it along your bow to find stiff spots you couldn’t normally catch with the naked eye.
There will be a gap between the block and the curve of the bow. On a perfectly tillered bow, as you slide the block down the limb the gap will stay the same. If, however, the gap gets bigger and then smaller it means that you have found yourself a hinge. If the gap does the opposite, gets smaller and then bigger, you’ve found a flat spot.
At this point you will want to creep your way to about 40#, remembering to move one inch at a time and to take out any flaws as soon as you see them.
Don’t forget to exercise the limbs.
After you’ve achieved your second target, it’s time to move your bow to full brace.
At full brace check for flaws and correct them if necessary.
It’s also a good idea to check string alignment when you first enter full brace.
Again, moving slowly, one inch at a time, bring your bow to your desired weight and draw – for our purposes that would be 45# at 28.”
Pro-tip: You might want to leave the bow a little heavy (a pound or two) as the bow will weaken slightly as it breaks in.
After you’ve achieved your desired draw weight and length it’s time to check if you have a positive tiller. A positive tiller is when one limb bends more than the other limb. The limb that bends more is normally chosen to be the top limb.
To check for a positive tiller, measure from the end of the fade near where the riser and limb meet to the string on both sides.
If you’re top limb has a gap 1/8” bigger than the bottom limb, then you have a 1/8” positive tiller. Don’t feel bad if your positive tiller is closer to 1/4″ or even 1/2.”
Pro-tip: A positive tiller is not a requirement though, a zero tiller is good too, just not a negative tiller.
Time to cut the arrow rest
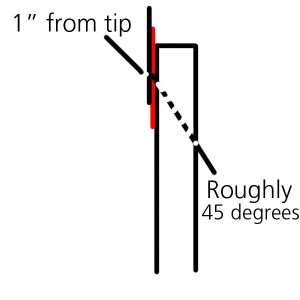
Draw a line on the handle (belly side) in the center, both horizontally and vertically (you should end up with an +). Draw a line 1” up the bow from the center (vertical | ) mark (toward the top of your bow). Pro-Tip: You are not doing a cut-to center shelf, as this would be too much for a self-bow. It should be at least 1/8” away from the center of the bow. In fact, you could avoid cutting the shelf altogether and simply shoot off the knuckle.
Make a mark 1/4″ down from the horizontal (-) center line. Connect those points to make a box. The corner of that box indicates the inside corner of your arrow rest. Draw a slopped line from the corner of the box to the corner of the handle. Cut out the marked section. Pro-Tip: These images are for a right handed shooter; flip the images for a left handed shooter.
Using a rasp, round file and sandpaper, round off the arrow rest.
Currently your arrow rest should look something like this. You want to round off the arrow rest until it looks something like this. This will make it so the arrow will only rest in the middle of the ledge, which will cause less resistance and save some arrow fletchings.
You will also want to use your round file to round out the inside corner of your arrow rest; currently it should look like the top image, you want it to look like the bottom image.
You might want to round-out and blend-in the remainder of your arrow rest, but that is purely up to you.
Shaping the Handle
Using your rasp start shaping the handle to look more like a pistol grip.
Pro-Tip: An easy way to do this is to simply hold the bow and see what feels like it should be shaved off; making sure it fits your grip.
Make the grip asymmetrical – that is, both sides should mirror each other (this is purely optional, but it helps give it that nice pistol grip shape) .
You don’t want to take too much off while shaping the handle.
After you’ve gotten the handle to feel right in your hand, use some sandpaper to take off the rough edges.
Start with a 60 grit and move up to a 220 grit – this will make your grip a delight to hold.
Rounding out the Nocks
Use your rasp and sandpaper to shape the nock into an inverted teardrop shape.
This is where the tip overlays we added start to come in useful; if you added different woods, your tips will really pop.
By making the tips of your bow a bit smaller it will speed up the bow and will also reduce hand shock.
There is no exact science to shaping the nocks, but you will want to be sure to maintain your good string edge.
Try and look online to see what others did.
Final sanding
The final sanding will smooth out the whole bow and take out any tooling marks that might still be around. It takes out any squared edges that are still visible and makes the whole bow smooth.
Be sure to sand the full belly of the bow to ensure consistency.
Don’t remove wood from the bow – you want to avoid tillering the bow at this point.
People start at different grits at this stage, but the higher the better – a 220 grit is a good idea to start with, but sanding with a 100 grit and then moving to a 220 grit is okay too.
The higher grit you go, the smoother your bow will be – consider working your way up to a 400 or 600 grit.
Finishing the bow
Clean the dust off with mineral oil
You have the option of staining the bow at this point, the color and kind of stain you get is all personal preference. You also have the option of simply clear coating your bow.
Many people also choose to paint the back of their bow:
This process is simple and cheap
Lay out some wax paper
Use painter’s tape to cover the areas you don’t want painted, and spray paint the back of your bow whatever color you want
After the paint has dried remove the painter’s tape
After you’ve stained and painted your bow, you will want to coat it (at least the belly) in polyurethane.
After the stain is dry, clean your bow with mineral oil
Lay out some wax paper and spray coat your bow in the polyurethane.
Wait 24 hours, gently sand the bow with 220 grit sandpaper and coat again.
Pro-Tip: You don’t have to wait the full 24 hours, but it’s a good idea if you’re going to give it that final sanding.
The final sanding is optional, but it will knock off any burrs that might have gotten stuck in the first coat of polyurethane.
Apply at least one more coat of polyurethane (some choose to coat their bow as many as five times).
Sign the bow with your name, date, draw length and weight.
Pro-Tip: You might want to sign your bow before your final coat of polyurethane to protect your markings.
Congratulations! You’ve built your first of many bows; feel free to customize your bow with a leather grip, arrow rest and plate, and whatever else you might fancy.
If you’re looking for something a little different with all of the tedious work already done, you should try one of our bow building kits.


.jpg "Welcome to the 3Rivers Archer's Den")


 Draw a line 1” up the bow from the center (vertical | ) mark (toward the top of your bow).
 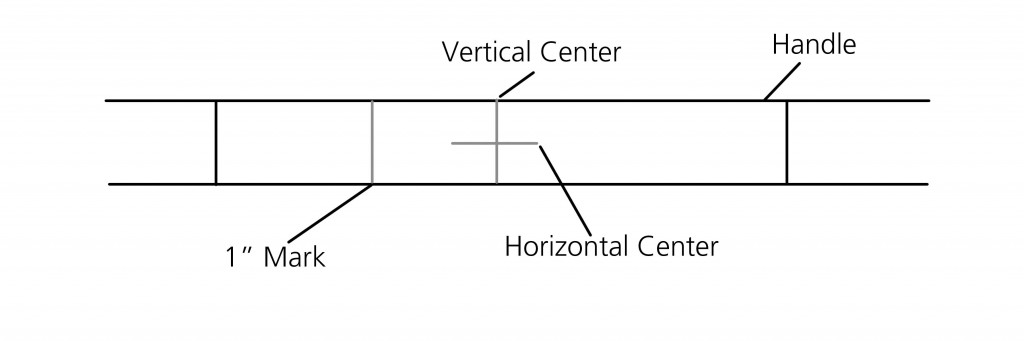 Pro-Tip: You are not doing a cut-to center shelf, as this would be too much for a self-bow. It should be at least 1/8” away from the center of the bow. In fact, you could avoid cutting the shelf altogether and simply shoot off the knuckle.
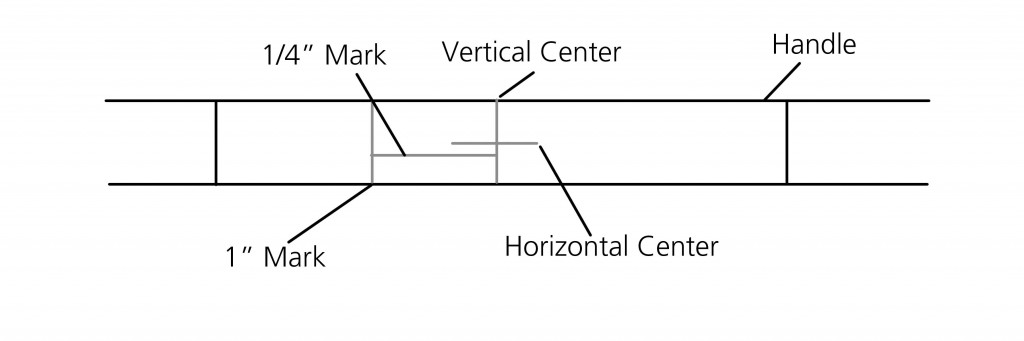 Connect those points to make a box.
 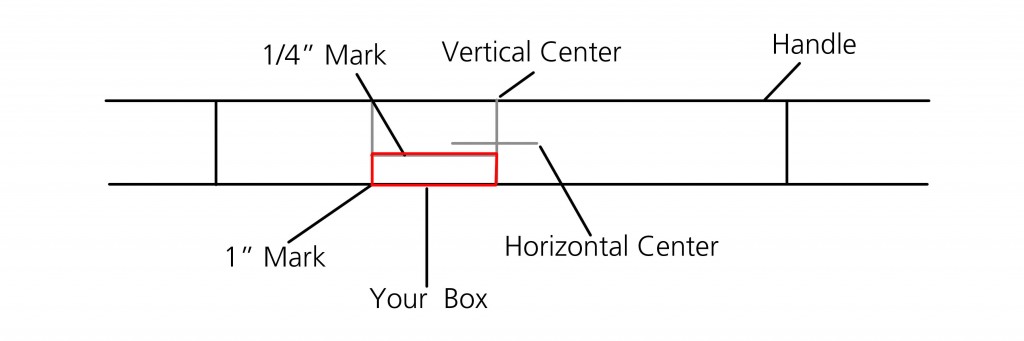 The corner of that box indicates the inside corner of your arrow rest.
 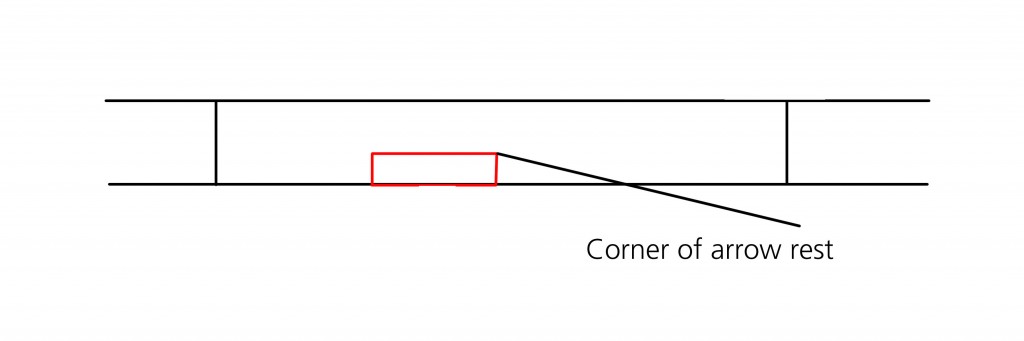 Draw a slopped line from the corner of the box to the corner of the handle.
 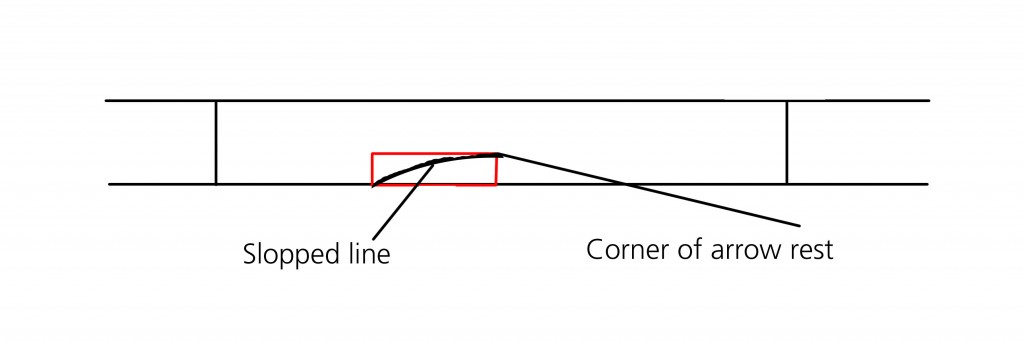 Cut out the marked section.
 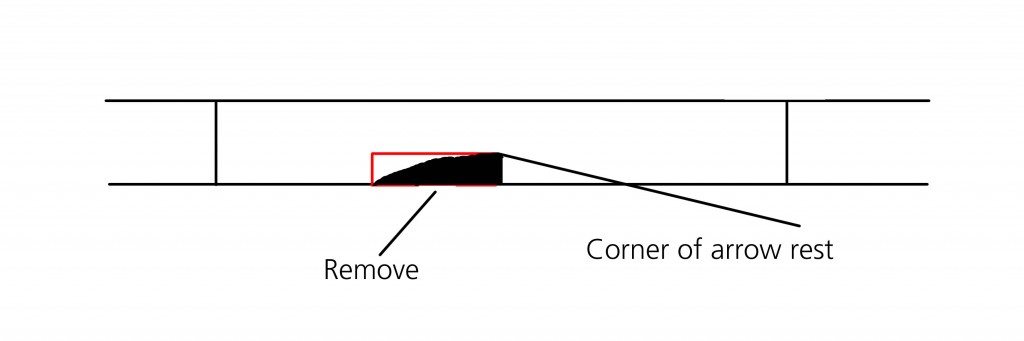 Pro-Tip: These images are for a right handed shooter; flip the images for a left handed shooter.
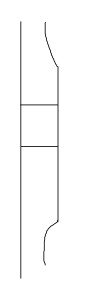 You want to round off the arrow rest until it looks something like this.
  This will make it so the arrow will only rest in the middle of the ledge, which will cause less resistance and save some arrow fletchings.
