


.jpg "Welcome to the 3Rivers Archer's Den")

Arrow Assembly
Broadhead Tuning
Paper Tuning
Bare Shaft Tuning
Broadhead Tuning – Things to Consider:
The more blade surface a broadhead has, the more steering ability it will have. For this reason fixed blade broadheads with large cutting diameters tend to be slightly more difficult to tune.
Although mechanical broadheads tend to have fewer tuning issues than fixed blade heads, they still need to be properly aligned and their point of impact needs to be verified prior to hunting.
Gold Tip recommends test shooting any style of broadheads for accuracy prior to hunting.
Step 1: Bow Tuning
In order to achieve good accuracy with broadheads, it is imperative that your bow be properly tuned. Consult our tuning instructions above and, if needed, consult a technician at your local pro shop for help with bow tuning.
Step 2: Broadhead Alignment
When a broadhead is installed into an arrow shaft, it is common for the broadhead to seat incorrectly on the insert. This will cause misalignment of the broadhead in relation to the arrow and will cause the broadhead to wobble when spun. In order to achieve good accuracy, the broadhead must be centered on the insert in order to spin true on the shaft. To do this, follow the steps below:
| 1. | Using an arrow spinner (like the Pine Ridge Arrow Inspector) place the point of the broadhead against a cardboard box. As you spin the arrow, the point will make a circle if it is not properly aligned. If the broadhead is properly aligned it will not appear to move and no additional steps are needed. (see figure #1) |
| 2. | If the point does make a circle, rotate the point to its uppermost point of movement and mark the box with a felt pen at that point. (see figure #2) |
| 3. | Rotate the arrow 180 degrees from that point and simply apply pressure to the point of the head on a hard surface. The goal of this is to push the broadhead into alignment with the insert. (see figure #3) |
| 4. | Put the arrow back on the spinner and check the head again for alignment. With a little trial and error you will soon become proficient and will be able to align a broadhead to the insert in under a minute. Keep in mind that shooting an arrow can cause misalignment, so it is a good idea to spin your broadhead tipped arrows repeatedly, particularly after shooting them. |
Step 3: Fletching
After bow tuning and broadhead alignment, you are now ready to test your arrows for accuracy. If you are experiencing poor accuracy with a well tuned bow and properly aligned broadheads, it is likely that you are not giving the arrow enough guidance. The answer to this is fletching. Increasing the amount of fletching either by using longer vanes, or more vanes (4-fletch instead of 3-fletch) will give better guidance and increased accuracy. Be careful however, as too much fletching can have other adverse effects such as excessive drag than can also hamper performance. The key is finding a happy medium. This may take some trial and error depending on your setup. The best rule of thumb is to use the smallest amount of fletching possible while still being able to achieve field point accuracy with your broadheads.
Figure 1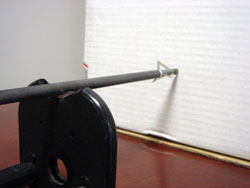 |
Figure 2 |
Figure 3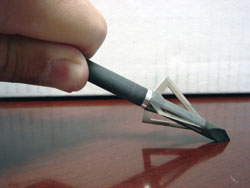 |